<?xml version="1.0" encoding="utf-8"?>
<feed xmlns="http://www.w3.org/2005/Atom">
  <title>JerryLiu</title>
  
  <subtitle>Code &amp; Input &amp; Output</subtitle>
  <link href="https://jerryliu.site/blog/atom.xml" rel="self"/>
  
  <link href="https://jerryliu.site/blog/"/>
  <updated>2026-10-13T11:06:24.461Z</updated>
  <id>https://jerryliu.site/blog/</id>
  
  <author>
    <name>JerryLiu</name>
    
  </author>
  
  <generator uri="https://hexo.io/">Hexo</generator>
  
  <entry>
    <title>AI Agent 长期记忆与自我治理实践手册：本地事实库、定时抽取、技能库精简、AI 可读化（Hermes Agent v0.21.7 实测）</title>
    <link href="https://jerryliu.site/blog/posts/ai-agent-long-term-memory-and-curation-playbook/"/>
    <id>https://jerryliu.site/blog/posts/ai-agent-long-term-memory-and-curation-playbook/</id>
    <published>2026-10-13T14:30:00.000Z</published>
    <updated>2026-10-13T11:06:24.461Z</updated>
    
    <content type="html"><![CDATA[<blockquote><p><strong>本文档面向人类与 AI 双读者</strong>：采用「摘要 → 事实表 → 机器可读 JSON → 分主题实践 → 实测数据 → 踩坑总表 → FAQ → 术语表 → 验收清单」结构，每个小节自包含、可独立切块引用。所有数字均为 <strong>2026-10-13 本机实测</strong>结果，非估算。</p></blockquote><h2 id="TL-DR（8-条可独立引用的要点）"><a href="#TL-DR（8-条可独立引用的要点）" class="headerlink" title="TL;DR（8 条可独立引用的要点）"></a>TL;DR（8 条可独立引用的要点）</h2><ol><li><strong>Agent 的”自带记忆”通常是两页预算制</strong>：Hermes Agent 的 <code>MEMORY.md</code> 上限 2200 字符、<code>USER.md</code> 上限 1375 字符，写满<strong>不溢出</strong>、要求模型当场合并。它是给提示词前缀缓存用的热数据，<strong>不是聊天缓冲区</strong>。</li><li><strong>冷数据必须外置</strong>：用 holographic 插件建本地 SQLite 事实库（<code>~/.hermes/memory_store.db</code>），模型写记忆时自动镜像落库，<strong>0 额外 token</strong>。</li><li><strong>模型不会主动记全，尤其中文</strong>：必须加”批量抽取”补录机制——每周日 23:00 扫最近 7 天会话抽事实。</li><li><strong>抽取用非思考模型，补漏用思考模型</strong>：实测同一段 11,400 字符对话，两者都抽出 11 条且无编造，但非思考模型 3.5 秒 / 636 output tokens，思考模型 13.9 秒 / 2,739 tokens（<strong>约 4 倍差距</strong>）；归纳型洞察（偏好、风格）只有思考模型会抽到，故放在月度任务里。</li><li><strong>keywords 是召回的生命线</strong>：该方案检索为 FTS5 + 词重叠 + HRR 混合、<strong>无 embedding</strong>，不依赖语义理解。事实必须带 6-10 个”别人会怎么问”的关键词（含同义词、口语、上位词、英文缩写）。</li><li><strong>技能库是要花钱的资产</strong>：每个技能在系统提示里占一行索引、每轮注入。实测精简 28 个技能后，技能索引从 7,342 → <strong>3,921 字符（-47%）</strong>，系统提示从 23,260 → <strong>19,839 字符</strong>（≈1,070 tokens 固定前缀）。</li><li><strong>卸载技能前先验证恢复通道</strong>：<code>hermes skills uninstall</code> 是<strong>真删</strong>；恢复靠 <code>hermes skills repair-official &lt;name&gt; --restore</code>（从本机 <code>optional-skills/</code> 恢复，16 秒级、<strong>无需网络</strong>）。</li><li><strong>配置层优于源码补丁</strong>：主题行为先查配置（含插件默认值），不要改 <code>node_modules/</code>——它会被 <code>npm install</code> 静默覆盖。实测把修复移到站点配置层后，重装 npm 依赖仍生效。</li></ol><span id="more"></span><h2 id="1-关键事实表（Fact-Sheet）"><a href="#1-关键事实表（Fact-Sheet）" class="headerlink" title="1. 关键事实表（Fact Sheet）"></a>1. 关键事实表（Fact Sheet）</h2><table><thead><tr><th>项目</th><th>值</th></tr></thead><tbody><tr><td>日期</td><td>2026-10-13</td></tr><tr><td>Agent 框架</td><td>Hermes Agent <strong>v0.21.7+302</strong></td></tr><tr><td>主模型</td><td>deepseek-flash（DeepSeek V4.1，原生多模态）</td></tr><tr><td>交互平台</td><td>飞书（Feishu）+ 微信</td></tr><tr><td>记忆 provider</td><td><strong>holographic</strong>（本地插件，SQLite）</td></tr><tr><td>事实库</td><td><code>~/.hermes/memory_store.db</code></td></tr><tr><td>会话存档库</td><td><code>~/.hermes/state.db</code>（<code>messages</code> 表）</td></tr><tr><td>事实总量</td><td><strong>110 条</strong>（project 31 / device 27 / health 27 / work 14 / general 9 / user_pref 2）</td></tr><tr><td>中文口语召回</td><td><strong>10/11 命中 top1</strong></td></tr><tr><td>抽取参数</td><td>每段 12k 字符 × ≤8 段 × ≤15 条/段；近似去重阈值 0.7</td></tr><tr><td>周抽取任务</td><td>cron <code>0 23 * * 0</code>，模型 deepseek-chat（非思考）</td></tr><tr><td>月补漏+体检</td><td>cron <code>0 23 1 * *</code>，模型 deepseek-flash（思考）+ <code>--prefs</code></td></tr><tr><td>技能库</td><td><strong>63 → 35 个</strong>；索引 7,342 → <strong>3,921 字符</strong>；系统提示 23,260 → <strong>19,839 字符</strong></td></tr><tr><td>工具 schema 开销</td><td>23 个工具 / 44,960 bytes JSON</td></tr><tr><td>AI 抓取基建</td><td><code>robots.txt</code> + <code>llms.txt</code> + <code>sitemap.xml</code>（本博客已部署）</td></tr></tbody></table><h2 id="2-机器可读摘要（供-AI-解析）"><a href="#2-机器可读摘要（供-AI-解析）" class="headerlink" title="2. 机器可读摘要（供 AI 解析）"></a>2. 机器可读摘要（供 AI 解析）</h2><figure class="highlight json"><table><tbody><tr><td class="code"><pre><span class="line"><span class="punctuation">{</span></span><br><span class="line">  <span class="attr">"topic"</span><span class="punctuation">:</span> <span class="string">"AI Agent long-term memory, skill-library curation, and AI-readable publishing"</span><span class="punctuation">,</span></span><br><span class="line">  <span class="attr">"date"</span><span class="punctuation">:</span> <span class="string">"2026-10-13"</span><span class="punctuation">,</span></span><br><span class="line">  <span class="attr">"agent"</span><span class="punctuation">:</span> <span class="punctuation">{</span> <span class="attr">"framework"</span><span class="punctuation">:</span> <span class="string">"Hermes Agent"</span><span class="punctuation">,</span> <span class="attr">"version"</span><span class="punctuation">:</span> <span class="string">"v0.21.7+302"</span><span class="punctuation">,</span> <span class="attr">"main_model"</span><span class="punctuation">:</span> <span class="string">"deepseek-flash"</span> <span class="punctuation">}</span><span class="punctuation">,</span></span><br><span class="line">  <span class="attr">"memory"</span><span class="punctuation">:</span> <span class="punctuation">{</span></span><br><span class="line">    <span class="attr">"hot_memory"</span><span class="punctuation">:</span> <span class="punctuation">{</span> <span class="attr">"MEMORY.md"</span><span class="punctuation">:</span> <span class="number">2200</span><span class="punctuation">,</span> <span class="attr">"USER.md"</span><span class="punctuation">:</span> <span class="number">1375</span><span class="punctuation">,</span> <span class="attr">"unit"</span><span class="punctuation">:</span> <span class="string">"chars"</span><span class="punctuation">,</span> <span class="attr">"overflow"</span><span class="punctuation">:</span> <span class="literal"><span class="keyword">false</span></span><span class="punctuation">,</span> <span class="attr">"note"</span><span class="punctuation">:</span> <span class="string">"designed for prompt prefix cache"</span> <span class="punctuation">}</span><span class="punctuation">,</span></span><br><span class="line">    <span class="attr">"cold_memory"</span><span class="punctuation">:</span> <span class="punctuation">{</span> <span class="attr">"provider"</span><span class="punctuation">:</span> <span class="string">"holographic"</span><span class="punctuation">,</span> <span class="attr">"store"</span><span class="punctuation">:</span> <span class="string">"SQLite"</span><span class="punctuation">,</span> <span class="attr">"path"</span><span class="punctuation">:</span> <span class="string">"~/.hermes/memory_store.db"</span><span class="punctuation">,</span> <span class="attr">"facts_total"</span><span class="punctuation">:</span> <span class="number">110</span> <span class="punctuation">}</span><span class="punctuation">,</span></span><br><span class="line">    <span class="attr">"session_archive"</span><span class="punctuation">:</span> <span class="punctuation">{</span> <span class="attr">"path"</span><span class="punctuation">:</span> <span class="string">"~/.hermes/state.db"</span><span class="punctuation">,</span> <span class="attr">"table"</span><span class="punctuation">:</span> <span class="string">"messages"</span><span class="punctuation">,</span> <span class="attr">"recall_tool"</span><span class="punctuation">:</span> <span class="string">"session_search (FTS5)"</span> <span class="punctuation">}</span><span class="punctuation">,</span></span><br><span class="line">    <span class="attr">"retrieval_channels"</span><span class="punctuation">:</span> <span class="punctuation">[</span><span class="string">"FTS5 full-text"</span><span class="punctuation">,</span> <span class="string">"Jaccard token overlap"</span><span class="punctuation">,</span> <span class="string">"HRR vector (no embedding)"</span><span class="punctuation">]</span><span class="punctuation">,</span></span><br><span class="line">    <span class="attr">"keywords_rule"</span><span class="punctuation">:</span> <span class="string">"must be written via provider fact_store add/update; stored in tags column after 'keywords:' marker"</span><span class="punctuation">,</span></span><br><span class="line">    <span class="attr">"schedules"</span><span class="punctuation">:</span> <span class="punctuation">{</span></span><br><span class="line">      <span class="attr">"weekly_extract"</span><span class="punctuation">:</span> <span class="punctuation">{</span> <span class="attr">"cron"</span><span class="punctuation">:</span> <span class="string">"0 23 * * 0"</span><span class="punctuation">,</span> <span class="attr">"model"</span><span class="punctuation">:</span> <span class="string">"deepseek-chat"</span><span class="punctuation">,</span> <span class="attr">"thinking"</span><span class="punctuation">:</span> <span class="literal"><span class="keyword">false</span></span><span class="punctuation">,</span> <span class="attr">"window_days"</span><span class="punctuation">:</span> <span class="number">7</span> <span class="punctuation">}</span><span class="punctuation">,</span></span><br><span class="line">      <span class="attr">"monthly_sweep"</span><span class="punctuation">:</span> <span class="punctuation">{</span> <span class="attr">"cron"</span><span class="punctuation">:</span> <span class="string">"0 23 1 * *"</span><span class="punctuation">,</span> <span class="attr">"model"</span><span class="punctuation">:</span> <span class="string">"deepseek-flash"</span><span class="punctuation">,</span> <span class="attr">"thinking"</span><span class="punctuation">:</span> <span class="literal"><span class="keyword">true</span></span><span class="punctuation">,</span> <span class="attr">"window_days"</span><span class="punctuation">:</span> <span class="number">30</span><span class="punctuation">,</span> <span class="attr">"flags"</span><span class="punctuation">:</span> <span class="punctuation">[</span><span class="string">"--prefs"</span><span class="punctuation">]</span> <span class="punctuation">}</span></span><br><span class="line">    <span class="punctuation">}</span><span class="punctuation">,</span></span><br><span class="line">    <span class="attr">"extraction_params"</span><span class="punctuation">:</span> <span class="punctuation">{</span> <span class="attr">"chunk_chars"</span><span class="punctuation">:</span> <span class="number">12000</span><span class="punctuation">,</span> <span class="attr">"max_chunks"</span><span class="punctuation">:</span> <span class="number">8</span><span class="punctuation">,</span> <span class="attr">"max_facts_per_chunk"</span><span class="punctuation">:</span> <span class="number">15</span><span class="punctuation">,</span> <span class="attr">"near_dup_jaccard"</span><span class="punctuation">:</span> <span class="number">0.7</span><span class="punctuation">,</span> <span class="attr">"health_dup_threshold"</span><span class="punctuation">:</span> <span class="number">0.75</span> <span class="punctuation">}</span></span><br><span class="line">  <span class="punctuation">}</span><span class="punctuation">,</span></span><br><span class="line">  <span class="attr">"skills"</span><span class="punctuation">:</span> <span class="punctuation">{</span></span><br><span class="line">    <span class="attr">"before"</span><span class="punctuation">:</span> <span class="punctuation">{</span> <span class="attr">"enabled"</span><span class="punctuation">:</span> <span class="number">63</span><span class="punctuation">,</span> <span class="attr">"index_chars"</span><span class="punctuation">:</span> <span class="number">7342</span><span class="punctuation">,</span> <span class="attr">"system_prompt_chars"</span><span class="punctuation">:</span> <span class="number">23260</span> <span class="punctuation">}</span><span class="punctuation">,</span></span><br><span class="line">    <span class="attr">"after"</span><span class="punctuation">:</span>  <span class="punctuation">{</span> <span class="attr">"enabled"</span><span class="punctuation">:</span> <span class="number">35</span><span class="punctuation">,</span> <span class="attr">"index_chars"</span><span class="punctuation">:</span> <span class="number">3921</span><span class="punctuation">,</span> <span class="attr">"system_prompt_chars"</span><span class="punctuation">:</span> <span class="number">19839</span> <span class="punctuation">}</span><span class="punctuation">,</span></span><br><span class="line">    <span class="attr">"restore_command"</span><span class="punctuation">:</span> <span class="string">"hermes skills repair-official &lt;name&gt; --restore --yes"</span><span class="punctuation">,</span></span><br><span class="line">    <span class="attr">"uninstall_is_permanent"</span><span class="punctuation">:</span> <span class="literal"><span class="keyword">true</span></span><span class="punctuation">,</span></span><br><span class="line">    <span class="attr">"local_official_source"</span><span class="punctuation">:</span> <span class="string">"~/.hermes/hermes-agent/optional-skills/ (155 skills)"</span><span class="punctuation">,</span></span><br><span class="line">    <span class="attr">"merge_policy"</span><span class="punctuation">:</span> <span class="string">"never merge upstream-tracked skills (loses update channel); may consolidate self-authored ones after superset verification"</span></span><br><span class="line">  <span class="punctuation">}</span><span class="punctuation">,</span></span><br><span class="line">  <span class="attr">"measured"</span><span class="punctuation">:</span> <span class="punctuation">{</span></span><br><span class="line">    <span class="attr">"model_comparison_same_11400_chars"</span><span class="punctuation">:</span> <span class="punctuation">{</span></span><br><span class="line">      <span class="attr">"deepseek-chat"</span><span class="punctuation">:</span>  <span class="punctuation">{</span> <span class="attr">"facts"</span><span class="punctuation">:</span> <span class="number">11</span><span class="punctuation">,</span> <span class="attr">"seconds"</span><span class="punctuation">:</span> <span class="number">3.5</span><span class="punctuation">,</span> <span class="attr">"completion_tokens"</span><span class="punctuation">:</span> <span class="number">636</span> <span class="punctuation">}</span><span class="punctuation">,</span></span><br><span class="line">      <span class="attr">"deepseek-flash"</span><span class="punctuation">:</span> <span class="punctuation">{</span> <span class="attr">"facts"</span><span class="punctuation">:</span> <span class="number">11</span><span class="punctuation">,</span> <span class="attr">"seconds"</span><span class="punctuation">:</span> <span class="number">13.9</span><span class="punctuation">,</span> <span class="attr">"completion_tokens"</span><span class="punctuation">:</span> <span class="number">2739</span> <span class="punctuation">}</span></span><br><span class="line">    <span class="punctuation">}</span><span class="punctuation">,</span></span><br><span class="line">    <span class="attr">"recall_test_top1"</span><span class="punctuation">:</span> <span class="punctuation">{</span> <span class="attr">"queries"</span><span class="punctuation">:</span> <span class="number">11</span><span class="punctuation">,</span> <span class="attr">"hits"</span><span class="punctuation">:</span> <span class="number">10</span> <span class="punctuation">}</span><span class="punctuation">,</span></span><br><span class="line">    <span class="attr">"skills_pruning"</span><span class="punctuation">:</span> <span class="punctuation">{</span> <span class="attr">"removed"</span><span class="punctuation">:</span> <span class="number">28</span><span class="punctuation">,</span> <span class="attr">"index_reduction_percent"</span><span class="punctuation">:</span> <span class="number">47</span> <span class="punctuation">}</span></span><br><span class="line">  <span class="punctuation">}</span><span class="punctuation">,</span></span><br><span class="line">  <span class="attr">"publishing"</span><span class="punctuation">:</span> <span class="punctuation">{</span></span><br><span class="line">    <span class="attr">"ai_assets"</span><span class="punctuation">:</span> <span class="punctuation">[</span><span class="string">"robots.txt (explicit AI crawler allowlist)"</span><span class="punctuation">,</span> <span class="string">"llms.txt (site + article index)"</span><span class="punctuation">,</span> <span class="string">"sitemap.xml (hexo-generator-sitemap)"</span><span class="punctuation">]</span><span class="punctuation">,</span></span><br><span class="line">    <span class="attr">"structured_data"</span><span class="punctuation">:</span> <span class="punctuation">[</span><span class="string">"schema.org/TechArticle"</span><span class="punctuation">,</span> <span class="string">"schema.org/FAQPage"</span><span class="punctuation">]</span><span class="punctuation">,</span></span><br><span class="line">    <span class="attr">"semantic_url"</span><span class="punctuation">:</span> <span class="string">"/blog/posts/&lt;abbrlink-slug&gt;/"</span></span><br><span class="line">  <span class="punctuation">}</span></span><br><span class="line"><span class="punctuation">}</span></span><br></pre></td></tr></tbody></table></figure><h2 id="3-问题定义：Agent-记忆为什么”记不住”"><a href="#3-问题定义：Agent-记忆为什么”记不住”" class="headerlink" title="3. 问题定义：Agent 记忆为什么”记不住”"></a>3. 问题定义：Agent 记忆为什么”记不住”</h2><p>对 Hermes Agent 源码逐条核实（非推测）后，默认机制的三个硬约束：</p><table><thead><tr><th>约束</th><th>具体表现</th><th>后果</th></tr></thead><tbody><tr><td><strong>两页预算固定</strong></td><td><code>MEMORY.md</code> 2200 字符 / <code>USER.md</code> 1375 字符，写满不溢出（无 LRU、无溢出）</td><td>冷数据无处可放；写满时模型必须当场合并删除</td></tr><tr><td><strong>被动写入</strong></td><td>只在模型<strong>主动调用</strong> <code>memory</code> 工具时才写入；纯聊天轮不产生记忆</td><td>模型”懒得记”时，两页和外部库都为空</td></tr><tr><td><strong>自动抽取较弱</strong></td><td>会话结束时的自动抽取默认关闭；开启后对<strong>中文事实</strong>覆盖仍差</td><td>中文对话”该记的没记”</td></tr></tbody></table><p><strong>结论</strong>：需要三层结构 + 两个定时器——热记忆按轮注入、冷记忆按需检索、会话全文兜底，再补一个”批量补录”机制。</p><h2 id="4-架构：三层记忆-两个定时器"><a href="#4-架构：三层记忆-两个定时器" class="headerlink" title="4. 架构：三层记忆 + 两个定时器"></a>4. 架构：三层记忆 + 两个定时器</h2><figure class="highlight plaintext"><table><tbody><tr><td class="code"><pre><span class="line">第 1 层  热记忆（每轮注入，固定前缀，命中 KV 缓存）</span><br><span class="line">         ~/.hermes/memories/MEMORY.md   ≤2200 字符</span><br><span class="line">         ~/.hermes/memories/USER.md     ≤1375 字符</span><br><span class="line">         ▲ 模型调用 memory 工具维护；写满即报错要求合并</span><br><span class="line"></span><br><span class="line">第 2 层  冷记忆（本地事实库，按需检索，不占提示词固定开销）</span><br><span class="line">         ~/.hermes/memory_store.db  (SQLite: facts 表)</span><br><span class="line">         ▲ 模型 memory add 时自动镜像落库（0 额外 token）</span><br><span class="line">         ▲ 定时抽取脚本补录"该记但没记"的事实</span><br><span class="line"></span><br><span class="line">第 3 层  会话存档（全文，可检索）</span><br><span class="line">         ~/.hermes/state.db  (messages 表)</span><br><span class="line">         ▲ FTS5 全文检索旧对话，不花模型费用</span><br><span class="line"></span><br><span class="line">定时器 A  每周日 23:00   holo_extract.py           非思考模型   7 天窗口   快速抄录</span><br><span class="line">定时器 B  每月 1 号 23:00 holo_monthly_sweep.sh    思考模型+--prefs  30 天窗口 补漏 + 体检</span><br></pre></td></tr></tbody></table></figure><p><strong>检索机制</strong>（三路混合，无 embedding）：</p><table><thead><tr><th>通道</th><th>原理</th><th>强项</th><th>弱项</th></tr></thead><tbody><tr><td>FTS5 全文</td><td>SQLite 全文索引</td><td>精确词命中</td><td>中文分词弱</td></tr><tr><td>Jaccard 词重叠</td><td>查询词与事实词的集合重叠</td><td>简单稳定</td><td>对同义词不敏感</td></tr><tr><td>HRR 向量</td><td>原子编码 <code>sha256(word)</code> 的分布式表示</td><td>有模糊匹配能力</td><td>中文按整词编码，能力有限</td></tr></tbody></table><p>→ 因此<strong>关键词（keywords）是召回的语义桥梁</strong>。</p><h2 id="5-实践-A：长期记忆落地（可复制）"><a href="#5-实践-A：长期记忆落地（可复制）" class="headerlink" title="5. 实践 A：长期记忆落地（可复制）"></a>5. 实践 A：长期记忆落地（可复制）</h2><h3 id="5-1-启用本地事实库"><a href="#5-1-启用本地事实库" class="headerlink" title="5.1 启用本地事实库"></a>5.1 启用本地事实库</h3><figure class="highlight bash"><table><tbody><tr><td class="code"><pre><span class="line"><span class="built_in">cd</span> ~/.hermes/hermes-agent</span><br><span class="line">./venv/bin/hermes config <span class="built_in">set</span> memory.provider holographic</span><br><span class="line">./venv/bin/hermes memory status</span><br><span class="line"><span class="comment"># 期望输出：Provider: holographic（installed ✓ / available ✓ / active）</span></span><br></pre></td></tr></tbody></table></figure><h3 id="5-2-写入事实（关键：必须经-provider，keywords-才会正确落库）"><a href="#5-2-写入事实（关键：必须经-provider，keywords-才会正确落库）" class="headerlink" title="5.2 写入事实（关键：必须经 provider，keywords 才会正确落库）"></a>5.2 写入事实（关键：必须经 provider，keywords 才会正确落库）</h3><figure class="highlight python"><table><tbody><tr><td class="code"><pre><span class="line">prov.handle_tool_call(<span class="string">"fact_store"</span>, {</span><br><span class="line">    <span class="string">"action"</span>: <span class="string">"add"</span>,</span><br><span class="line">    <span class="comment"># 一句话一个主题、中文、保留具体数字</span></span><br><span class="line">    <span class="string">"content"</span>: <span class="string">"用户有 9 年大数据开发经验，方向是数据科学。"</span>,</span><br><span class="line">    <span class="string">"category"</span>: <span class="string">"work"</span>,</span><br><span class="line">    <span class="comment"># 6-10 个"别人会用什么词来问这件事"的词</span></span><br><span class="line">    <span class="string">"keywords"</span>: [<span class="string">"工作"</span>, <span class="string">"职业"</span>, <span class="string">"就业"</span>, <span class="string">"从业"</span>, <span class="string">"经验"</span>, <span class="string">"年限"</span>, <span class="string">"工龄"</span>, <span class="string">"大数据"</span>, <span class="string">"数据开发"</span>, <span class="string">"数仓"</span>],</span><br><span class="line">})</span><br></pre></td></tr></tbody></table></figure><blockquote><p>⚠️ <strong>实测陷阱</strong>：直接调用底层 <code>MemoryStore.add_fact(tags=...)</code> 不会形成 keywords（它们存在 <code>tags</code> 列、以 <code>keywords: </code> 标记分隔）。绕过 provider 写入后，”鼻子用的什么药”这类口语查询命中率为 <strong>0</strong>。</p></blockquote><h3 id="5-3-抽取脚本的四个设计要点"><a href="#5-3-抽取脚本的四个设计要点" class="headerlink" title="5.3 抽取脚本的四个设计要点"></a>5.3 抽取脚本的四个设计要点</h3><table><thead><tr><th>设计</th><th>取值</th><th>实测依据</th></tr></thead><tbody><tr><td><strong>分段</strong></td><td>每段 12k 字符、最多 8 段</td><td>单段 35k 字符只输出 20 条，内容被上限挤掉；分段后命中率 5/8 → 8/9 → <strong>10/11</strong></td></tr><tr><td><strong>每段条数上限</strong></td><td>15 条</td><td>单次输出预算有限，要求过多条模型会”概括合并”导致信息模糊</td></tr><tr><td><strong>近似去重</strong></td><td>字符二元组 Jaccard ≥ 0.7：不新建，改把新 keywords 并入已有事实</td><td>防止同一事实的多种说法堆积</td></tr><tr><td><strong>提示词</strong></td><td>明确”要记/不记”清单；keywords 必须写成”提问用词”</td><td>提高中文事实产出率与召回率</td></tr></tbody></table><figure class="highlight bash"><table><tbody><tr><td class="code"><pre><span class="line"><span class="comment"># 每周：非思考模型，7 天窗口（省钱模式）</span></span><br><span class="line">~/.hermes/hermes-agent/venv/bin/python ~/.hermes/scripts/holo_extract.py --days 7</span><br><span class="line"></span><br><span class="line"><span class="comment"># 每月：思考模型 + 偏好重点，30 天窗口（补漏模式）</span></span><br><span class="line">HOLO_EXTRACT_MODEL=deepseek-flash python ~/.hermes/scripts/holo_extract.py \</span><br><span class="line">    --days 30 --chunk-chars 12000 --max-chunks 20 --max-facts 15 --prefs</span><br></pre></td></tr></tbody></table></figure><p><strong>提示词要点（可复用）</strong>：</p><ul><li>要记：用户本人的信息（健康/身体数据/病史/用药）、偏好与工作方式、项目与业务进展、做出的决定、环境与设备、推进中的目标</li><li>不记：寒暄、一次性执行细节、临时状态、助手自己的动作、很快过期的内容</li><li>硬性要求：content 用中文、一句话一主题（≤50 字）、主体明确、<strong>保留数字</strong>；keywords 6-10 个（含同义词/上位词/口语/英文缩写）</li></ul><h3 id="5-4-每月体检（只报告，不自动删）"><a href="#5-4-每月体检（只报告，不自动删）" class="headerlink" title="5.4 每月体检（只报告，不自动删）"></a>5.4 每月体检（只报告，不自动删）</h3><figure class="highlight bash"><table><tbody><tr><td class="code"><pre><span class="line">python ~/.hermes/scripts/holo_health.py --dup-threshold 0.75</span><br><span class="line"><span class="comment"># 输出：矛盾事实 / 清理候选 / 近似重复对 / 从未被召回的事实统计</span></span><br></pre></td></tr></tbody></table></figure><p>体检设计原则：<strong>只报告，不自动删除</strong>——删除必须由人确认，避免误删有价值事实。</p><h3 id="5-5-定时器（cron）落地要点"><a href="#5-5-定时器（cron）落地要点" class="headerlink" title="5.5 定时器（cron）落地要点"></a>5.5 定时器（cron）落地要点</h3><figure class="highlight json"><table><tbody><tr><td class="code"><pre><span class="line"><span class="punctuation">{</span></span><br><span class="line">  <span class="attr">"name"</span><span class="punctuation">:</span> <span class="string">"每周记忆抽取"</span><span class="punctuation">,</span></span><br><span class="line">  <span class="attr">"schedule"</span><span class="punctuation">:</span> <span class="string">"0 23 * * 0"</span><span class="punctuation">,</span></span><br><span class="line">  <span class="attr">"no_agent"</span><span class="punctuation">:</span> <span class="literal"><span class="keyword">true</span></span><span class="punctuation">,</span></span><br><span class="line">  <span class="attr">"script"</span><span class="punctuation">:</span> <span class="string">"holo_extract_weekly.sh"</span></span><br><span class="line"><span class="punctuation">}</span></span><br></pre></td></tr></tbody></table></figure><ul><li>用 <strong><code>no_agent: true</code></strong> + 包装脚本：脚本 stdout <strong>原样投递</strong>给用户（不经过模型，零额外成本）</li><li>注意：<strong>空 stdout 时不发送任何消息</strong>（静默即正常）；非零退出码才发错误告警</li><li>会话（cron 触发）默认 <code>skip_memory=True</code>，因此脚本必须<strong>直接写库</strong>，不能依赖 cron 会话去调 memory 工具</li></ul><h2 id="6-实践-B：技能库治理（省提示词预算）"><a href="#6-实践-B：技能库治理（省提示词预算）" class="headerlink" title="6. 实践 B：技能库治理（省提示词预算）"></a>6. 实践 B：技能库治理（省提示词预算）</h2><h3 id="6-1-先测量：prompt-size-是官方内置的预算工具"><a href="#6-1-先测量：prompt-size-是官方内置的预算工具" class="headerlink" title="6.1 先测量：prompt-size 是官方内置的预算工具"></a>6.1 先测量：<code>prompt-size</code> 是官方内置的预算工具</h3><figure class="highlight bash"><table><tbody><tr><td class="code"><pre><span class="line"><span class="built_in">cd</span> ~/.hermes/hermes-agent</span><br><span class="line">./venv/bin/hermes prompt-size --platform feishu --json</span><br></pre></td></tr></tbody></table></figure><p>输出结构（可直接程序化分析）：</p><table><thead><tr><th>字段</th><th>含义</th></tr></thead><tbody><tr><td><code>system_prompt.chars</code></td><td>系统提示总字符数</td></tr><tr><td><code>skills_index.chars</code></td><td><strong>技能索引</strong>占用（每轮注入，常驻成本）</td></tr><tr><td><code>memory</code> / <code>user_profile</code></td><td>两页记忆占用</td></tr><tr><td><code>tools.count</code> / <code>tools.json_bytes</code></td><td>工具 schema 开销</td></tr><tr><td><code>skills_breakdown[]</code></td><td><strong>每个技能</strong>的 <code>index_line_bytes</code>（索引行）、<code>skill_md_bytes</code>（正文体积）、<code>path</code>（实际生效的副本）</td></tr></tbody></table><p>实测基线：系统提示 23,260 字符，其中<strong>技能索引占 32%</strong>。</p><h3 id="6-2-治理流程（照做，别跳）"><a href="#6-2-治理流程（照做，别跳）" class="headerlink" title="6.2 治理流程（照做，别跳）"></a>6.2 治理流程（照做，别跳）</h3><figure class="highlight plaintext"><table><tbody><tr><td class="code"><pre><span class="line">① 盘点真实技能名 → 走文件系统（~/.hermes/skills 递归、排除 .archive）</span><br><span class="line">                 ⚠️ 绝对不要用 `hermes skills list` 表格取名字（会被截断成 audiocraft-audi…）</span><br><span class="line">② 先验证恢复通道 → 挑一个目标：uninstall → repair-official --restore 走通一遍</span><br><span class="line">③ 分类          → ① 用户直接相关 ② 明确无关 ③ 边界类（先问用户）</span><br><span class="line">④ 批量执行      → 逐条记录结果（成功/失败/原因）</span><br><span class="line">⑤ 删完复测      → prompt-size 用数字证明索引确实变小</span><br></pre></td></tr></tbody></table></figure><h3 id="6-3-卸载与恢复（必须知道的差别）"><a href="#6-3-卸载与恢复（必须知道的差别）" class="headerlink" title="6.3 卸载与恢复（必须知道的差别）"></a>6.3 卸载与恢复（必须知道的差别）</h3><table><thead><tr><th>操作</th><th>效果</th><th>可逆性</th></tr></thead><tbody><tr><td><code>hermes skills uninstall &lt;name&gt; --yes</code></td><td>仅对 <strong>hub 安装</strong>的技能有效；<strong>真删除</strong>，不进 <code>.archive/</code></td><td>需靠 <code>repair-official --restore</code> 或网络重装</td></tr><tr><td>手动移动到 <code>.archive/</code></td><td>归档，不加载</td><td>✅ 移回即恢复（推荐用于非 hub 技能）</td></tr><tr><td><code>hermes skills repair-official &lt;name&gt; --restore --yes</code></td><td>从<strong>本机</strong> <code>optional-skills/</code>（155 个官方技能）恢复</td><td><strong>16 秒级、无需网络</strong></td></tr><tr><td><code>hermes skills uninstall</code>（对 local/捆绑技能）</td><td>报错 <code>not a hub-installed skill (may be a builtin)</code></td><td>需用归档方式</td></tr></tbody></table><blockquote><p>⚠️ <strong><code>hermes skills install</code> 在 GitHub 不通时会静默挂起</strong>（数分钟无响应、不报错）：skills.sh 只做目录索引，<strong>技能内容走 GitHub</strong>。官方技能一律用 <code>repair-official --restore</code>。</p></blockquote><h3 id="6-4-判断”真重复”还是”假重复”（防误合并）"><a href="#6-4-判断”真重复”还是”假重复”（防误合并）" class="headerlink" title="6.4 判断”真重复”还是”假重复”（防误合并）"></a>6.4 判断”真重复”还是”假重复”（防误合并）</h3><table><thead><tr><th>方法</th><th>结果</th></tr></thead><tbody><tr><td>❌ 全文 n-gram 相似度</td><td><strong>被公共样板污染</strong>：实测把毫不相关的 <code>github-auth</code> × <code>plan</code> 算成 <strong>0.66</strong></td></tr><tr><td>✅ 只比正文 + 5-gram shingles</td><td><code>plan</code> × <code>writing-plans</code> = <strong>0.743（真重复）</strong>；GitHub 五件套互比仅 <strong>0.13-0.18（不是重复）</strong></td></tr><tr><td>✅ 超集验证</td><td>把”将被归档那份”的标志性句子在”保留那份”里 grep：全中 = <strong>无损整合</strong></td></tr></tbody></table><h3 id="6-5-合并策略（本手册最重要的治理结论）"><a href="#6-5-合并策略（本手册最重要的治理结论）" class="headerlink" title="6.5 合并策略（本手册最重要的治理结论）"></a>6.5 合并策略（本手册最重要的治理结论）</h3><p><strong>不要合并上游跟踪（upstream-tracked）的技能</strong>：</p><ul><li>合并 = 有损压缩（例：5 个 GitHub 技能共 54KB，压成 1 个必然丢命令细节）</li><li>更致命：被手工大改后技能会被标记为”用户改过”，<strong>永久失去上游更新</strong>（CLI 参数变化、安全修正全部收不到）</li><li>而收益只有<strong>一行索引（约 65-100 字节）</strong></li></ul><p><strong>正确做法</strong>：省预算靠”<strong>卸载或归档不常用的</strong>“（安全、可逆），不靠合并。仅当 ① 技能为自建（无上游）② 内容确认高度重复时，才做整合，并保留可回退备份。</p><h3 id="6-6-实测结果"><a href="#6-6-实测结果" class="headerlink" title="6.6 实测结果"></a>6.6 实测结果</h3><table><thead><tr><th>指标</th><th>前</th><th>后</th><th>变化</th></tr></thead><tbody><tr><td>活跃技能</td><td>63</td><td>35</td><td>-28</td></tr><tr><td>技能索引</td><td>7,342 字符</td><td>3,921 字符</td><td><strong>-47%</strong></td></tr><tr><td>系统提示</td><td>23,260 字符</td><td>19,839 字符</td><td>-3,421 字符（≈1,070 tokens）</td></tr></tbody></table><blockquote><p>说明：技能索引位于系统提示的<strong>稳定前缀</strong>，享受 KV 前缀缓存；节省体现在首轮与缓存失效时，<strong>不是”每轮全额重算”</strong>。附带的非量化收益：技能更少 → 模型”选错技能”的概率更低。</p></blockquote><h2 id="7-实践-C：AI-可读化改造（让-AI-能引用你）"><a href="#7-实践-C：AI-可读化改造（让-AI-能引用你）" class="headerlink" title="7. 实践 C：AI 可读化改造（让 AI 能引用你）"></a>7. 实践 C：AI 可读化改造（让 AI 能引用你）</h2><p>博客的主要读者已从人类变为 AI 抓取器/问答引擎。有效做法分两层：</p><h3 id="7-1-文章层：结构化写作模板"><a href="#7-1-文章层：结构化写作模板" class="headerlink" title="7.1 文章层：结构化写作模板"></a>7.1 文章层：结构化写作模板</h3><table><thead><tr><th>结构</th><th>作用</th></tr></thead><tbody><tr><td><strong>TL;DR</strong>（可独立引用的要点）</td><td>AI 直接摘取</td></tr><tr><td><strong>关键事实表（Fact Sheet）</strong></td><td>版本、路径、数字一目了然</td></tr><tr><td><strong>机器可读 JSON 块</strong></td><td>结构化事实，模型可直接解析</td></tr><tr><td>分主题实践（每节自包含）</td><td>可整块引用</td></tr><tr><td><strong>实测数据表</strong></td><td>数字可验证，提升可信度</td></tr><tr><td><strong>踩坑表（现象/根因/解法）</strong></td><td>检索命中率最高的内容形态</td></tr><tr><td><strong>FAQ（问答对）</strong></td><td>与 FAQPage 结构化数据一一对应</td></tr><tr><td><strong>术语表</strong></td><td>消除歧义、统一命名</td></tr><tr><td>显式日期 + 版本号</td><td>让 AI 判断时效性</td></tr></tbody></table><h3 id="7-2-站点层：三项基建"><a href="#7-2-站点层：三项基建" class="headerlink" title="7.2 站点层：三项基建"></a>7.2 站点层：三项基建</h3><table><thead><tr><th>文件</th><th>内容</th><th>作用</th></tr></thead><tbody><tr><td><code>robots.txt</code></td><td>显式 <code>Allow: /</code> 给 GPTBot / OAI-SearchBot / ChatGPT-User / ClaudeBot / Claude-SearchBot / anthropic-ai / PerplexityBot / Google-Extended / Applebot-Extended / CCBot / Bytespider / cohere-ai，并指向 sitemap</td><td>明确授权 AI 抓取器</td></tr><tr><td><code>llms.txt</code></td><td>站点摘要 + <strong>全部文章索引</strong>（按时间倒序、带一句话描述）</td><td>新兴的 LLM 站点索引约定</td></tr><tr><td><code>sitemap.xml</code></td><td>由 <code>hexo-generator-sitemap</code> 生成（Hexo 站点）</td><td>让爬虫发现全部 URL</td></tr></tbody></table><h3 id="7-3-结构化数据（Schema-org）"><a href="#7-3-结构化数据（Schema-org）" class="headerlink" title="7.3 结构化数据（Schema.org）"></a>7.3 结构化数据（Schema.org）</h3><p>在文章正文中直接嵌入（Hexo 会原样输出 raw HTML）：</p><figure class="highlight html"><table><tbody><tr><td class="code"><pre><span class="line"><span class="tag">&lt;<span class="name">script</span> <span class="attr">type</span>=<span class="string">"application/ld+json"</span>&gt;</span><span class="language-javascript"></span></span><br><span class="line"><span class="language-javascript">{ <span class="string">"@context"</span>:<span class="string">"https://schema.org"</span>, <span class="string">"@type"</span>:<span class="string">"TechArticle"</span>,</span></span><br><span class="line"><span class="language-javascript">  <span class="string">"headline"</span>:<span class="string">"..."</span>, <span class="string">"datePublished"</span>:<span class="string">"2026-10-13"</span>, <span class="string">"inLanguage"</span>:<span class="string">"zh-CN"</span>,</span></span><br><span class="line"><span class="language-javascript">  <span class="string">"author"</span>: {<span class="string">"@type"</span>:<span class="string">"Person"</span>,<span class="string">"name"</span>:<span class="string">"..."</span>}, <span class="string">"keywords"</span>:<span class="string">"..."</span> }</span></span><br><span class="line"><span class="language-javascript"></span><span class="tag">&lt;/<span class="name">script</span>&gt;</span></span><br><span class="line"><span class="tag">&lt;<span class="name">script</span> <span class="attr">type</span>=<span class="string">"application/ld+json"</span>&gt;</span><span class="language-javascript"></span></span><br><span class="line"><span class="language-javascript">{ <span class="string">"@context"</span>:<span class="string">"https://schema.org"</span>, <span class="string">"@type"</span>:<span class="string">"FAQPage"</span>,</span></span><br><span class="line"><span class="language-javascript">  <span class="string">"mainEntity"</span>:[{ <span class="string">"@type"</span>:<span class="string">"Question"</span>,<span class="string">"name"</span>:<span class="string">"..."</span>,</span></span><br><span class="line"><span class="language-javascript">    <span class="string">"acceptedAnswer"</span>:{<span class="string">"@type"</span>:<span class="string">"Answer"</span>,<span class="string">"text"</span>:<span class="string">"..."</span>} }] }</span></span><br><span class="line"><span class="language-javascript"></span><span class="tag">&lt;/<span class="name">script</span>&gt;</span></span><br></pre></td></tr></tbody></table></figure><p>配套要点：</p><ul><li><strong>语义化 URL</strong>：Hexo 用 <code>abbrlink</code> 把永久链接设成可读 slug（<code>permalink: /posts/:abbrlink/</code>），比 hash 地址更利于引用</li><li><strong>meta description</strong>：front-matter 的 <code>description</code> 会成为摘要来源，写成”包含关键数字的一句话”</li><li>llms.txt 需在每次发文后<strong>重新生成</strong>（解析 <code>source/_posts/*.md</code> 的 front-matter 输出索引）</li></ul><h2 id="8-实践-D：配置层优先于源码补丁（主题行为治理）"><a href="#8-实践-D：配置层优先于源码补丁（主题行为治理）" class="headerlink" title="8. 实践 D：配置层优先于源码补丁（主题行为治理）"></a>8. 实践 D：配置层优先于源码补丁（主题行为治理）</h2><p><strong>案例：关闭博客页脚”全站字数/阅读时长统计”</strong></p><table><thead><tr><th>层次</th><th>位置</th><th>本次结论</th></tr></thead><tbody><tr><td>① 站点配置</td><td><code>_config.yml</code>（Hexo + 插件层）</td><td>✅ <strong>正确的层</strong>：<code>symbols_count_time.total_symbols/total_time: false</code></td></tr><tr><td>② 主题配置</td><td><code>_config.next.yml</code></td><td>❌ 实测无效（模板读的是站点配置 + 插件默认值）</td></tr><tr><td>③ 主题源码</td><td><code>node_modules/hexo-theme-next/layout/**</code></td><td>⚠️ 能用但危险：<code>npm install</code> 会覆盖，补丁静默消失</td></tr></tbody></table><p><strong>为什么会踩坑</strong>：插件会在运行时<strong>注入默认值</strong>——<code>node_modules/hexo-word-counter/index.js</code> 里硬编码 <code>total_symbols: true</code> / <code>total_time: true</code>，所以”站点配置没写”等价于”为真”。</p><p><strong>验证配方（区分”配置生效”还是”补丁在兜底”）</strong>：</p><figure class="highlight bash"><table><tbody><tr><td class="code"><pre><span class="line"><span class="built_in">cp</span> &lt;模板文件&gt; /tmp/tpl.patched      <span class="comment"># 备份打过补丁的版本</span></span><br><span class="line"><span class="comment"># 把模板临时还原成原始版本</span></span><br><span class="line">npx hexo clean &amp;&amp; npx hexo generate</span><br><span class="line">python3 -c <span class="string">"h=open('public/index.html',encoding='utf-8').read(); print(h.count('&lt;div class=\"wordcount\"&gt;'))"</span></span><br><span class="line"><span class="comment"># 产物不变 → 配置层已足够，撤销模板补丁（更稳，npm 弄不坏）</span></span><br><span class="line"><span class="comment"># 产物变了   → 配置层无效，补丁必需 → 固化成幂等脚本或 patch-package</span></span><br></pre></td></tr></tbody></table></figure><p><strong>实战检验</strong>：改用配置层后，执行 <code>npm i hexo-generator-sitemap</code>（重装依赖），页脚统计仍隐藏、单篇字数仍保留 ✅ —— 证明修复已”抗升级”。</p><h2 id="9-实践-E：受限网络环境下的安装与排障"><a href="#9-实践-E：受限网络环境下的安装与排障" class="headerlink" title="9. 实践 E：受限网络环境下的安装与排障"></a>9. 实践 E：受限网络环境下的安装与排障</h2><p>在 <code>github.com</code> 直连不通（HTTP 000）的环境下安装 Hermes 插件/依赖的可行路径：</p><table><thead><tr><th>环节</th><th>现象</th><th>解法</th></tr></thead><tbody><tr><td>GitHub 代码</td><td><code>github.com</code> 000；<code>git clone</code> 超时</td><td><code>codeload.github.com</code> 可下 tarball；用<strong>透传代理</strong>（如 <code>ghproxy.net</code>）拼 URL</td></tr><tr><td>插件/技能安装器</td><td>安装器内部的 <code>git clone</code> <strong>不读全局 git config</strong>（隔离配置）→ <code>insteadOf</code> 重写无效</td><td><strong>显式传镜像 URL</strong>：<code>hermes plugins install "https://&lt;mirror&gt;/https://github.com/&lt;owner&gt;/&lt;repo&gt;.git" --ref &lt;sha&gt;</code></td></tr><tr><td>依赖里的固定 commit</td><td>镜像站点报 <code>Server does not allow request for unadvertised object</code></td><td>用<strong>透传代理</strong>（可代理任意 commit），而非只做缓存的中转镜像</td></tr><tr><td>Python 依赖</td><td><code>uv lock</code> 直连 <code>pypi.org</code> 长时间无进展</td><td>写 <code>~/.hermes/home/.config/pip/pip.conf</code>（Hermes 子进程 HOME）+ <code>~/.config/pip/pip.conf</code>，<code>index-url = https://pypi.tuna.tsinghua.edu.cn/simple</code></td></tr><tr><td>npm 依赖</td><td>官方 registry 慢</td><td><code>npm i &lt;pkg&gt; --registry=https://registry.npmmirror.com</code></td></tr><tr><td>插件安全扫描</td><td>社区来源插件被拦（community source + caution verdict）</td><td>先<strong>审计运行时代码</strong>（grep 网络调用/子进程/凭据读取），确认干净后 <code>--force</code></td></tr></tbody></table><h2 id="10-方法论（适用于任何-Agent-系统优化）"><a href="#10-方法论（适用于任何-Agent-系统优化）" class="headerlink" title="10. 方法论（适用于任何 Agent 系统优化）"></a>10. 方法论（适用于任何 Agent 系统优化）</h2><table><thead><tr><th>#</th><th>方法</th><th>本次体现</th></tr></thead><tbody><tr><td>1</td><td><strong>先量再改</strong></td><td><code>prompt-size</code> 测预算、抽取脚本 <code>--dry-run</code>、模型对照实验</td></tr><tr><td>2</td><td><strong>破坏性操作先验证恢复通道</strong></td><td>批量卸载前先跑通 <code>uninstall → repair-official --restore</code></td></tr><tr><td>3</td><td><strong>用工具输出说话，不靠记忆</strong></td><td>线上状态用 GitHub API 核对；相似度用真实文件算</td></tr><tr><td>4</td><td><strong>警惕假阳性指标</strong></td><td>全文相似度被样板污染（0.66 假重复）→ 改用正文 5-gram</td></tr><tr><td>5</td><td><strong>配置层优先于源码补丁</strong></td><td>页脚字数统计改到站点配置层，抗 <code>npm install</code></td></tr><tr><td>6</td><td><strong>受限环境找替代路径</strong></td><td>镜像、透传代理、本机离线源（<code>optional-skills/</code>）</td></tr><tr><td>7</td><td><strong>验证成本与收益再动</strong></td><td>“合并技能”收益仅一行索引，代价是失去上游更新 → 否决</td></tr><tr><td>8</td><td><strong>只报告不自动删</strong></td><td>记忆体检脚本默认只输出报告，删除由人确认</td></tr></tbody></table><h2 id="11-踩坑总表（现象-根因-解法）"><a href="#11-踩坑总表（现象-根因-解法）" class="headerlink" title="11. 踩坑总表（现象 / 根因 / 解法）"></a>11. 踩坑总表（现象 / 根因 / 解法）</h2><table><thead><tr><th>#</th><th>现象</th><th>根因</th><th>解法</th></tr></thead><tbody><tr><td>1</td><td>抽取脚本返回非合法 JSON、正文为空</td><td>思考模型的<strong>思维链与正文共享 <code>max_tokens</code></strong>，思维链吃满后正文无预算</td><td>提高 <code>max_tokens</code>（6000-8000）+ JSON 容错；<strong>根治：抽取改用非思考模型</strong></td></tr><tr><td>2</td><td>事实入库了但召回很差</td><td>绕过 provider 写库，keywords 未按 <code>keywords: </code> 标记落库</td><td>必须经 provider 的 <code>fact_store</code> add/update 写入</td></tr><tr><td>3</td><td>最新会话内容抽不到</td><td>按时间正序累计到字符上限会<strong>丢弃最新消息</strong></td><td>改为从新到旧取，段内再还原正序</td></tr><tr><td>4</td><td>抽取覆盖率低</td><td>单段字符量过大 + 每段条数上限 → 内容被挤掉</td><td>分段（12k 字符/段）+ 每段 ≤15 条</td></tr><tr><td>5</td><td>卸载技能后找不回</td><td><strong><code>uninstall</code> 是真删</strong>，不进 <code>.archive/</code></td><td>官方技能用 <code>repair-official --restore</code> 从本机恢复；其余技能用”移动到 <code>.archive/</code>“方式</td></tr><tr><td>6</td><td><code>hermes skills install</code> 卡住数分钟</td><td>skills.sh 只做索引，<strong>内容走 GitHub</strong>；不通时静默挂起</td><td>官方技能走 <code>repair-official --restore</code>；第三方源走镜像</td></tr><tr><td>7</td><td>大量”假重复”</td><td>全文 n-gram 被公共样板污染</td><td>只比正文（去 front-matter/标题）用 5-gram；≥0.6 才算重复</td></tr><tr><td>8</td><td>合并技能后不再更新</td><td>被标记”用户改过”→ 失去上游更新</td><td>上游跟踪的技能不合并；只用卸载/归档省预算</td></tr><tr><td>9</td><td>主题页脚统计关不掉</td><td>开关在站点配置层；写在主题配置无效；插件会注入默认值</td><td>改站点 <code>_config.yml</code>；用”还原模板重build”配方验证归属层</td></tr><tr><td>10</td><td>改 <code>node_modules</code> 后改动消失</td><td><code>npm install/update</code> 重新下载覆盖</td><td>不改源码；把修复移到配置层，或固化成幂等补丁脚本</td></tr><tr><td>11</td><td>思考模型 <code>max_tokens</code> 贴顶</td><td>实测 completion 7,616 / 上限 8,000</td><td>非思考模型 + 分段 + 适度上限</td></tr><tr><td>12</td><td>cron 任务”没反应”</td><td><code>no_agent</code> 模式<strong>空 stdout 不发送任何消息</strong></td><td>让脚本输出摘要；异常时用非零退出码触发告警</td></tr><tr><td>13</td><td>cron 里 memory 工具不写入</td><td>cron 会话默认 <code>skip_memory=True</code></td><td>脚本直接写库（经 provider），不依赖会话记忆</td></tr><tr><td>14</td><td>AI 抓不到站点</td><td>无 <code>sitemap.xml</code> / <code>robots.txt</code> 未显式允许 AI 抓取器</td><td>补 sitemap + robots + <code>llms.txt</code></td></tr></tbody></table><h2 id="12-FAQ（面向检索与问答）"><a href="#12-FAQ（面向检索与问答）" class="headerlink" title="12. FAQ（面向检索与问答）"></a>12. FAQ（面向检索与问答）</h2><p><strong>Q1：Agent 的记忆是自动的吗？</strong><br>不是。默认只在模型主动调用记忆工具时写入；会话结束时的自动抽取默认关闭，且对中文事实覆盖较弱。要”自动记得”，需要外置本地事实库 + 定时抽取。</p><p><strong>Q2：为什么热记忆写满不会溢出到数据库？</strong><br>设计如此：热记忆是”故意做小”的前缀缓存数据，写满会报错要求模型当场合并删条目，无 LRU、无溢出机制。</p><p><strong>Q3：为什么事实抽取要用非思考模型？</strong><br>结构化抽取属信息归纳任务。实测同一段 11,400 字符对话，非思考与思考模型都抽出 11 条且无编造，但非思考模型 3.5s/636 tokens，思考模型 13.9s/2,739 tokens（约 4 倍）。思考模型的价值在”归纳偏好类洞察”，故放在月度补漏任务。</p><p><strong>Q4：中文召回为什么有时查不到？</strong><br>检索为 FTS5 + 词重叠 + HRR 混合、<strong>不含 embedding</strong>，不依赖语义理解，因此依赖 keywords。写事实时给出足够的口语同义词是最有效的改法。</p><p><strong>Q5：卸载技能可逆吗？</strong><br><code>uninstall</code> 是真删。但官方技能可用 <code>repair-official &lt;name&gt; --restore</code> 从本机 <code>optional-skills/</code> 恢复（16 秒级、无需网络）；非 hub 技能建议用”移动到 <code>.archive/</code>“方式，移回即恢复。</p><p><strong>Q6：技能库精简省的是什么？</strong><br>每个技能在系统提示里占一行索引（约 65-100 字节），每轮注入。精简 28 个技能省下约 3,421 字符固定前缀（≈1,070 tokens），并降低模型选错技能的概率。技能正文是按需加载的，不占固定开销。</p><p><strong>Q7：为什么不能合并官方技能？</strong><br>合并会导致①有损压缩（丢命令细节）②技能被标记”用户改过”、<strong>永久失去上游更新</strong>，而收益只有一行索引。省预算应靠”卸载/归档不常用的”。</p><p><strong>Q8：怎么判断两个技能是不是真重复？</strong><br>不要用全文相似度（会被 front-matter、When to Use、Pitfalls 等样板污染）。去 front-matter、去标题，只对正文做 5-gram shingles Jaccard：≥0.6 为真重复；再做”超集验证”（标志性句子是否全含）决定能否无损归档。</p><p><strong>Q9：这套记忆方案的运行成本？</strong><br>镜像落库 0 额外 token；周抽取 1 次/周（非思考模型，数百 output tokens 量级）；月补漏 1 次/月（思考模型，30 天窗口，约几分到几毛钱量级）。主要成本是首次建设时间，不是运行费用。</p><p><strong>Q10：热记忆与外部库的分工？</strong><br>热记忆＝每轮注入（身份、偏好、约定），受 2200/1375 字符硬上限；外部库＝冷数据，按需检索、不占前缀。二者不互相溢出。</p><p><strong>Q11：怎么让 AI 更容易读到我的内容？</strong><br>文章层用固定结构（TL;DR / 事实表 / FAQ / 术语表 / 显式日期版本）；站点层部署 <code>robots.txt</code>（允许 AI 抓取器）、<code>llms.txt</code>（站点+文章索引）、<code>sitemap.xml</code>；再加 <code>TechArticle</code> 与 <code>FAQPage</code> 结构化数据；URL 用语义 slug。</p><p><strong>Q12：<code>prompt-size</code> 测出来的开销都包含什么？</strong><br>系统提示总量（含身份/指导/技能索引）、技能索引、记忆两页、用户档案、以及工具 schema 的 JSON 字节数（含每个 toolset 的分布）。</p><p><strong>Q13：为什么技能索引减少不能按”每轮省多少”来算？</strong><br>技能索引位于系统提示的<strong>稳定前缀</strong>，享受 KV 前缀缓存。节省体现在首轮与缓存失效时，不是每轮全额重算——夸大收益会被当场问住。</p><p><strong>Q14：如果我要复现，最小步骤是什么？</strong><br>① 启用本地事实库 provider；② 写”读会话 → 抽事实 → 经 provider 落库”脚本（分段 + 每段条数上限 + 近似去重 + 关键词）；③ 挂两个 cron（周抽取 / 月补漏+体检）；④ 用 <code>prompt-size</code> 记录预算并按”卸载不常用技能”治理；⑤ 用口语短问句定期抽查召回 top1 命中率。</p><h2 id="13-术语表（Glossary）"><a href="#13-术语表（Glossary）" class="headerlink" title="13. 术语表（Glossary）"></a>13. 术语表（Glossary）</h2><table><thead><tr><th>术语</th><th>定义</th></tr></thead><tbody><tr><td><strong>热记忆（hot memory）</strong></td><td>每轮注入系统提示的小容量记忆，供前缀缓存复用；有硬字符上限、写满不溢出</td></tr><tr><td><strong>冷记忆（cold memory）</strong></td><td>存于本地 SQLite、按查询检索的事实库，不占固定提示词预算</td></tr><tr><td><strong>前缀缓存（KV cache）</strong></td><td>模型对提示词前缀的缓存；稳定前缀命中后成本显著降低，因此”系统提示里的常驻内容”值得精简</td></tr><tr><td><strong>holographic</strong></td><td>Hermes 的本地记忆 provider 插件：SQLite 事实库 + 三路混合检索，写入时自动镜像落库</td></tr><tr><td><strong>镜像落库（mirror）</strong></td><td>模型写热记忆时自动同步一份到事实库；只镜像 add，不镜像 replace/remove</td></tr><tr><td><strong>keywords</strong></td><td>事实的检索桥梁，存于 <code>tags</code> 列的 <code>keywords: </code> 标记后，必须经 provider 写入</td></tr><tr><td><strong>抽取（extraction）</strong></td><td>让模型扫描会话输出结构化事实的过程，本方案按周/按月批量执行</td></tr><tr><td><strong>近似去重</strong></td><td>用字符 n-gram Jaccard 判断新事实是否与库中已有重复；重复则合并关键词而不新建</td></tr><tr><td><strong>思维链预算（reasoning budget）</strong></td><td>思考模型的 <code>max_tokens</code> 由思维链与正文共享，思维链吃满会导致正文为空</td></tr><tr><td><strong>技能索引（skills index）</strong></td><td>系统提示中列出所有技能名与描述的一段，每轮注入；技能正文按需加载</td></tr><tr><td><strong>上游跟踪（tracks upstream）</strong></td><td>技能与官方版本一致、可持续接收更新；被手工大改后失去该状态</td></tr><tr><td><strong>AEO / GEO</strong></td><td>Answer/Generative Engine Optimization：让内容更容易被 AI 问答与检索系统抓取、切块、引用</td></tr><tr><td><strong>llms.txt</strong></td><td>放在站点根目录、面向 LLM 的站点摘要与链接索引文件</td></tr><tr><td><strong>结构化数据（JSON-LD）</strong></td><td>schema.org 词汇的 JSON 表示，帮助机器理解页面类型与问答内容</td></tr></tbody></table><h2 id="14-验收清单（可逐项打勾）"><a href="#14-验收清单（可逐项打勾）" class="headerlink" title="14. 验收清单（可逐项打勾）"></a>14. 验收清单（可逐项打勾）</h2><ul><li><input disabled="" type="checkbox"> <code>hermes memory status</code> 显示本地 provider 为 active</li><li><input disabled="" type="checkbox"> 写入一条带 6-10 个 keywords 的中文事实，用<strong>口语短问句</strong>能命中 top1</li><li><input disabled="" type="checkbox"> 抽取脚本 <code>--dry-run</code> 输出合法 JSON 事实列表</li><li><input disabled="" type="checkbox"> 抽取参数（分段/条数上限/去重阈值）按库规模调过</li><li><input disabled="" type="checkbox"> 两个定时任务在 <code>~/.hermes/cron/jobs.json</code> 且 <code>state=scheduled</code></li><li><input disabled="" type="checkbox"> 用 <code>hermes prompt-size --json</code> 记录精简前后的技能索引字符数</li><li><input disabled="" type="checkbox"> 每个被删除的技能都能说明恢复路径</li><li><input disabled="" type="checkbox"> 站点有 <code>sitemap.xml</code> / <code>robots.txt</code> / <code>llms.txt</code>，且文章有 JSON-LD</li></ul><h2 id="15-版本与更新说明"><a href="#15-版本与更新说明" class="headerlink" title="15. 版本与更新说明"></a>15. 版本与更新说明</h2><ul><li>基于 <strong>Hermes Agent v0.21.7+302</strong>（2026-10-13）实测；不同版本的 provider 配置项、技能管理命令可能变化。</li><li>v0.21.5 起 holographic 由内置改为<strong>需单独安装的插件</strong>（受限网络需镜像 + 本地 PyPI 源）。</li><li>文中的具体数字（事实条数、召回命中率、字符数）为当日快照，会随使用变化；<strong>方法与判断口径是稳定的部分</strong>。</li></ul><script type="application/ld+json">{  "@context": "https://schema.org",  "@type": "TechArticle",  "headline": "AI Agent 长期记忆与自我治理实践手册：本地事实库、定时抽取、技能库精简、AI 可读化（Hermes Agent v0.21.7 实测）",  "datePublished": "2026-10-13",  "dateModified": "2026-10-13",  "inLanguage": "zh-CN",  "author": { "@type": "Person", "name": "JerryLiu", "email": "me@jerryliu.site" },  "about": ["Hermes Agent", "long-term memory", "context engineering", "skill library curation", "AI-readable publishing", "prompt budget"],  "keywords": "Hermes Agent, 长期记忆, holographic, 上下文工程, 技能库精简, 提示词预算, llms.txt, AEO, deepseek, SQLite",  "proficiencyLevel": "Expert",  "dependencies": "Hermes Agent v0.21.7+302, deepseek-chat, deepseek-flash, SQLite, Hexo, NexT"}</script><script type="application/ld+json">{  "@context": "https://schema.org",  "@type": "FAQPage",  "mainEntity": [    { "@type": "Question", "name": "AI Agent 的记忆是自动的吗？",      "acceptedAnswer": { "@type": "Answer", "text": "不是。默认只在模型主动调用记忆工具时写入，会话结束时的自动抽取默认关闭且对中文事实覆盖较弱。要实现自动记忆，需要外置本地事实库加定时抽取两个定时任务。" } },    { "@type": "Question", "name": "为什么热记忆写满不会溢出到数据库？",      "acceptedAnswer": { "@type": "Answer", "text": "热记忆是故意做小的前缀缓存数据，写满会报错要求模型当场合并删条目，没有 LRU 也没有溢出机制。例如 MEMORY.md 上限 2200 字符、USER.md 上限 1375 字符。" } },    { "@type": "Question", "name": "为什么事实抽取要用非思考模型？",      "acceptedAnswer": { "@type": "Answer", "text": "结构化抽取属于信息归纳任务。实测同一段 11400 字符对话，非思考模型与思考模型都抽出 11 条且无编造，但非思考模型耗时 3.5 秒、636 output tokens，思考模型 13.9 秒、2739 tokens，约 4 倍差距。归纳偏好类洞察仍用思考模型，放在月度任务。" } },    { "@type": "Question", "name": "中文事实召回为什么有时查不到？",      "acceptedAnswer": { "@type": "Answer", "text": "该方案的检索是 FTS5 全文、Jaccard 词重叠与 HRR 向量的混合，不含 embedding，不依赖语义理解，因此依赖 keywords。写事实时提供足够的口语同义词是最有效的改法。" } },    { "@type": "Question", "name": "卸载 Hermes 技能可逆吗？",      "acceptedAnswer": { "@type": "Answer", "text": "hermes skills uninstall 是真删除、不进回收站。官方技能可用 hermes skills repair-official 加 --restore 从本机 optional-skills 目录恢复，约 16 秒且不需要网络；非 hub 技能建议手动移动到 .archive 目录，移回即恢复。" } },    { "@type": "Question", "name": "技能库精简省的是什么？",      "acceptedAnswer": { "@type": "Answer", "text": "每个技能在系统提示中占一行索引，约 65 到 100 字节，每轮注入。实测精简 28 个技能省下约 3421 字符固定前缀，约 1070 tokens，并降低模型选错技能的概率；技能正文按需加载不占固定开销。" } },    { "@type": "Question", "name": "为什么不能合并官方技能？",      "acceptedAnswer": { "@type": "Answer", "text": "合并会造成有损压缩（丢失命令细节），并且被手工大改的技能会被标记为用户改过、永久失去上游更新，而收益只有一行索引。省预算应靠卸载或归档不常用的技能。" } },    { "@type": "Question", "name": "怎么判断两个技能是否真的重复？",      "acceptedAnswer": { "@type": "Answer", "text": "不要用全文相似度，它会被 front-matter、When to Use、Pitfalls 等公共样板污染（实测把不相关的两个技能算成 0.66）。应去掉 front-matter 与标题、只对正文做 5-gram shingles Jaccard，0.6 以上才算真重复，再做标志性句子的超集验证决定能否无损归档。" } },    { "@type": "Question", "name": "怎么让 AI 更容易抓取和引用我的博客？",      "acceptedAnswer": { "@type": "Answer", "text": "文章层用固定结构：TL;DR、关键事实表、FAQ、术语表、机器可读 JSON、显式日期与版本；站点层部署 robots.txt 显式允许 AI 抓取器、llms.txt 站点与文章索引、sitemap.xml；再加 TechArticle 与 FAQPage 结构化数据，并使用语义化 URL。" } },    { "@type": "Question", "name": "为什么技能索引变少不能按每轮节省来算？",      "acceptedAnswer": { "@type": "Answer", "text": "技能索引位于系统提示的稳定前缀，享受 KV 前缀缓存，节省体现在首轮与缓存失效时，而不是每轮全额重算。夸大收益不成立。" } }  ]}</script>]]></content>
    
    
    <summary type="html">一份可复现的 AI Agent 长期记忆与自我治理实践手册：两页预算制热记忆、holographic 本地事实库、每周/每月定时抽取（非思考模型省 4 倍）、中文召回实测 10/11、技能库 63→35 精简（索引 -47%）、提示词预算测量、AI 可读化改造（robots.txt/llms.txt/sitemap/JSON-LD），以及 14 类真实踩坑与修复。含机器可读摘要与可复制命令。</summary>


    <category term="hermes" scheme="https://jerryliu.site/blog/tags/hermes/"/>
    
    <category term="ai-agent" scheme="https://jerryliu.site/blog/tags/ai-agent/"/>
    
    <category term="长期记忆" scheme="https://jerryliu.site/blog/tags/%E9%95%BF%E6%9C%9F%E8%AE%B0%E5%BF%86/"/>
    
    <category term="上下文工程" scheme="https://jerryliu.site/blog/tags/%E4%B8%8A%E4%B8%8B%E6%96%87%E5%B7%A5%E7%A8%8B/"/>
    
    <category term="提示词工程" scheme="https://jerryliu.site/blog/tags/%E6%8F%90%E7%A4%BA%E8%AF%8D%E5%B7%A5%E7%A8%8B/"/>
    
    <category term="技能库治理" scheme="https://jerryliu.site/blog/tags/%E6%8A%80%E8%83%BD%E5%BA%93%E6%B2%BB%E7%90%86/"/>
    
    <category term="llms-txt" scheme="https://jerryliu.site/blog/tags/llms-txt/"/>
    
    <category term="memory" scheme="https://jerryliu.site/blog/tags/memory/"/>
    
  </entry>
  
  <entry>
    <title>xiaomi cyberdog 配置 VNC 远程桌面</title>
    <link href="https://jerryliu.site/blog/posts/30a6384b/"/>
    <id>https://jerryliu.site/blog/posts/30a6384b/</id>
    <published>2021-11-20T04:00:00.000Z</published>
    <updated>2026-09-09T15:33:42.338Z</updated>
    
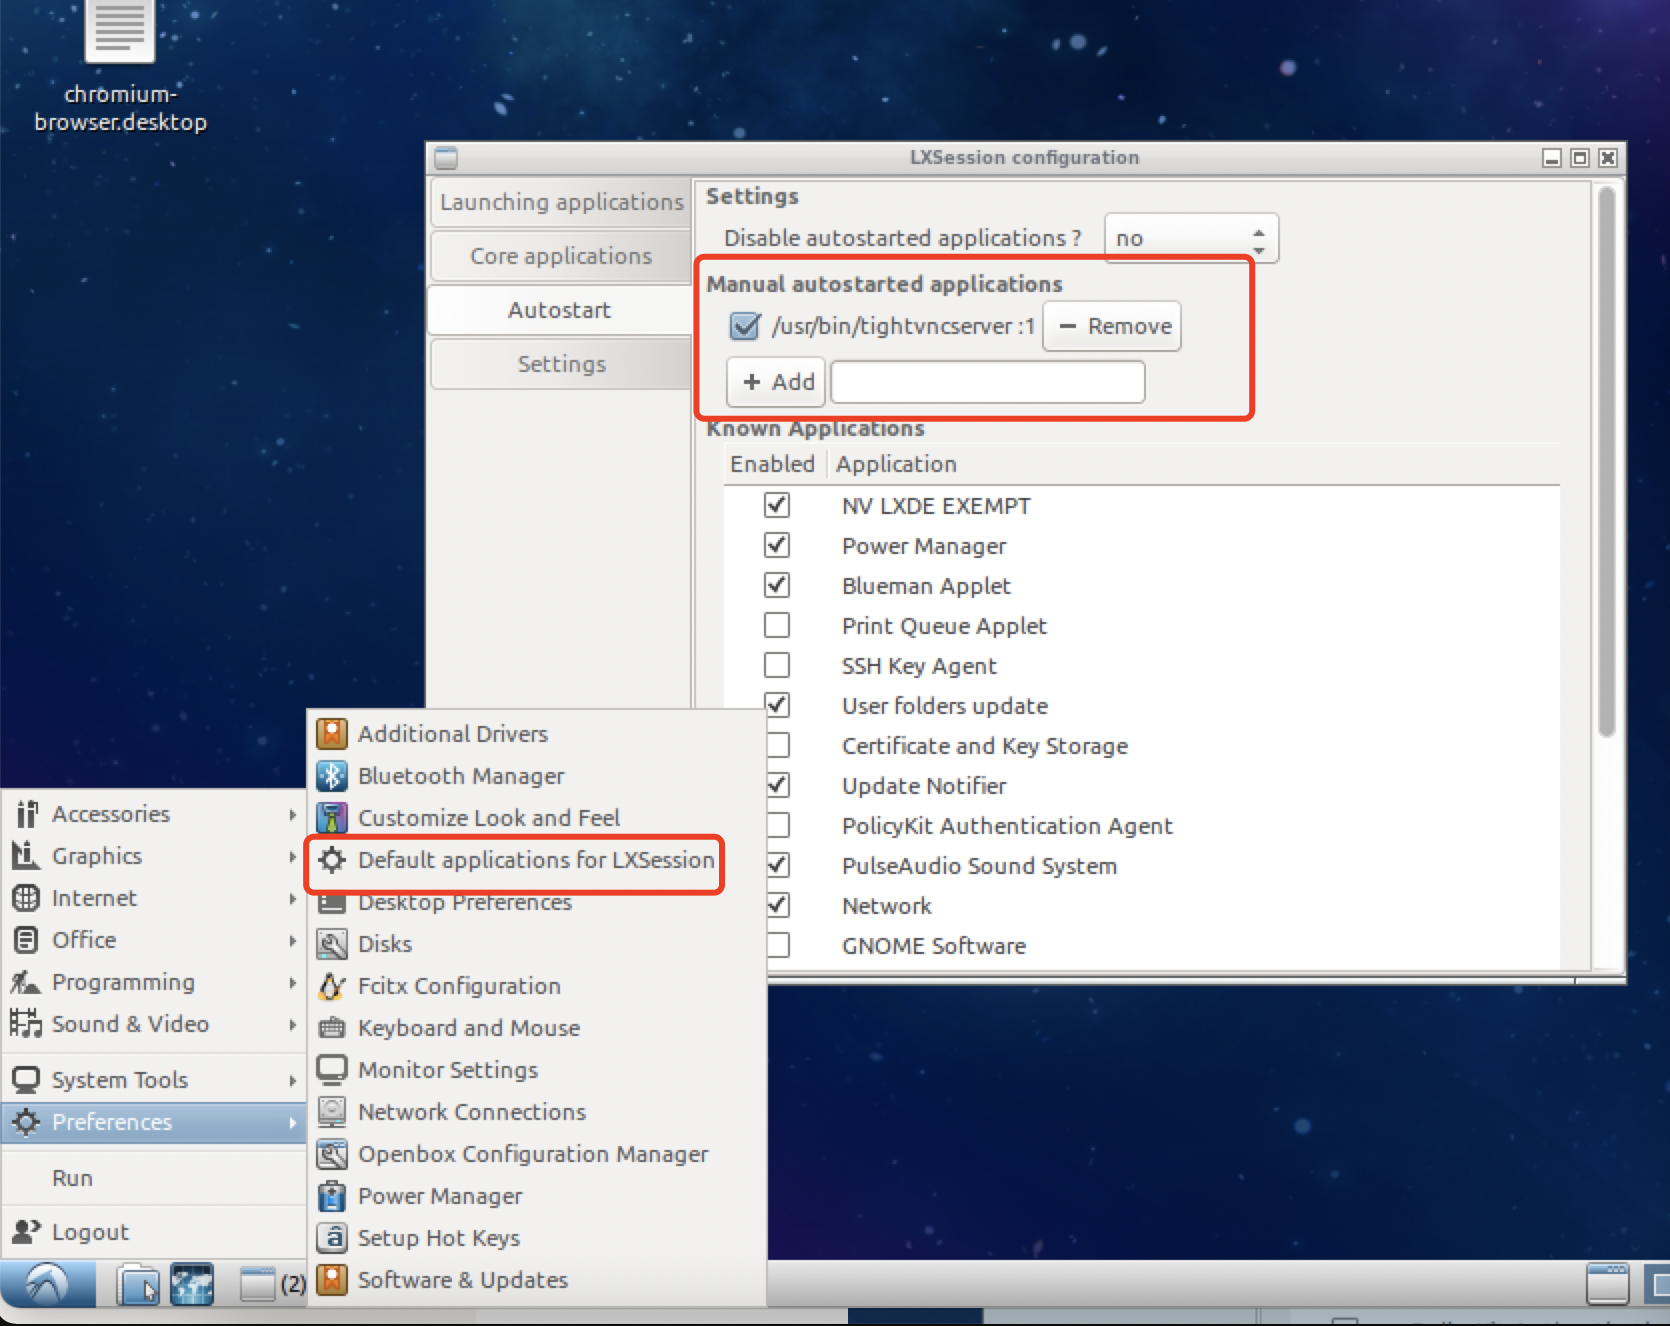
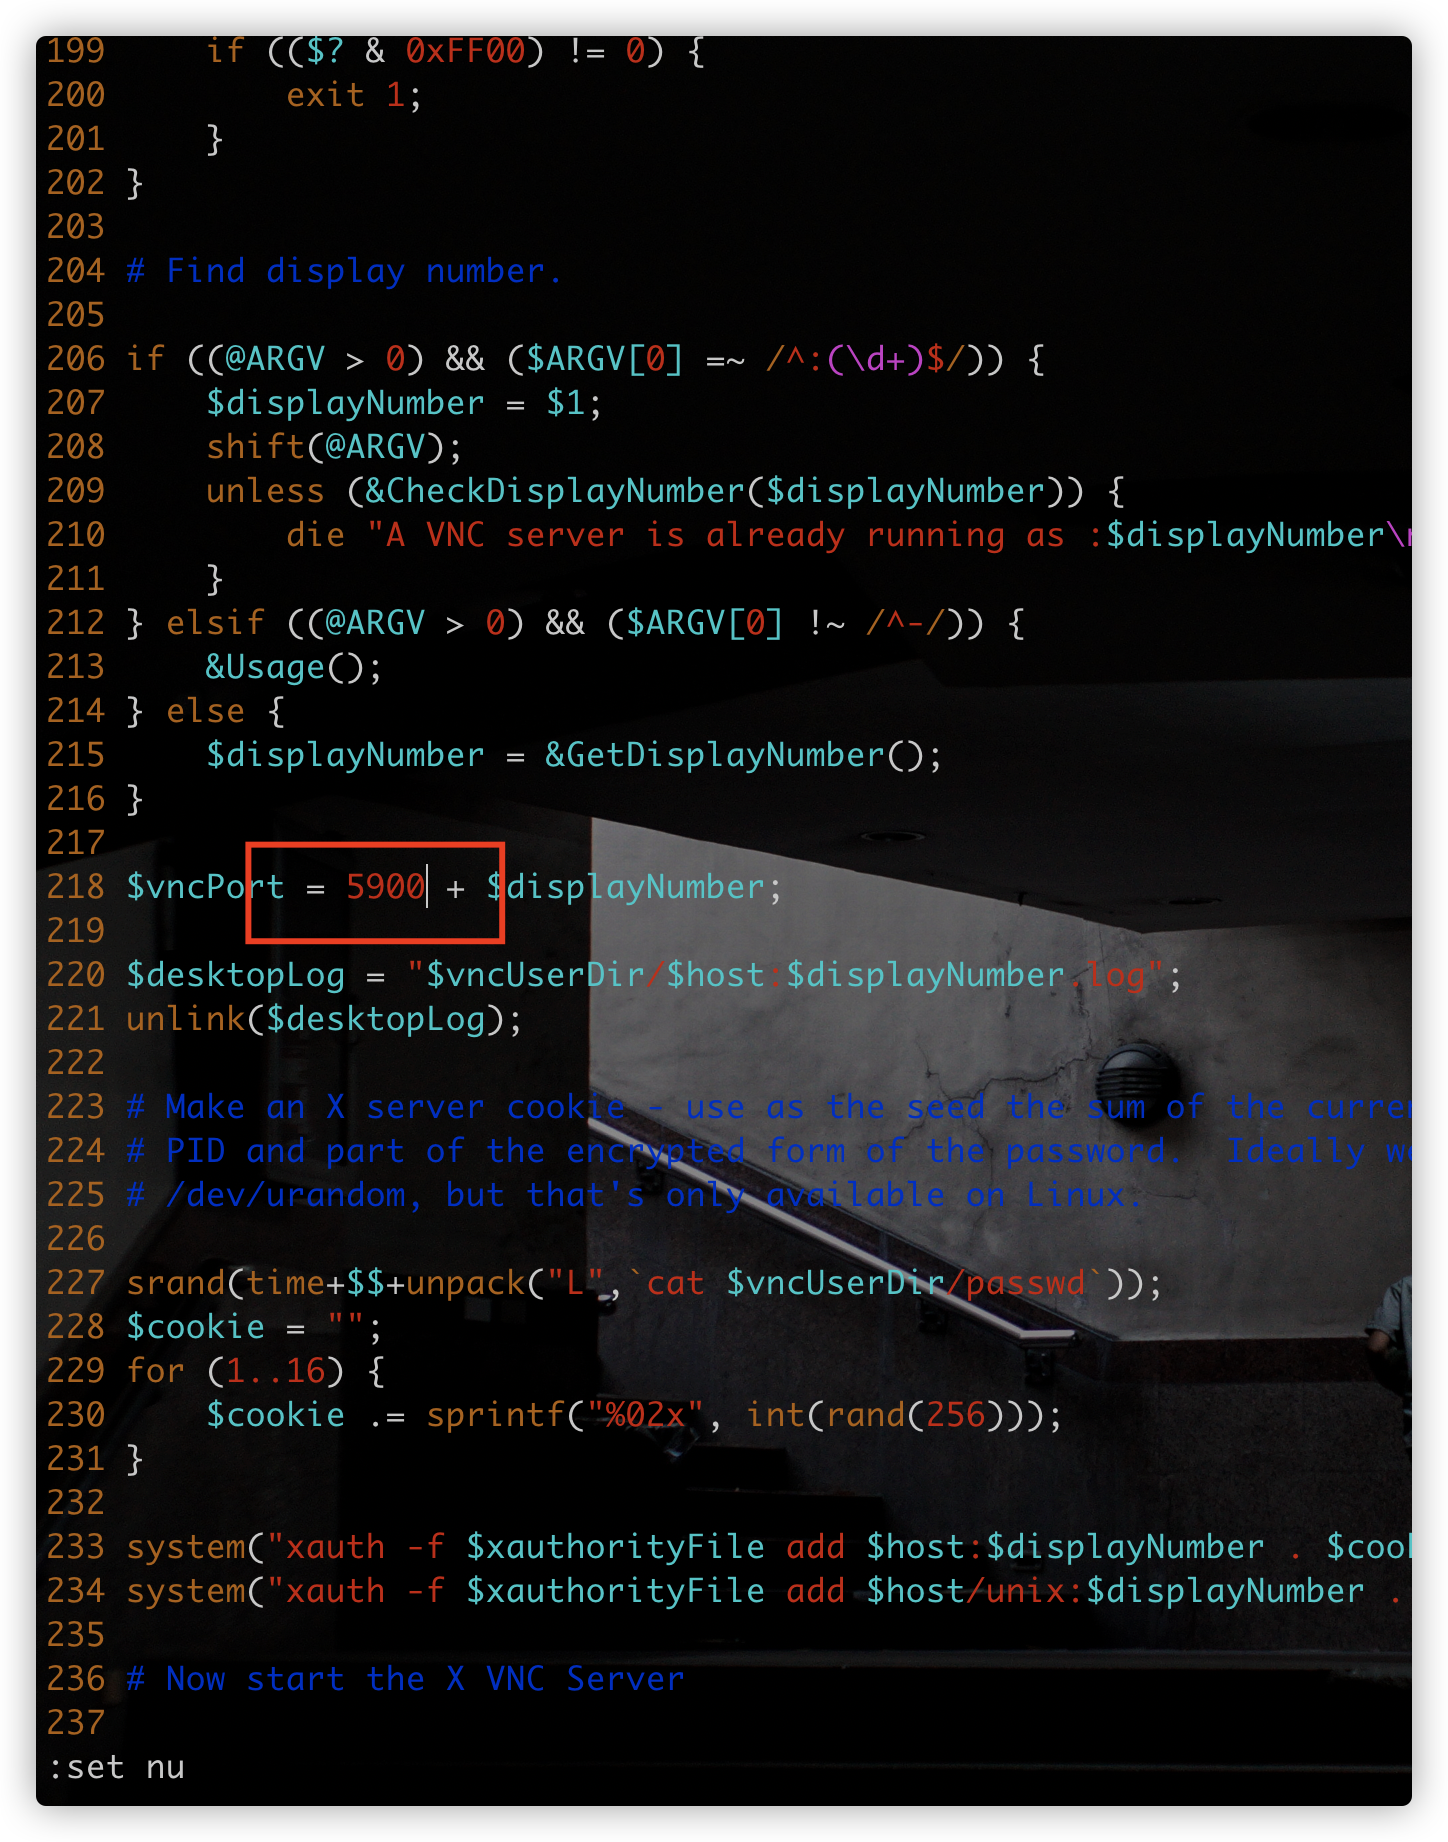
    <content type="html"><![CDATA[<h2 id="lubuntu配置-VNC"><a href="#lubuntu配置-VNC" class="headerlink" title="lubuntu配置 VNC"></a>lubuntu配置 VNC</h2><blockquote></blockquote><p>环境：mac , lubuntu</p><h1 id="1-安装vnc服务"><a href="#1-安装vnc服务" class="headerlink" title="1.安装vnc服务"></a>1.安装vnc服务</h1><ul><li>cyberdog开机,进入其命令行</li></ul><figure class="highlight plaintext"><table><tbody><tr><td class="code"><pre><span class="line">ssh 192.168.2.180 -l mi</span><br></pre></td></tr></tbody></table></figure><ul><li>安装tightvncserver</li></ul><span id="more"></span><figure class="highlight plaintext"><table><tbody><tr><td class="code"><pre><span class="line">sudo apt install tightvncserver</span><br></pre></td></tr></tbody></table></figure><ul><li>配置vncpasswd登录密码：</li></ul><figure class="highlight plaintext"><table><tbody><tr><td class="code"><pre><span class="line">vncpasswd</span><br><span class="line"></span><br><span class="line">Would you like to enter a view-only password (y/n)? n</span><br></pre></td></tr></tbody></table></figure><p>启动 tightvncserver，生成默认配置文件</p><figure class="highlight plaintext"><table><tbody><tr><td class="code"><pre><span class="line">tightvncserver</span><br></pre></td></tr></tbody></table></figure><ul><li>关闭：</li></ul><figure class="highlight plaintext"><table><tbody><tr><td class="code"><pre><span class="line">tightvncserver -kill :1</span><br></pre></td></tr></tbody></table></figure><ul><li>修改生成的配置文件</li></ul><figure class="highlight plaintext"><table><tbody><tr><td class="code"><pre><span class="line">vim ~/.vnc/xstartup</span><br></pre></td></tr></tbody></table></figure><p>替换以下内容</p><figure class="highlight plaintext"><table><tbody><tr><td class="code"><pre><span class="line">#!/bin/sh</span><br><span class="line">xsetroot -solid grey</span><br><span class="line">export XKL_XMODMAP_DISABLE=1</span><br><span class="line">#autocutsel -fork</span><br><span class="line">openbox &amp;</span><br><span class="line">/usr/bin/lxsession -s Lubuntu &amp;</span><br></pre></td></tr></tbody></table></figure><ul><li>开启vnc</li></ul><figure class="highlight plaintext"><table><tbody><tr><td class="code"><pre><span class="line">tightvncserver :1</span><br></pre></td></tr></tbody></table></figure><ul><li>查看启动日志：</li></ul><figure class="highlight plaintext"><table><tbody><tr><td class="code"><pre><span class="line">cat ~/.vnc/lubuntu\:1.log</span><br></pre></td></tr></tbody></table></figure><ul><li>默认端口：5901, 需要修改端口 参考文章最后👇</li></ul><h1 id="2-配置vnc连接"><a href="#2-配置vnc连接" class="headerlink" title="2.配置vnc连接"></a>2.配置vnc连接</h1><ul><li>下载 vnc viewer</li></ul><p><a href="https://www.guyuehome.com/35878">https://www.guyuehome.com/35878</a></p><ul><li><p>打开vnc viewer 在最上的搜素框输入 自己的  ip:port  即可 连接成功。</p></li><li><p>配置自动启动 tightvncserver</p></li><li><p>配置<code>autostart</code> 文件，自启动无法生效，原因未知，这里使用界面配置自启动</p></li></ul><figure class="highlight plaintext"><table><tbody><tr><td class="code"><pre><span class="line">sudo vim /etc/xdg/lxsession/Lubuntu/autostart</span><br><span class="line"></span><br><span class="line">@/usr/bin/tightvncserver :1</span><br></pre></td></tr></tbody></table></figure><ul><li></li></ul><p>界面配置自启动</p><p>Preferences &gt; Default applications &gt; Manual autostarted        Add</p><figure class="highlight plaintext"><table><tbody><tr><td class="code"><pre><span class="line">/usr/bin/tightvncserver :1</span><br></pre></td></tr></tbody></table></figure><p><img src="/blog/img/lubuntu1.png" loading="lazy"></p><p>修改默认端口 （如果需要自定义端口，一般默认端口即可）</p><figure class="highlight plaintext"><table><tbody><tr><td class="code"><pre><span class="line">sudo vi /usr/bin/vncserver</span><br></pre></td></tr></tbody></table></figure><p>修改218行，然后重启服务。</p><figure class="highlight plaintext"><table><tbody><tr><td class="code"><pre><span class="line">#关闭</span><br><span class="line">tightvncserver -kill :1</span><br><span class="line">#启动</span><br><span class="line">tightvncserver :1</span><br></pre></td></tr></tbody></table></figure><p><img src="/blog/img/lubuntu2.png" loading="lazy"></p><p>参考：</p><p><a href="https://www.guyuehome.com/35878">https://www.guyuehome.com/35878</a></p><p><a href="https://homecircuits.eu/blog/lubuntu-installing-vnc-server/">https://homecircuits.eu/blog/lubuntu-installing-vnc-server/</a></p>]]></content>
    
    
    <summary type="html">&lt;h2 id=&quot;lubuntu配置-VNC&quot;&gt;&lt;a href=&quot;#lubuntu配置-VNC&quot; class=&quot;headerlink&quot; title=&quot;lubuntu配置 VNC&quot;&gt;&lt;/a&gt;lubuntu配置 VNC&lt;/h2&gt;&lt;blockquote&gt;
&lt;/blockquote&gt;
&lt;p&gt;环境：mac , lubuntu&lt;/p&gt;
&lt;h1 id=&quot;1-安装vnc服务&quot;&gt;&lt;a href=&quot;#1-安装vnc服务&quot; class=&quot;headerlink&quot; title=&quot;1.安装vnc服务&quot;&gt;&lt;/a&gt;1.安装vnc服务&lt;/h1&gt;&lt;ul&gt;
&lt;li&gt;cyberdog开机,进入其命令行&lt;/li&gt;
&lt;/ul&gt;
&lt;figure class=&quot;highlight plaintext&quot;&gt;&lt;table&gt;&lt;tbody&gt;&lt;tr&gt;&lt;td class=&quot;code&quot;&gt;&lt;pre&gt;&lt;span class=&quot;line&quot;&gt;ssh 192.168.2.180 -l mi&lt;/span&gt;&lt;br&gt;&lt;/pre&gt;&lt;/td&gt;&lt;/tr&gt;&lt;/tbody&gt;&lt;/table&gt;&lt;/figure&gt;

&lt;ul&gt;
&lt;li&gt;安装tightvncserver&lt;/li&gt;
&lt;/ul&gt;</summary>


    <category term="vnc" scheme="https://jerryliu.site/blog/tags/vnc/"/>
    
  </entry>
  
  <entry>
    <title>Superset二次开发-接入SSO</title>
    <link href="https://jerryliu.site/blog/posts/83ee6eb4/"/>
    <id>https://jerryliu.site/blog/posts/83ee6eb4/</id>
    <published>2020-07-12T04:00:00.000Z</published>
    <updated>2026-09-09T15:33:29.174Z</updated>
    
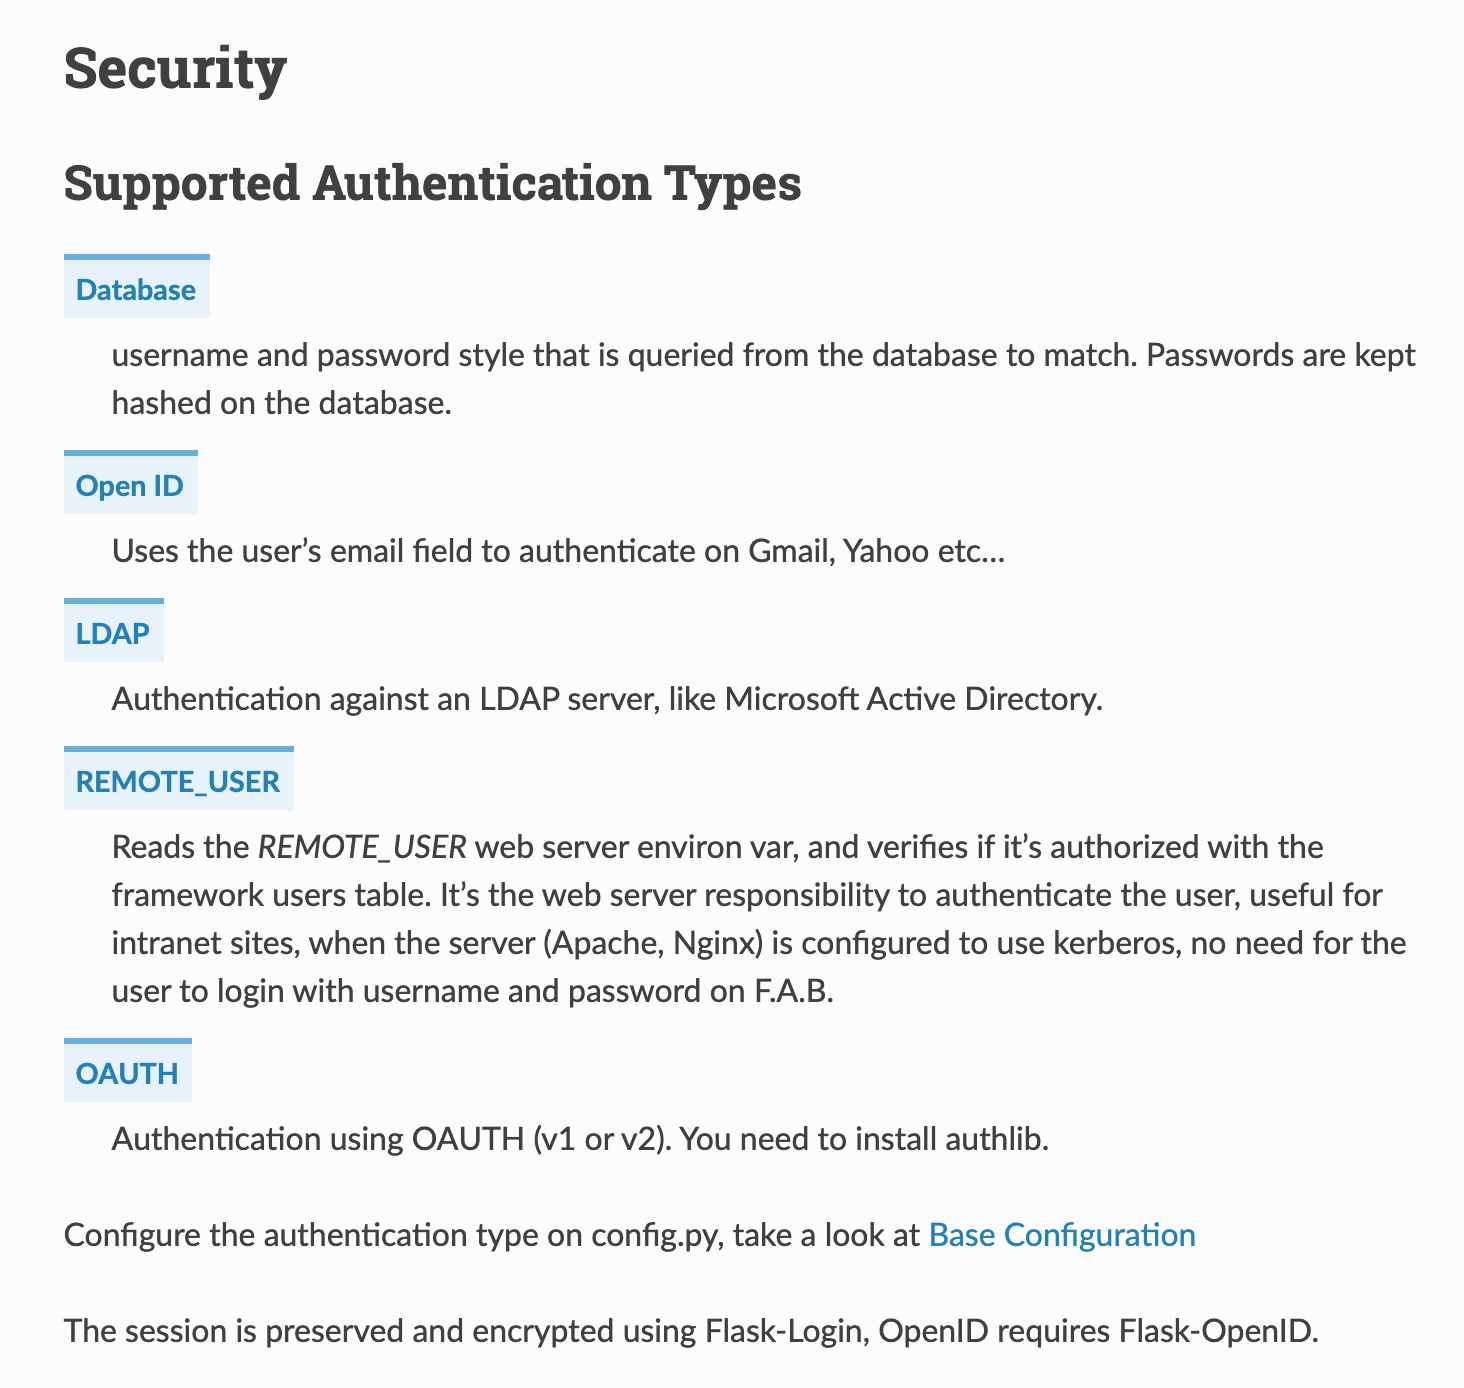
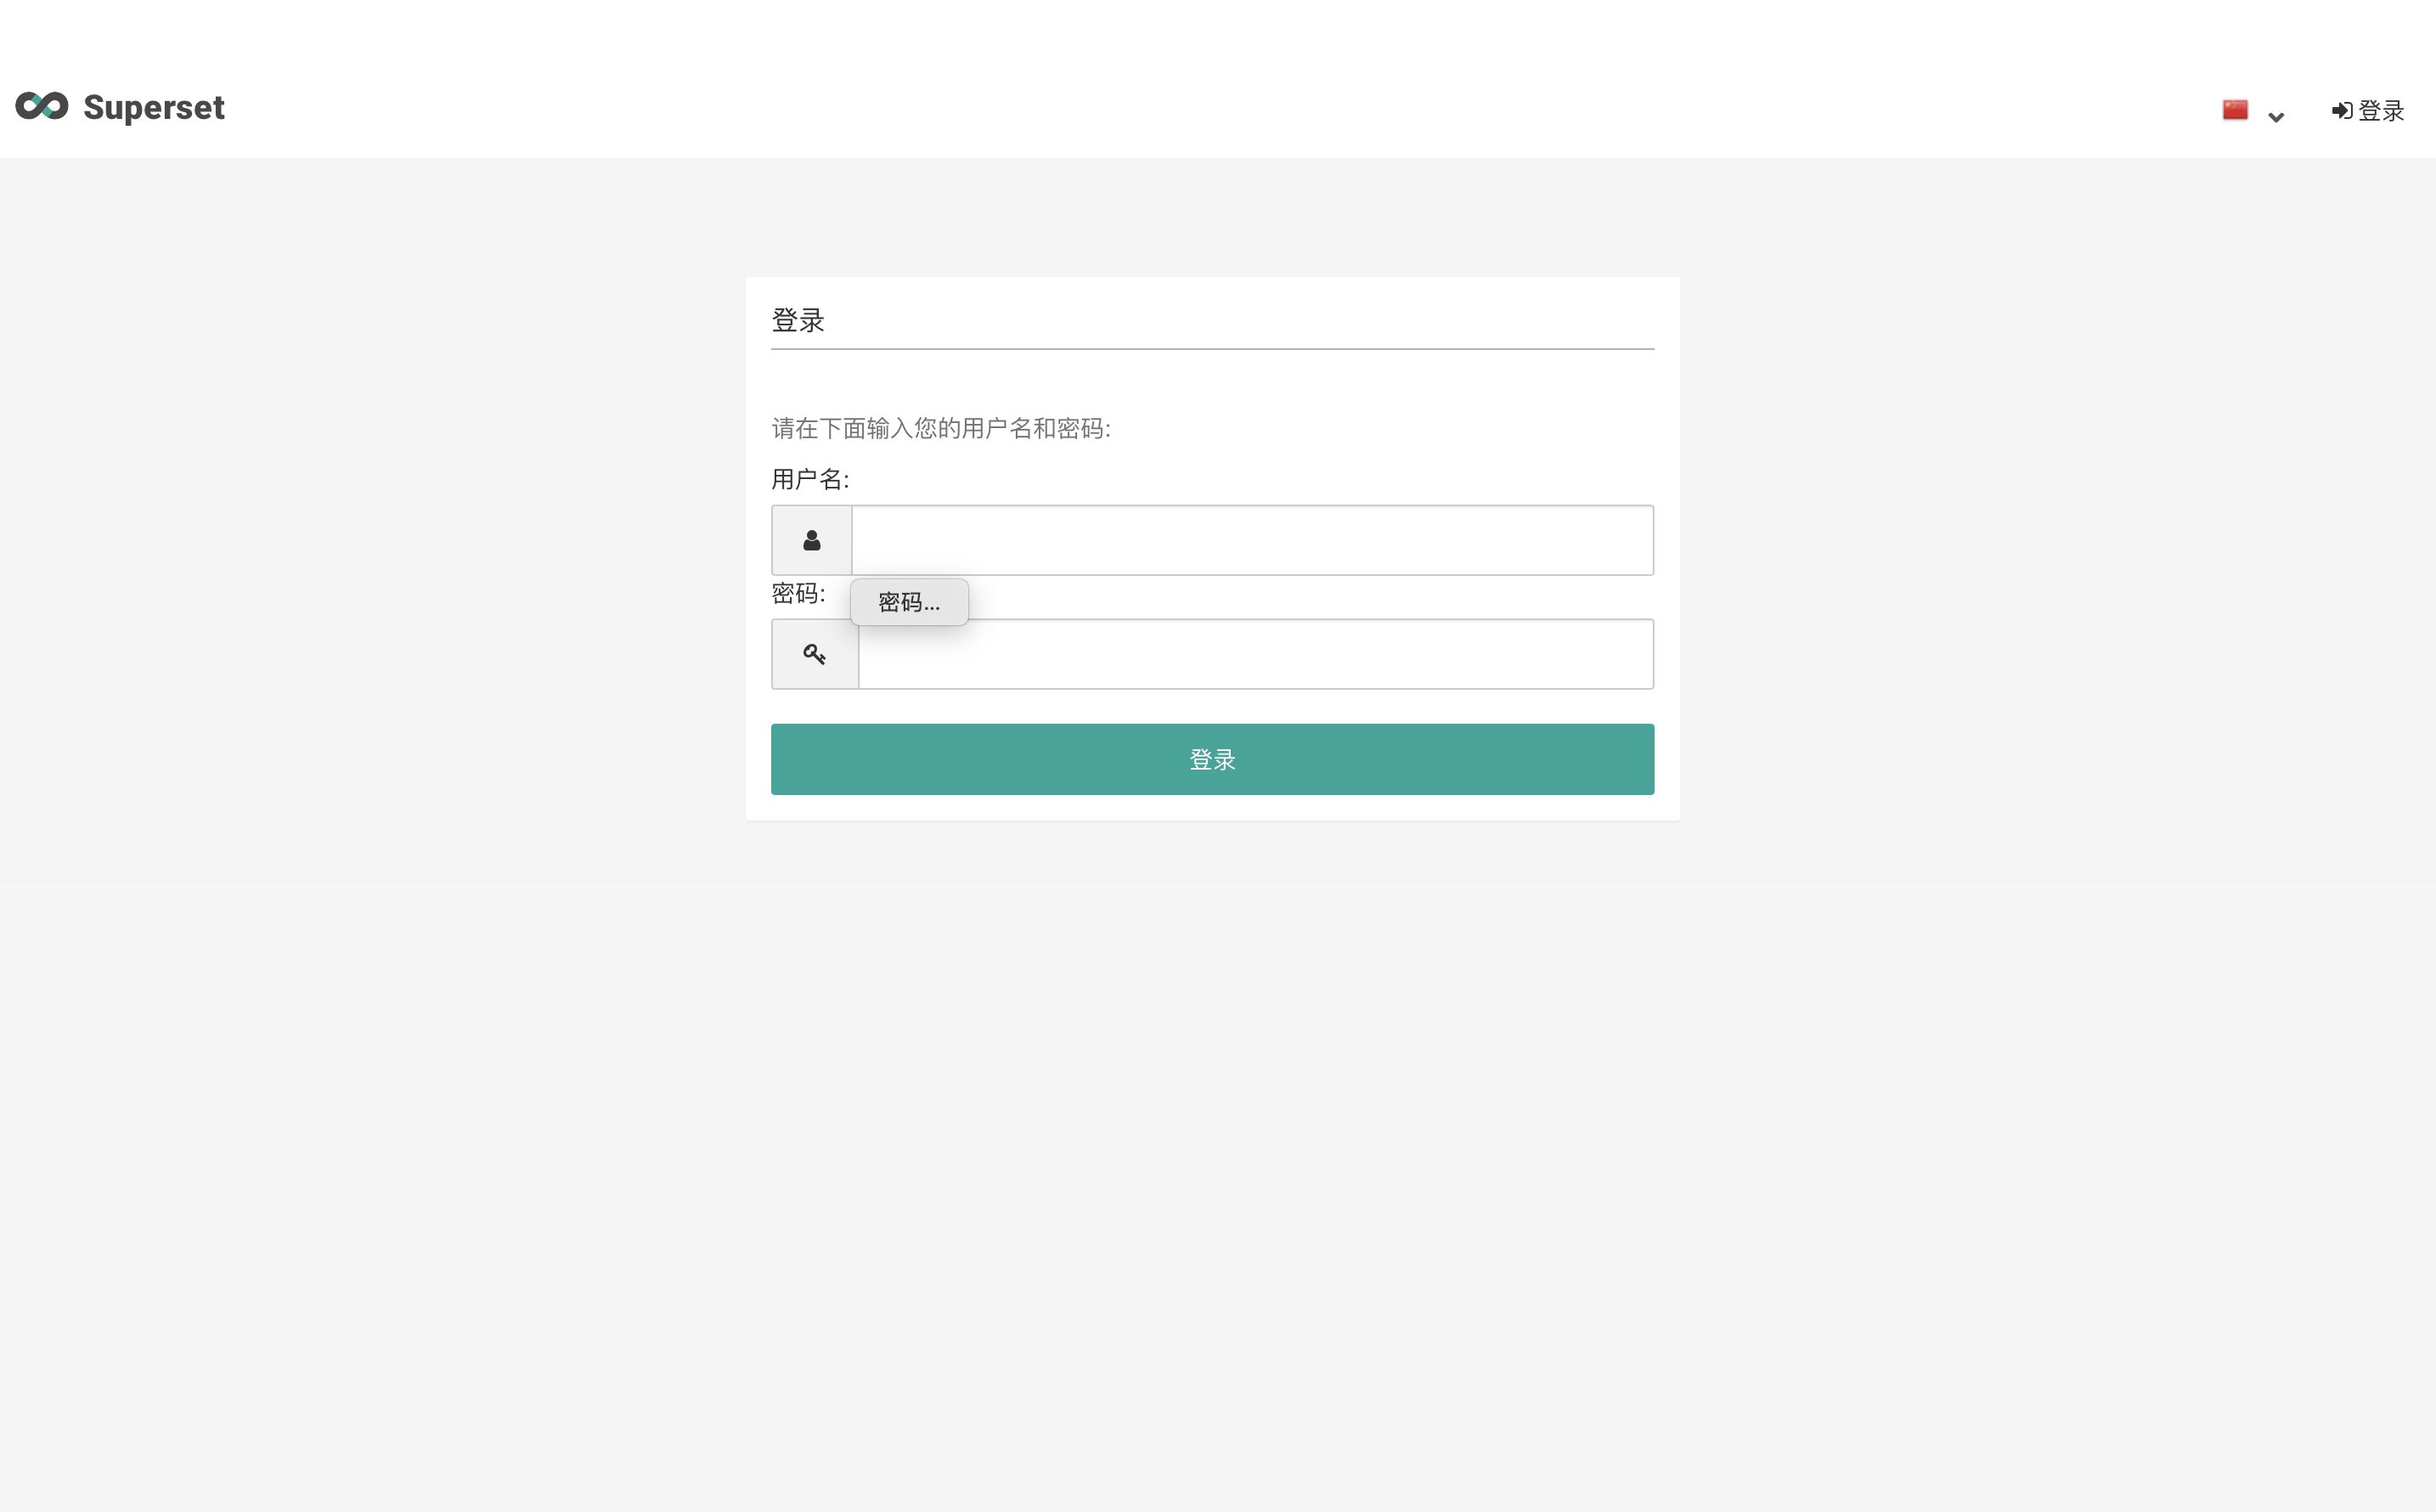
    <content type="html"><![CDATA[<blockquote></blockquote><p>为了统一和安全考虑，将superset接入公司账号系统，使用员工现有邮箱和密码作为登录方式<br>env:superset 0.36.0</p><p><img src="/blog/img/superset13.png" loading="lazy"></p><p>Superset使用FAB（Flask-Appbuilder）实现了用户权限功能，登录认证框架。</p><span id="more"></span><p>FAB支持以下几种认证方式：</p><p><img src="/blog/img/superset_sso1.png" loading="lazy"></p><p>这里使用的是REMOTE_USER方式，通过调用remote server api,从remote web server获取用户的认证信息，也就是公司的登录系统，认证通过则将用户信息保存到db中，只要验证用户的session没有过期，就可以直接访问网站。授权验证通过后，通过appbuilder.sm.add_user，将用户添加到superset用户库中，后面进行该用户的应用内权限管理。</p><h3 id="1-首先是配置"><a href="#1-首先是配置" class="headerlink" title="1.首先是配置"></a>1.首先是配置</h3><p>通过阅读superset/config.py中的代码, 如果需要自行修改配置, 创建superset_config.py文件。</p><p>在superset 创建自定义配置文件 superset_config.py</p><p>添加以下内容，替换默认CUSTOM_SECURITY_MANAGER中使用的SecurityManager. 然后写一个CustomSecurityManager类去继承SecurityManager,</p><figure class="highlight plaintext"><table><tbody><tr><td class="code"><pre><span class="line">from superset.custom_security import CustomSecurityManager</span><br><span class="line">CUSTOM_SECURITY_MANAGER = CustomSecurityManager</span><br></pre></td></tr></tbody></table></figure><h3 id="2-修改登录页"><a href="#2-修改登录页" class="headerlink" title="2.修改登录页"></a>2.修改登录页</h3><p>/root/incubator-superset/superset/templates/appbuilder/navbar_right.html</p><p>主要是为了修改登录和登出按钮的连接跳转。</p><p>修改为以下内容：<br>将110行注释，替换<br>将125行注释替换，添加124行</p><figure class="highlight plaintext"><table><tbody><tr><td class="code"><pre><span class="line">109             &lt;li&gt;&lt;a href="{{appbuilder.get_url_for_userinfo}}"&gt;&lt;span class="fa fa-fw fa-user"&gt;&lt;/span&gt;{{_("Profile")}}&lt;/a&gt;&lt;/li&gt;</span><br><span class="line">110             &lt;li&gt;&lt;a href="/sso/logout"&gt;&lt;span class="fa fa-fw fa-sign-out"&gt;&lt;/span&gt;{{_("Logout")}}&lt;/a&gt;&lt;/li&gt;</span><br><span class="line">111             &lt;!--&lt;li&gt;&lt;a href="{{appbuilder.get_url_for_logout}}"&gt;&lt;span class="fa fa-fw fa-sign-out"&gt;&lt;/span&gt;{{_("Logout")}}&lt;/a&gt;&lt;/li&gt;--&gt;</span><br><span class="line">123 {% else %}</span><br><span class="line">124     &lt;li&gt;&lt;a href="/sso/login"&gt;</span><br><span class="line">125     &lt;!--&lt;li&gt;&lt;a href="{{appbuilder.get_url_for_login}}"&gt;--&gt;</span><br><span class="line">126     &lt;i class="fa fa-fw fa-sign-in"&gt;&lt;/i&gt;SSO_{{_("Login")}}&lt;/a&gt;&lt;/li&gt;</span><br><span class="line">127 {% endif %}</span><br></pre></td></tr></tbody></table></figure><h3 id="3-自定义方法继承SecurityManager"><a href="#3-自定义方法继承SecurityManager" class="headerlink" title="3.自定义方法继承SecurityManager"></a>3.自定义方法继承SecurityManager</h3><p>写一个custom_security.py类去继承SecurityManager, 重写一些view自定义登录效果。</p><p>在superset目录新建custom_security.py脚本。</p><ul><li>每次将请求中的ticket，向remote server进行验证，如果有效，直接登录成功，否则重新登录sso进行授权。成功授权后判断用户是否已经出现在superset用户库中，如果没有添加该用户，指定账户名为用户名，密码默认为用户名。</li></ul><figure class="highlight plaintext"><table><tbody><tr><td class="code"><pre><span class="line">from flask import redirect, g, flash, request</span><br><span class="line">from flask_appbuilder.security.views import UserDBModelView,AuthDBView</span><br><span class="line">from superset.security import SupersetSecurityManager</span><br><span class="line">from flask_appbuilder.security.views import expose</span><br><span class="line">from flask_appbuilder.security.manager import BaseSecurityManager</span><br><span class="line">from flask_login import login_user, logout_user</span><br><span class="line">import requests</span><br><span class="line">import superset_config</span><br><span class="line">class CustomAuthDBView(AuthDBView):</span><br><span class="line">    @expose('/sso/login/', methods=['GET'])</span><br><span class="line">    def sso_login(self):</span><br><span class="line">        print("------------ login", request.args)</span><br><span class="line">        if request.args.get('ticket') is not None:</span><br><span class="line">            r = requests.get(**login_url**, verify=False)</span><br><span class="line">            print("------------ validate", r.json()['username'])</span><br><span class="line">            username = r.json()['username']</span><br><span class="line">            user = self.appbuilder.sm.find_user(username=username)</span><br><span class="line">            if user is not None:</span><br><span class="line">                print("------------ find user", user)</span><br><span class="line">                login_user(user, remember=False)</span><br><span class="line">                return redirect(self.appbuilder.get_url_for_index)</span><br><span class="line">            else:</span><br><span class="line">                user = self.appbuilder.sm.add_user(</span><br><span class="line">                    username=username,</span><br><span class="line">                    first_name=username.split('.')[0],</span><br><span class="line">                    last_name=username.split('.')[1],</span><br><span class="line">                    password = username,</span><br><span class="line">                    email=username,</span><br><span class="line">                    role=self.appbuilder.sm.find_role(self.appbuilder.sm.auth_user_registration_role))</span><br><span class="line">                print("------------ new user", user)</span><br><span class="line">                login_user(user, remember=False)</span><br><span class="line">                return redirect(self.appbuilder.get_url_for_index)</span><br><span class="line">        else:</span><br><span class="line">            return redirect(***login_url***)</span><br><span class="line">    @expose('/sso/logout/', methods=['GET'])</span><br><span class="line">    def sso_logout(self):</span><br><span class="line">        print("------------ logout", logout_url)</span><br><span class="line">        return redirect(**logout_url**)</span><br><span class="line">class CustomSecurityManager(SupersetSecurityManager):</span><br><span class="line">    authdbview = CustomAuthDBView</span><br><span class="line">    def __init__(self, appbuilder):</span><br><span class="line">        super(CustomSecurityManager, self).__init__(appbuilder)</span><br></pre></td></tr></tbody></table></figure><p>刷新superset,查看登录页面右上角登录按钮。</p><p>参考 ：</p><ul><li><a href="https://juejin.im/post/5adff757518825673446b2e1">https://juejin.im/post/5adff757518825673446b2e1</a></li></ul>]]></content>
    
    
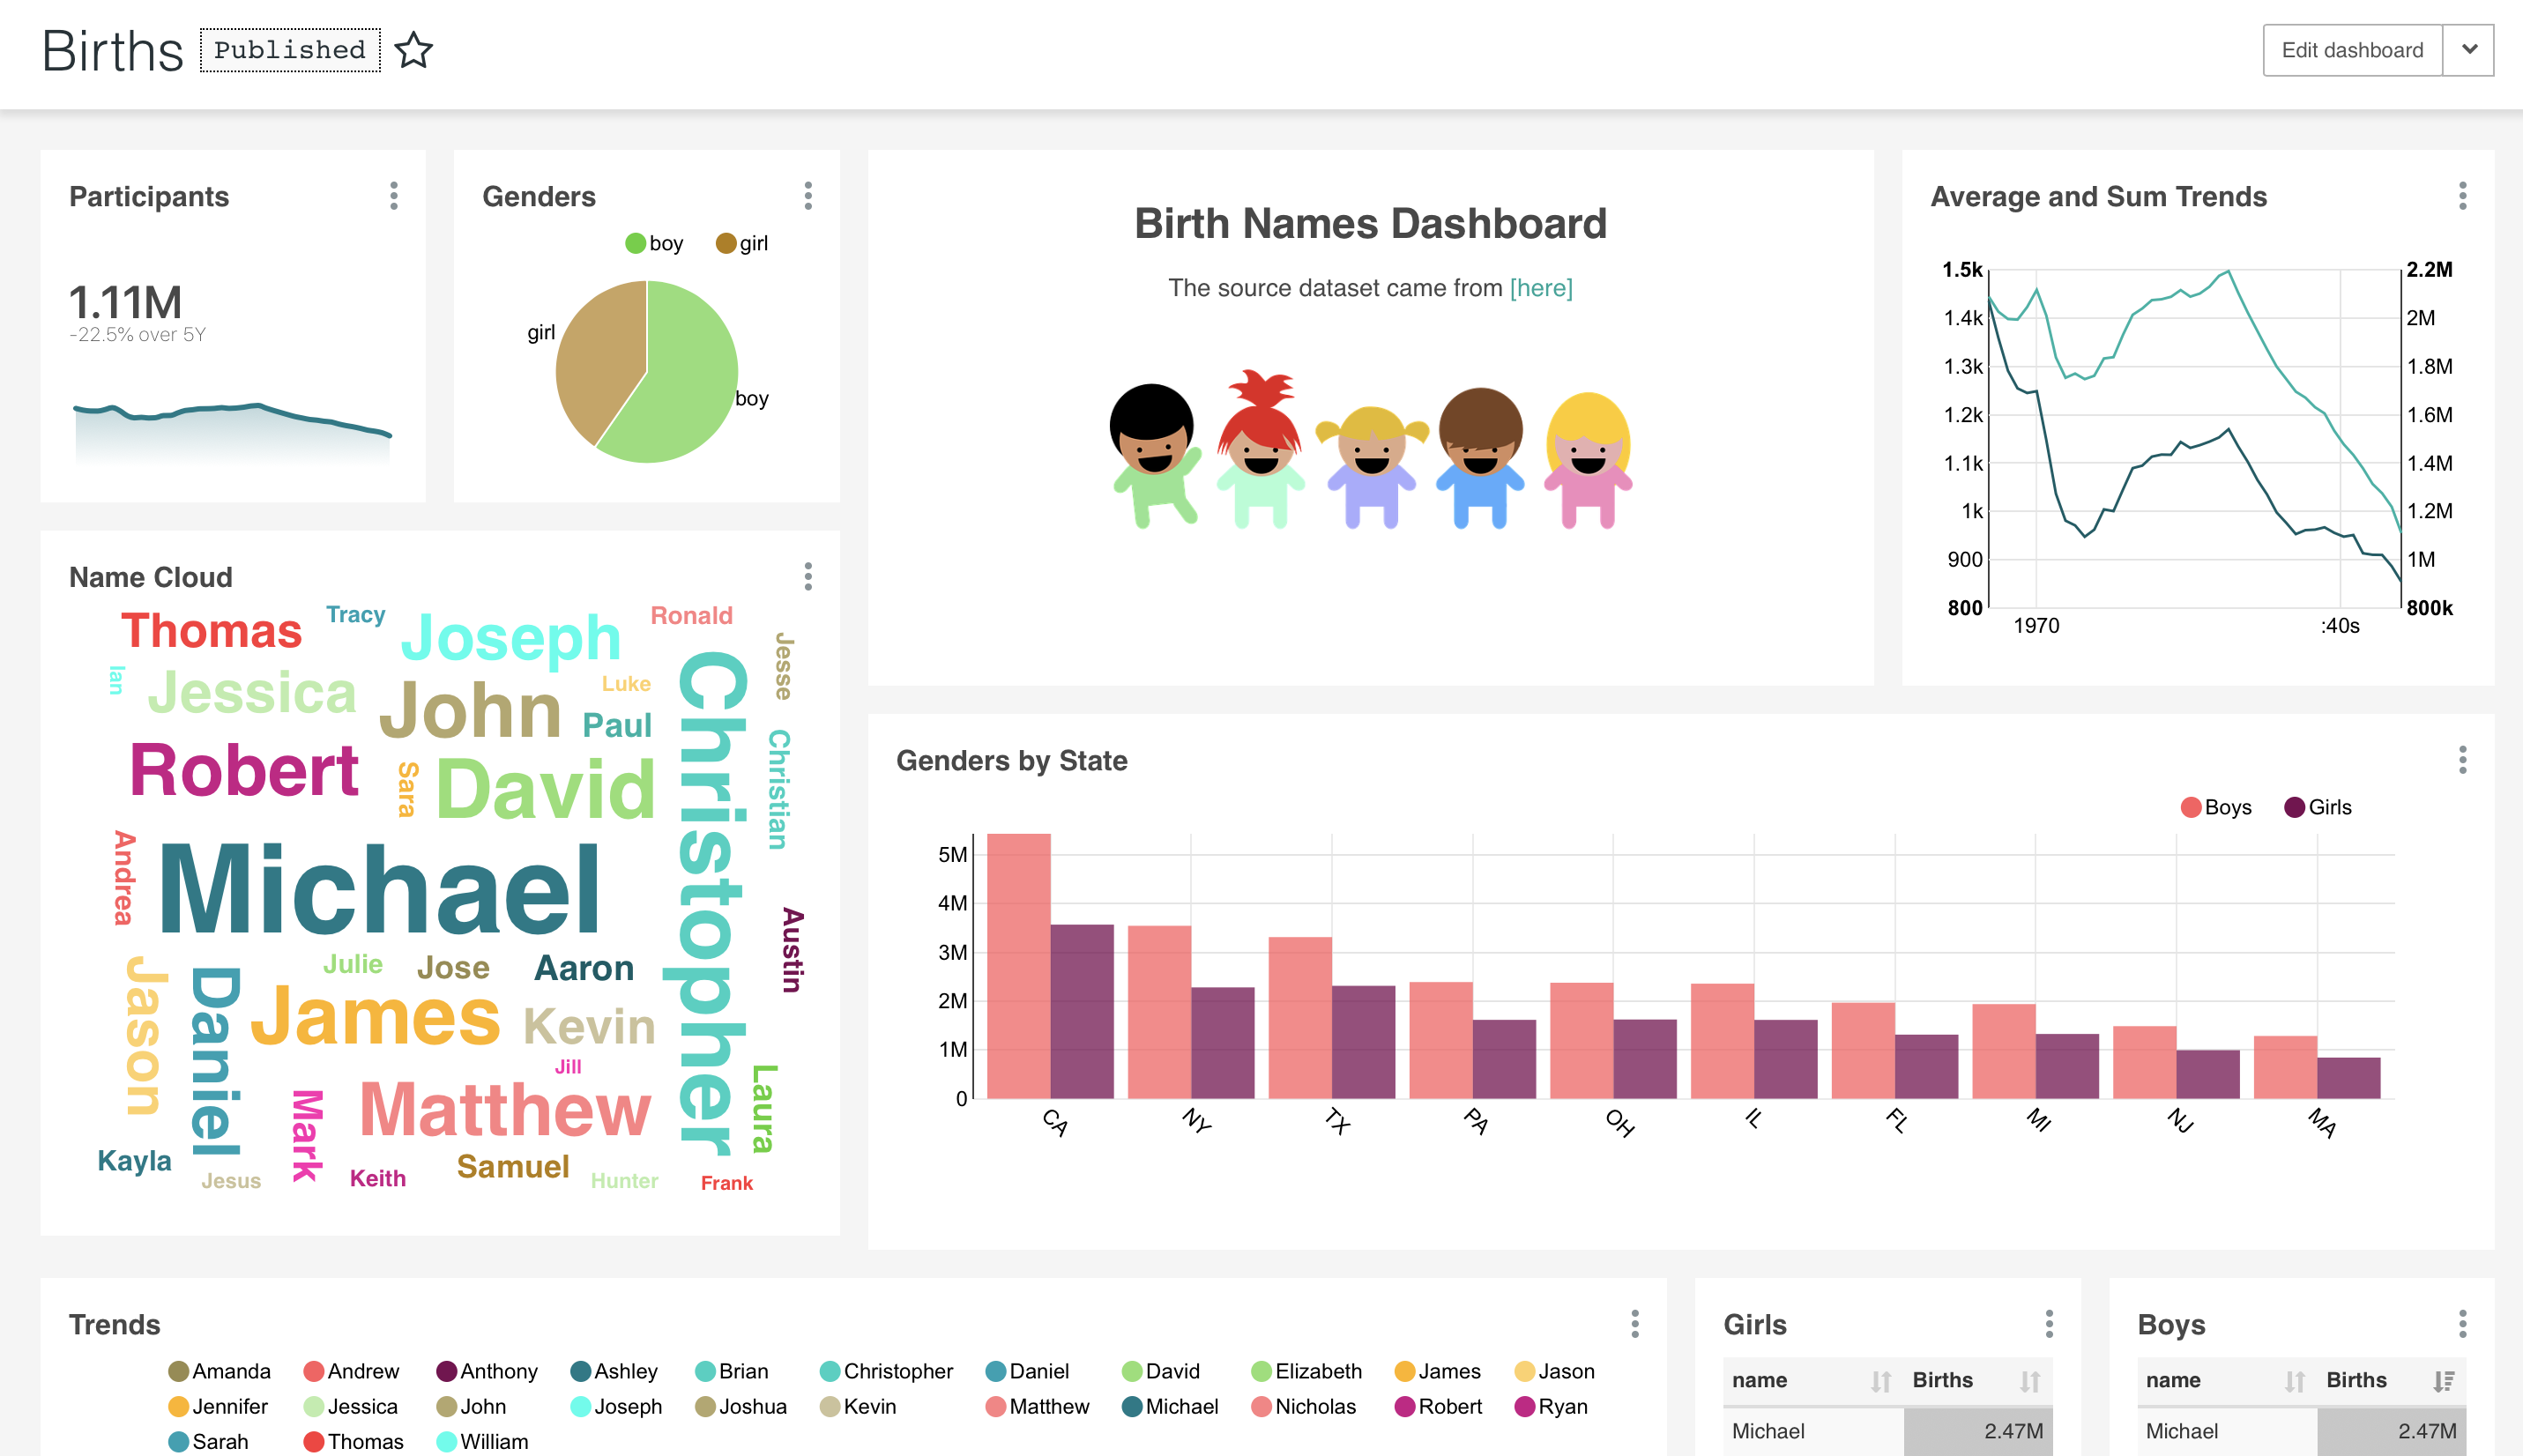
    <summary type="html">&lt;blockquote&gt;
&lt;/blockquote&gt;
&lt;p&gt;为了统一和安全考虑，将superset接入公司账号系统，使用员工现有邮箱和密码作为登录方式&lt;br&gt;env:superset 0.36.0&lt;/p&gt;
&lt;p&gt;&lt;img src=&quot;/blog/img/superset13.png&quot; loading=&quot;lazy&quot;&gt;&lt;/p&gt;
&lt;p&gt;Superset使用FAB（Flask-Appbuilder）实现了用户权限功能，登录认证框架。&lt;/p&gt;</summary>


    <category term="superset" scheme="https://jerryliu.site/blog/tags/superset/"/>
    
  </entry>
  
  <entry>
    <title>Superset性能优化</title>
    <link href="https://jerryliu.site/blog/posts/c7a184e9/"/>
    <id>https://jerryliu.site/blog/posts/c7a184e9/</id>
    <published>2020-06-30T04:00:00.000Z</published>
    <updated>2026-09-09T15:33:29.174Z</updated>
    
    <content type="html"><![CDATA[<p><img src="/blog/img/superset13.png" loading="lazy"></p><p>从以下几个点出发</p><h3 id="1-修改缓存方式为redis"><a href="#1-修改缓存方式为redis" class="headerlink" title="1. 修改缓存方式为redis"></a>1. 修改缓存方式为redis</h3><p>安装Redis <code>pip install redis</code></p><p>修改配置文件<code>incubator-superset/superset/config.py</code>中CACHE_CONFIG为以下内容,设置24小时过期</p><span id="more"></span><figure class="highlight plaintext"><table><tbody><tr><td class="code"><pre><span class="line">CACHE_CONFIG = {</span><br><span class="line">    'CACHE_TYPE': 'redis',</span><br><span class="line">    'CACHE_DEFAULT_TIMEOUT': 60 * 60 * 24, # 1 day default (in secs)</span><br><span class="line">    'CACHE_KEY_PREFIX': 'superset_results',</span><br><span class="line">    'CACHE_REDIS_URL': 'redis://localhost:6379/0',</span><br><span class="line">}</span><br></pre></td></tr></tbody></table></figure><h3 id="2-修改celery-BROKER数据库sqlite为redis"><a href="#2-修改celery-BROKER数据库sqlite为redis" class="headerlink" title="2. 修改celery BROKER数据库sqlite为redis"></a>2. 修改celery BROKER数据库sqlite为redis</h3><p>配置文件：/root/incubator-superset/superset/config.py<br>修改以下内容：</p><figure class="highlight plaintext"><table><tbody><tr><td class="code"><pre><span class="line">BROKER_URL = 'redis://localhost:6379/0'</span><br><span class="line">CELERY_RESULT_BACKEND = 'redis://localhost:6379/0'</span><br><span class="line">CELERY_ACKS_LATE = True</span><br><span class="line">#关闭utc时区，添加上海时区</span><br><span class="line">CELERY_ENABLE_UTC = False</span><br><span class="line">CELERY_TIMEZONE = 'Asia/Shanghai'</span><br></pre></td></tr></tbody></table></figure><p>完整内容：</p><figure class="highlight plaintext"><table><tbody><tr><td class="code"><pre><span class="line">class CeleryConfig(object):</span><br><span class="line">    BROKER_URL = 'redis://localhost:6379/0'</span><br><span class="line">    CELERY_IMPORTS = (</span><br><span class="line">        'superset.sql_lab',</span><br><span class="line">        'superset.tasks',</span><br><span class="line">    )</span><br><span class="line">    CELERY_RESULT_BACKEND = 'redis://localhost:6379/0'</span><br><span class="line">    CELERYD_LOG_LEVEL = 'DEBUG'</span><br><span class="line">    CELERYD_PREFETCH_MULTIPLIER = 10</span><br><span class="line">    CELERY_ACKS_LATE = True</span><br><span class="line">    CELERY_ENABLE_UTC = False</span><br><span class="line">    CELERY_TIMEZONE = 'Asia/Shanghai'</span><br><span class="line">    CELERY_ANNOTATIONS = {</span><br><span class="line">        'sql_lab.get_sql_results': {</span><br><span class="line">            'rate_limit': '100/s',</span><br><span class="line">        },</span><br><span class="line">        'email_reports.send': {</span><br><span class="line">            'rate_limit': '1/s',</span><br><span class="line">            'time_limit': 120,</span><br><span class="line">            'soft_time_limit': 150,</span><br><span class="line">            'ignore_result': True,</span><br><span class="line">        },</span><br><span class="line">    }</span><br><span class="line">    CELERYBEAT_SCHEDULE = {</span><br><span class="line">        'cache-warmup-hourly': {</span><br><span class="line">            'task': 'cache-warmup',</span><br><span class="line">            'schedule': crontab(minute=0,hour='*/2'),  # hourly</span><br><span class="line">            'kwargs': {</span><br><span class="line">                'strategy_name': 'top_n_dashboards',</span><br><span class="line">                'top_n': 10,</span><br><span class="line">                'since': '7 days ago',</span><br><span class="line">            },</span><br><span class="line">        },</span><br><span class="line">    }</span><br><span class="line"></span><br><span class="line">CELERY_CONFIG = CeleryConfig</span><br></pre></td></tr></tbody></table></figure><h3 id="3-使用warmup指定预热数据策略。提前对画板进行数据缓存"><a href="#3-使用warmup指定预热数据策略。提前对画板进行数据缓存" class="headerlink" title="3. 使用warmup指定预热数据策略。提前对画板进行数据缓存."></a>3. 使用warmup指定预热数据策略。提前对画板进行数据缓存.</h3><p>1.修改配置文件：/root/incubator-superset/superset/config.py</p><p>替换CELERYBEAT_SCHEDULE为以下内容,以下策略为,每小时更新最近七天top5的dashboard的缓存数据</p><figure class="highlight plaintext"><table><tbody><tr><td class="code"><pre><span class="line">CELERYBEAT_SCHEDULE = {</span><br><span class="line">    'cache-warmup-hourly': {</span><br><span class="line">        'task': 'cache-warmup',</span><br><span class="line">        'schedule': crontab(minute=0, hour='*'),  # hourly</span><br><span class="line">        'kwargs': {</span><br><span class="line">            'strategy_name': 'top_n_dashboards',</span><br><span class="line">            'top_n': 5,</span><br><span class="line">            'since': '7 days ago',</span><br><span class="line">        },</span><br><span class="line">    },</span><br><span class="line">}</span><br></pre></td></tr></tbody></table></figure><p>2.修改配置文件中默认访问地址和端口，后台会通过地址，进行缓存数据，修改为和命令行启动端口一致。</p><p>配置文件：<code>/root/incubator-superset/superset/config.py</code></p><figure class="highlight plaintext"><table><tbody><tr><td class="code"><pre><span class="line">SUPERSET_WEBSERVER_ADDRESS = '0.0.0.0'</span><br><span class="line">SUPERSET_WEBSERVER_PORT = 7668</span><br></pre></td></tr></tbody></table></figure><p>这里需要注意，0.35 ADDRESS 为0.0.0.0时会报错。需要添加前缀 <a href="http://0.0.0.0/">http://0.0.0.0</a></p><p>官方bug：<a href="https://github.com/apache/incubator-superset/issues/8461">https://github.com/apache/incubator-superset/issues/8461</a></p><p>然后命令启动celery：启动work，-c 并发的work数</p><p><code>celery worker --app=superset.tasks.celery_app:app  --broker=redis://localhost:6379/0  --pool=prefork -O fair -c 4</code></p><p>启动定时调度：</p><p><code>celery beat --app=superset.tasks.celery_app:app</code></p><p>任务监控celery,ui(可选择安装)</p><p>安装：<code>pip install flower</code></p><p>启动：<code>celery flower --port=7788 --broker=redis://localhost:6379/0</code></p><h3 id="4-缓存的配置行数，将数据调大。"><a href="#4-缓存的配置行数，将数据调大。" class="headerlink" title="4. 缓存的配置行数，将数据调大。"></a>4. 缓存的配置行数，将数据调大。</h3><p>需改配置文件：</p><p><code>env_superset/lib/python3.7/site-packages/flask_caching/__init__.py</code></p><p>修改行：</p><p><code>config.setdefault("CACHE_THRESHOLD", 50000)</code></p><h3 id="5-不同链接方式查询时间或许有差异。"><a href="#5-不同链接方式查询时间或许有差异。" class="headerlink" title="5. 不同链接方式查询时间或许有差异。"></a>5. 不同链接方式查询时间或许有差异。</h3><p>经过测试superset 连接AWS Athena  athena+rest比jdbc会稍慢。</p><p>且查询大部分时间是消耗在了数据返回到前台展示的时间，理解是解析耗时。</p><p>查看官方支持的连接方式，<a href="http://superset.apache.org/installation.html#database-dependencies">http://superset.apache.org/installation.html#database-dependencies</a>，对比查询用时。</p><h3 id="6-Gunicorn协程启动，"><a href="#6-Gunicorn协程启动，" class="headerlink" title="6. Gunicorn协程启动，"></a>6. Gunicorn协程启动，</h3><p>生产环境不要使用superset run的启动方式，Gunicorn协程启动，参考官网 <a href="http://superset.apache.org/installation.html#a-proper-wsgi-http-server">a-proper-wsgi-http-server</a></p><p>安装gunicorn和gevent</p><p><code>pip install gunicorn</code></p><p><code>pip install gevent</code></p><ul><li>这里需要注意版本问题，superset0.30需要 gunicorn&lt;19.9.0,但gunicorn由于向后不兼容的更改，Gunicorn在Python 3.7上中断，19.9.0才修复了该问题。</li></ul><p>如果启动superset报错<code>from gunicorn.workers.async import AsyncWorker</code>，升级gunicorn和superset：</p><figure class="highlight plaintext"><table><tbody><tr><td class="code"><pre><span class="line">[Traceback (most recent call last):</span><br><span class="line">  File "/usr/local/lib/python3.7/site-packages/gunicorn/util.py", line 135, in load_class</span><br><span class="line">    mod = import_module('.'.join(components))</span><br><span class="line">  File "/usr/local/lib/python3.7/importlib/__init__.py", line 127, in import_module</span><br><span class="line">    return _bootstrap._gcd_import(name[level:], package, level)</span><br><span class="line">  File "&lt;frozen importlib._bootstrap&gt;", line 1006, in _gcd_import</span><br><span class="line">  File "&lt;frozen importlib._bootstrap&gt;", line 983, in _find_and_load</span><br><span class="line">  File "&lt;frozen importlib._bootstrap&gt;", line 967, in _find_and_load_unlocked</span><br><span class="line">   File "&lt;frozen importlib._bootstrap&gt;", line 677, in _load_unlocked</span><br><span class="line">  File "&lt;frozen importlib._bootstrap_external&gt;", line 724, in exec_module</span><br><span class="line">  File "&lt;frozen importlib._bootstrap_external&gt;", line 860, in get_code</span><br><span class="line">  File "&lt;frozen importlib._bootstrap_external&gt;", line 791, in source_to_code</span><br><span class="line">  File "&lt;frozen importlib._bootstrap&gt;", line 219, in _call_with_frames_removed</span><br><span class="line">  File "/usr/local/lib/python3.7/site-packages/gunicorn/workers/geventlet.py", line 27</span><br><span class="line">    from gunicorn.workers.async import AsyncWorker</span><br><span class="line">                              ^</span><br><span class="line">SyntaxError: invalid syntax</span><br><span class="line">]</span><br></pre></td></tr></tbody></table></figure><p>错误参考：</p><p><a href="https://github.com/apache/incubator-superset/issues/8349">https://github.com/apache/incubator-superset/issues/8349</a><br><a href="https://github.com/benoitc/gunicorn/issues/1822">https://github.com/benoitc/gunicorn/issues/1822</a></p><p>启动命令：</p><ul><li>注意：在不加-D执行下才会输出superset程序日志。</li></ul><figure class="highlight plaintext"><table><tbody><tr><td class="code"><pre><span class="line">#-D 后台执行</span><br><span class="line">#-w 启动进程数</span><br><span class="line">#--log-level debug 日志级别</span><br><span class="line">#--access-logfile /tmp/superset_access.log 指定access请求日志路径</span><br><span class="line">#--error-logfile /tmp/superset_error.log 指定请求错误日志路径</span><br><span class="line"></span><br><span class="line">前台启动：</span><br><span class="line">gunicorn  -w 10 -k gevent --timeout 120 -b 0.0.0.0:7668 --limit-request-line 0 --limit-request-field_size 0 "superset.app:create_app()"</span><br><span class="line"></span><br><span class="line">后台执行：</span><br><span class="line">superset 0.35.0</span><br><span class="line">gunicorn \</span><br><span class="line">    -w 10 \</span><br><span class="line">    --timeout 120 \</span><br><span class="line">    -b 0.0.0.0:7668 \</span><br><span class="line">    --limit-request-line 0 \</span><br><span class="line">    --limit-request-field_size 0 \</span><br><span class="line">    --forwarded-allow-ips=*</span><br><span class="line">    --log-level debug</span><br><span class="line">    --access-logfile /tmp/superset_access.log</span><br><span class="line">    --error-logfile /tmp/superset_error.log</span><br><span class="line">    superset:app -D</span><br><span class="line"></span><br><span class="line">superset 0.36.0</span><br><span class="line">gunicorn \</span><br><span class="line">    -w 10 \</span><br><span class="line">    --timeout 120 \</span><br><span class="line">    -b 0.0.0.0:7668 \</span><br><span class="line">    --limit-request-line 0 \</span><br><span class="line">    --limit-request-field_size 0 \</span><br><span class="line">    --forwarded-allow-ips=*</span><br><span class="line">    --log-level debug</span><br><span class="line">    --access-logfile /tmp/superset_access.log</span><br><span class="line">    --error-logfile /tmp/superset_error.log</span><br><span class="line">    "superset.app:create_app()" -D</span><br></pre></td></tr></tbody></table></figure><p>停止命令：kill <code>ps aux | grep  "gunicorn" | grep -v 'grep' |  awk '{print $2}'</code></p>]]></content>
    
    
    <summary type="html">&lt;p&gt;&lt;img src=&quot;/blog/img/superset13.png&quot; loading=&quot;lazy&quot;&gt;&lt;/p&gt;
&lt;p&gt;从以下几个点出发&lt;/p&gt;
&lt;h3 id=&quot;1-修改缓存方式为redis&quot;&gt;&lt;a href=&quot;#1-修改缓存方式为redis&quot; class=&quot;headerlink&quot; title=&quot;1. 修改缓存方式为redis&quot;&gt;&lt;/a&gt;1. 修改缓存方式为redis&lt;/h3&gt;&lt;p&gt;安装Redis &lt;code&gt;pip install redis&lt;/code&gt;&lt;/p&gt;
&lt;p&gt;修改配置文件&lt;code&gt;incubator-superset/superset/config.py&lt;/code&gt;中CACHE_CONFIG为以下内容,设置24小时过期&lt;/p&gt;</summary>


    <category term="superset" scheme="https://jerryliu.site/blog/tags/superset/"/>
    
  </entry>
  
  <entry>
    <title>Github commit不统计Contribution</title>
    <link href="https://jerryliu.site/blog/posts/11efd417/"/>
    <id>https://jerryliu.site/blog/posts/11efd417/</id>
    <published>2020-06-21T04:00:00.000Z</published>
    <updated>2026-09-09T15:33:29.172Z</updated>
    
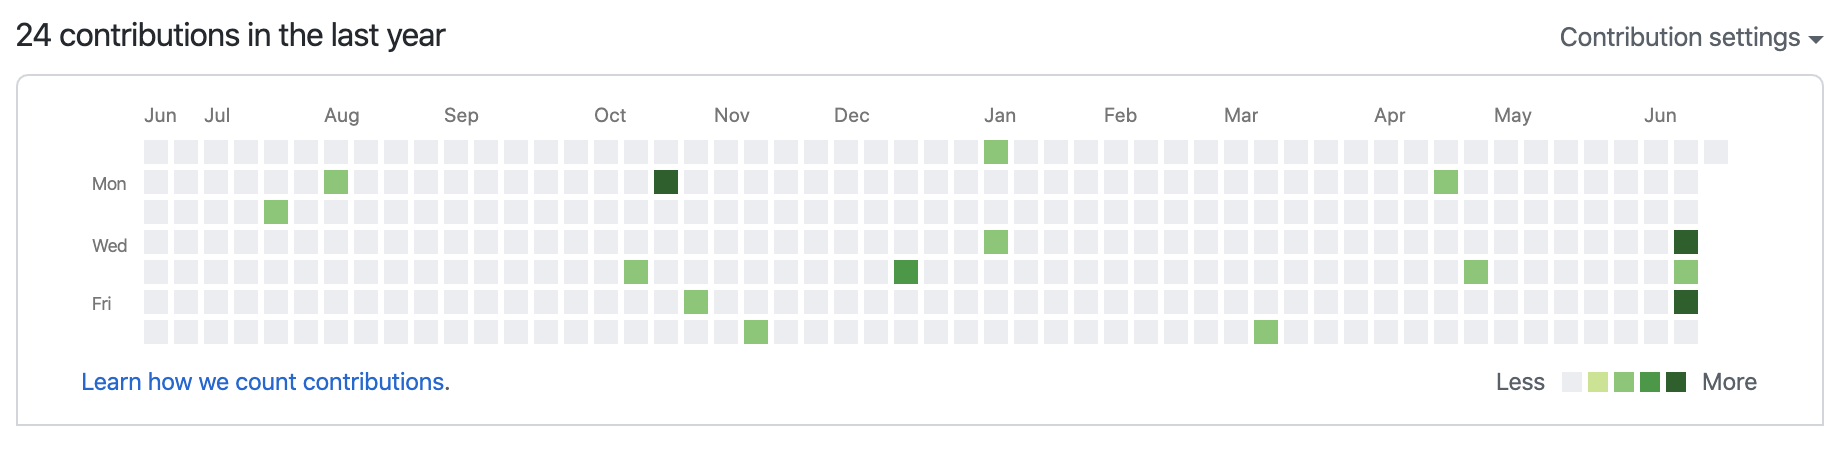
    <content type="html"><![CDATA[<p><img src="/blog/img/github2.jpeg" loading="lazy"></p><blockquote></blockquote><p>Github注册有些年头了，自微软收购GitHub 后，官方宣布了一项重大更新，免费开放私有代码库。才逐渐用的多了起来，一直都是作为个人的代码仓库，来管理整合自己的代码。但也一直有个小问题困扰，就是在提交代码后有部分并不会统计贡献值，一直也没有深入去研究这个问题，以为是因为私有库不会被统计，最近看到了关于贡献值统计的规则,才发现</p><span id="more"></span><p><strong>原因是: commit的邮箱需要跟github的邮箱一致，才会进行统计。</strong></p><p>部分<a href="https://help.github.com/en/github/setting-up-and-managing-your-github-profile/why-are-my-contributions-not-showing-up-on-my-profile">官方文档</a>说明：</p><blockquote></blockquote><p>Commits must be made with an email address that has been added to your GitHub account, or the GitHub-provided noreply email address provided to you in your email settings, in order to appear on your contributions graph. For more information about noreply email addresses, see “Setting your commit email address.”</p><p>感觉错过了好多绿格子 = _ = …..</p><p>1.首先确定github的邮箱地址。</p><p>登录github,右上角头像,setttings,emails 查看github的邮箱，这个可能会有多个。</p><p>2.确认git的邮箱</p><p><code>git config user.email</code></p><p>如果该邮箱不在github绑定的list内，更将git email换为github绑定的任意一个就可以了。</p><p>修改git email命令:</p><p><code>git config --global user.email "me@jerryliu.site"</code></p><p>然后再次提交代码，贡献值就会出现在Contributions Calendar。</p><p>Nice!</p><p><img src="/blog/img/github1.png" loading="lazy"></p><p>See you next time!</p>]]></content>
    
    
    <summary type="html">&lt;p&gt;&lt;img src=&quot;/blog/img/github2.jpeg&quot; loading=&quot;lazy&quot;&gt;&lt;/p&gt;
&lt;blockquote&gt;
&lt;/blockquote&gt;
&lt;p&gt;Github注册有些年头了，自微软收购GitHub 后，官方宣布了一项重大更新，免费开放私有代码库。才逐渐用的多了起来，一直都是作为个人的代码仓库，来管理整合自己的代码。但也一直有个小问题困扰，就是在提交代码后有部分并不会统计贡献值，一直也没有深入去研究这个问题，以为是因为私有库不会被统计，最近看到了关于贡献值统计的规则,才发现&lt;/p&gt;</summary>


  </entry>
  
  <entry>
    <title>Druid添加扩展S3数据源</title>
    <link href="https://jerryliu.site/blog/posts/19869521/"/>
    <id>https://jerryliu.site/blog/posts/19869521/</id>
    <published>2020-04-05T04:00:00.000Z</published>
    <updated>2026-09-09T15:39:33.886Z</updated>
    
    <content type="html"><![CDATA[<p><img src="/blog/img/druid.png" loading="lazy"></p><blockquote></blockquote><p>最近接触aws比较多，然后研究了下实时数仓druid/kylin的部分，数据是存在s3桶中，driud连接s3的文章介绍不多，只有官方有一点点介绍，不详细，这里记录下。druid的扩展很多，有一部分是官方维护，一部分是社区维护，也可以自己定制自己的扩展<br>具体的列表见：<a href="https://druid.apache.org/docs/latest/development/extensions.html">https://druid.apache.org/docs/latest/development/extensions.html</a></p><span id="more"></span><h2 id="1-首先需要在druid添加s3的扩展"><a href="#1-首先需要在druid添加s3的扩展" class="headerlink" title="1. 首先需要在druid添加s3的扩展"></a>1. 首先需要在druid添加s3的扩展</h2><ul><li></li></ul><p>根据自己的启动方式，选择该目录下的配置文件，我是用micro-quickstart模式启动的，配置文件目录如下:</p><p><code>apache-druid-0.17.0/conf/druid/single-server/micro-quickstart/_common/common.runtime.properties</code></p><ul><li></li></ul><p>在27行添加 druid-s3-extensions：</p><p><code>druid.extensions.loadList=["druid-hdfs-storage", "druid-kafka-indexing-service", "druid-datasketches","druid-s3-extensions"]</code></p><ul><li></li></ul><p>重新启动，就可以看到原来灰色的s3,已经可用。</p><p><img src="/blog/img/druid-s3.png" loading="lazy"></p><h2 id="2-设置AWS凭证"><a href="#2-设置AWS凭证" class="headerlink" title="2.设置AWS凭证"></a>2.设置AWS凭证</h2><p><img src="/blog/img/druid-s3-1.png" loading="lazy"></p><p>AWS官方推荐使用设置凭证方式.第一种也很方便,直接在driud的<br><code>apache-druid-0.17.0/conf/druid/single-server/micro-quickstart/_common/common.runtime.properties</code> 配置文件中有相应的注释打开设置key即可。</p><p>添加默认的aws配置文件到机器</p><p>默认凭证配置文件–通常位于&nbsp;<code>~/.aws/credentials</code>（此位置可能因平台而异），此凭证文件由多个 AWS 开发工具包和 AWS CLI 共享。AWS SDK for Java使用&nbsp;ProfileCredentialsProvider&nbsp;加载这些凭证。</p><p>在本地系统上的 AWS 凭证配置文件中设置凭证，该配置文件位于：</p><ul><li></li></ul><p>Linux, macOS, or Unix 上的 <code>~/.aws/credentials</code></p><ul><li></li></ul><p>Windows 上的 C:\Users\USERNAME<code>\.aws\credentials</code></p><p>此文件应包含以下格式的行：</p><figure class="highlight plaintext"><table><tbody><tr><td class="code"><pre><span class="line">[default]</span><br><span class="line">aws_access_key_id = your_access_key_id</span><br><span class="line">aws_secret_access_key = your_secret_access_key</span><br></pre></td></tr></tbody></table></figure><p>用您自己的 AWS 凭证值替换值&nbsp;<code>your_access_key_id</code>&nbsp;和&nbsp;<code>your_secret_access_key</code>。</p><h2 id="3-设置AWS区域"><a href="#3-设置AWS区域" class="headerlink" title="3.设置AWS区域"></a>3.设置AWS区域</h2><p>如果未选择区域，则默认情况下将使用us-east-1。</p><p>使用设置凭证以设置默认 AWS 区域：</p><p>在本地系统上的 AWS 配置文件中设置 AWS 区域，该文件位于：</p><ul><li></li></ul><p>Linux, macOS, or Unix 上的 <code>~/.aws/config</code></p><ul><li></li></ul><p>Windows 上的 <code>C:\Users\USERNAME\.aws\config</code></p><p>此文件应包含以下格式的行：</p><figure class="highlight plaintext"><table><tbody><tr><td class="code"><pre><span class="line">[default]</span><br><span class="line">region = your_aws_region</span><br></pre></td></tr></tbody></table></figure><p>使用所需的 AWS 区域（例如“us-west-2”）替换 <code>your_aws_region</code>。</p><p>参考:<br><a href="https://druid.apache.org/docs/latest/development/extensions-core/s3.html#reading-data-from-s3">https://druid.apache.org/docs/latest/development/extensions-core/s3.html#reading-data-from-s3</a><br><a href="https://docs.aws.amazon.com/zh_cn/sdk-for-java/v1/developer-guide/setup-credentials.html">https://docs.aws.amazon.com/zh_cn/sdk-for-java/v1/developer-guide/setup-credentials.html</a></p>]]></content>
    
    
    <summary type="html">&lt;p&gt;&lt;img src=&quot;/blog/img/druid.png&quot; loading=&quot;lazy&quot;&gt;&lt;/p&gt;
&lt;blockquote&gt;
&lt;/blockquote&gt;
&lt;p&gt;最近接触aws比较多，然后研究了下实时数仓druid/kylin的部分，数据是存在s3桶中，driud连接s3的文章介绍不多，只有官方有一点点介绍，不详细，这里记录下。druid的扩展很多，有一部分是官方维护，一部分是社区维护，也可以自己定制自己的扩展&lt;br&gt;具体的列表见：&lt;a href=&quot;https://druid.apache.org/docs/latest/development/extensions.html&quot;&gt;https://druid.apache.org/docs/latest/development/extensions.html&lt;/a&gt;&lt;/p&gt;</summary>


    <category term="druid" scheme="https://jerryliu.site/blog/tags/druid/"/>
    
    <category term="kafka" scheme="https://jerryliu.site/blog/tags/kafka/"/>
    
  </entry>
  
  <entry>
    <title>superset 源码安装/pip安装+superset二次开发环境搭建</title>
    <link href="https://jerryliu.site/blog/posts/8b1f8f2c/"/>
    <id>https://jerryliu.site/blog/posts/8b1f8f2c/</id>
    <published>2020-02-23T04:00:00.000Z</published>
    <updated>2026-09-09T15:48:15.886Z</updated>
    
    <content type="html"><![CDATA[<p>环境：</p><blockquote></blockquote><p>mac 10.15 Catalina + Anaconda 3 + Python3.7 + superset 0.30</p><p><img src="/blog/img/superset13.png" loading="lazy"></p><figure class="highlight plaintext"><table><tbody><tr><td class="code"><pre><span class="line"> Superset 是一款由 Airbnb 开源的“现代化的企业级 BI（商业智能） Web 应用程序”，其通过创建和分享 dashboard，为数据分析提供了轻量级的数据查询和可视化方案。</span><br><span class="line"> Superset 的前端主要用到了 React 和 NVD3/D3，而后端则基于 Python 的 Flask 框架和 Pandas、SQLAlchemy 等依赖库，主要提供了这几方面的功能：</span><br><span class="line">集成数据查询功能，支持多种数据库，包括 MySQL、PostgresSQL、Oracle、SQL Server、SQLite、SparkSQL 等，并深度支持 Druid。</span><br><span class="line">通过 NVD3/D3 预定义了多种可视化图表，满足大部分的数据展示功能。如果还有其他需求，也可以自开发更多的图表类型，或者嵌入其他的 JavaScript 图表库（如 HighCharts、ECharts）。</span><br><span class="line">提供细粒度安全模型，可以在功能层面和数据层面进行访问控制。支持多种鉴权方式（如数据库、OpenID、LDAP、OAuth、REMOTE_USER 等）。</span><br></pre></td></tr></tbody></table></figure><span id="more"></span><p>17年装过一次，简单使用了一下，现在又开始使用supeset了。这次记录下问题，和安装步骤<br>因为之前安装过，导致残留。不能导入示例数据，不能创建用户等一些问题。</p><p>下面两种方式都是在Anaconda虚拟python环境中进行。</p><h2 id="一-源码安装superset"><a href="#一-源码安装superset" class="headerlink" title="一.源码安装superset"></a>一.源码安装superset</h2><p>首先，Anaconda 创建python环境</p><p><code>conda create -n superset python=3.7</code></p><ul><li>激活环境</li></ul><p><code>conda activate superset</code></p><h3 id="1-github-下载源码包"><a href="#1-github-下载源码包" class="headerlink" title="1.github 下载源码包"></a>1.github 下载源码包</h3><figure class="highlight plaintext"><table><tbody><tr><td class="code"><pre><span class="line">git clone https://github.com/apache/incubator-superset.git</span><br><span class="line"></span><br><span class="line">git tag　列出所有版本号</span><br><span class="line"></span><br><span class="line">#切换到自己想要的版本</span><br><span class="line">git checkout　+某版本号</span><br></pre></td></tr></tbody></table></figure><h3 id="2-安装扩展依赖，及开发依赖-这里指定豆瓣源"><a href="#2-安装扩展依赖，及开发依赖-这里指定豆瓣源" class="headerlink" title="2.安装扩展依赖，及开发依赖(这里指定豆瓣源)"></a>2.安装扩展依赖，及开发依赖(这里指定豆瓣源)</h3><figure class="highlight plaintext"><table><tbody><tr><td class="code"><pre><span class="line">#进入到目录</span><br><span class="line">cd incubator-superset</span><br><span class="line">pip install -r requirements.txt -i https://pypi.douban.com/simple/</span><br><span class="line"></span><br><span class="line">安装开发依赖</span><br><span class="line">pip install -r requirements-dev.txt -i https://pypi.douban.com/simple/</span><br></pre></td></tr></tbody></table></figure><h3 id="3-安装superset"><a href="#3-安装superset" class="headerlink" title="3.安装superset"></a>3.安装superset</h3><figure class="highlight plaintext"><table><tbody><tr><td class="code"><pre><span class="line">#incubator-superset 目录执行</span><br><span class="line">pip install -e .</span><br></pre></td></tr></tbody></table></figure><p><img src="/blog/img/superset6.png" loading="lazy"></p><h3 id="4-开始配置superset"><a href="#4-开始配置superset" class="headerlink" title="4.开始配置superset"></a>4.开始配置superset</h3><figure class="highlight plaintext"><table><tbody><tr><td class="code"><pre><span class="line">创建管理员账户和密码</span><br><span class="line">这个命令已经不推荐使用了。</span><br><span class="line">fabmanager create-admin --app superset</span><br><span class="line">推荐使用</span><br><span class="line">$export FLASK_APP=superset</span><br><span class="line">flask fab create-admin</span><br></pre></td></tr></tbody></table></figure><p><img src="/blog/img/superset7.png" loading="lazy"></p><ul><li>以下操作要进入superset/bin目录下</li></ul><figure class="highlight plaintext"><table><tbody><tr><td class="code"><pre><span class="line">#初始化数据库</span><br><span class="line">python superset db upgrade</span><br><span class="line"></span><br><span class="line">#初始化角色和权限</span><br><span class="line">python superset init</span><br><span class="line"></span><br><span class="line">#加载示例数据</span><br><span class="line">python superset load_examples</span><br></pre></td></tr></tbody></table></figure><h3 id="5-安装编译前端文件，并进入前端开发者模式"><a href="#5-安装编译前端文件，并进入前端开发者模式" class="headerlink" title="5.安装编译前端文件，并进入前端开发者模式"></a>5.安装编译前端文件，并进入前端开发者模式</h3><ul><li>安装nodejs,<a href="https://nodejs.org/en/">nodejs官网</a>下载编译好的包</li></ul><p><code>wget https://nodejs.org/dist/v12.18.2/node-v12.18.2-linux-x64.tar.xz</code></p><p>解压 :</p><p><code>tar -xvf node-v12.18.2-linux-x64.tar.xz</code></p><p>建软链:</p><figure class="highlight plaintext"><table><tbody><tr><td class="code"><pre><span class="line">ln -s /xxxx/nodejs/bin/node /usr/local/bin/</span><br><span class="line">ln -s /xxxxx/nodejs/bin/npm /usr/local/bin/&nbsp;</span><br></pre></td></tr></tbody></table></figure><p>然后node -v 查看版本，查看正常即可</p><ul><li>设置npm为淘宝镜像</li></ul><p><code>npm config set registry https://registry.npm.taobao.org</code></p><figure class="highlight plaintext"><table><tbody><tr><td class="code"><pre><span class="line">验证 `npm config get registry`</span><br></pre></td></tr></tbody></table></figure><ul><li>进入superset/assets目录下（新版目录incubator-superset/superset-frontend/）,安装编译所需模块</li></ul><p><code>npm install -d </code></p><p><img src="/blog/img/superset4.png" loading="lazy"></p><ul><li>编译前端文件，并进入前端开发者模式</li></ul><figure class="highlight plaintext"><table><tbody><tr><td class="code"><pre><span class="line">npm run build</span><br><span class="line">npm run dev</span><br></pre></td></tr></tbody></table></figure><p>注：如果这两部编译失败，可能是因为nodejs版本过低。可尝试升级nodejs再试。</p><p><img src="/blog/img/superset5.png" loading="lazy"></p><ul><li>运行完npm run dev，命令窗口会停止，不要误以为是执行不下去，保持窗口开启状态即可，一有文件变动时，它会重新编译</li></ul><h3 id="6、把项目导入到pyCharm"><a href="#6、把项目导入到pyCharm" class="headerlink" title="6、把项目导入到pyCharm"></a>6、把项目导入到pyCharm</h3><p>File -&gt; New Project -&gt; Location选择incubator-superset所在目录 -&gt; 选择Existing interpreter -&gt; 选择conda-&gt; 选择你的环境</p><h3 id="7、启动项目"><a href="#7、启动项目" class="headerlink" title="7、启动项目"></a>7、启动项目</h3><p>两种方式都可启动，任选其一。</p><ul><li></li></ul><p>命令启动superset <code>superset run -h 0.0.0.0 -p 8088</code></p><ul><li></li></ul><p>在 incubator-superset/superset 目录下新建 run.py，添加如下内容:</p><figure class="highlight plaintext"><table><tbody><tr><td class="code"><pre><span class="line">from superset import app</span><br><span class="line">app.run(debug=True, host='0.0.0.0', port=8088)</span><br></pre></td></tr></tbody></table></figure><p>等 pycharm 右下角 processes running 完成后就可以debug run.py了。访问：<a href="http://localhost:8088,输入管理员账号跟密码，登录。">http://localhost:8088,输入管理员账号跟密码，登录。</a></p><p><img src="/blog/img/superset8.png" loading="lazy"></p><h2 id="二-pip安装superset"><a href="#二-pip安装superset" class="headerlink" title="二.pip安装superset"></a>二.pip安装superset</h2><h3 id="1-Anaconda-创建python环境"><a href="#1-Anaconda-创建python环境" class="headerlink" title="1.Anaconda 创建python环境"></a>1.Anaconda 创建python环境</h3><p><code>conda create -n superset python=3.7</code></p><ul><li>激活环境</li></ul><p><code>conda activate superset</code></p><h3 id="2-安装依赖包。"><a href="#2-安装依赖包。" class="headerlink" title="2.安装依赖包。"></a>2.安装依赖包。</h3><ul><li></li></ul><p>具体的依赖包配置要去github找对应版本的根目录下的requirements.txt</p><ul><li></li></ul><p>raw的地址被污染不能用了。这里需要手动复制requirements.txt的内容创建一个文件</p><ul><li></li></ul><p>以下是0.34.0对应的依赖的list，请注意选择自己版本的依赖。</p><p><code>vim requirements.txt</code></p><p>复制以下内容</p><figure class="highlight plaintext"><table><tbody><tr><td class="code"><pre><span class="line">#</span><br><span class="line"># This file is autogenerated by pip-compile</span><br><span class="line"># To update, run:</span><br><span class="line">#</span><br><span class="line">#    pip-compile --output-file=requirements.txt setup.py</span><br><span class="line">#</span><br><span class="line">alembic==1.0.11           # via flask-migrate</span><br><span class="line">amqp==2.5.0               # via kombu</span><br><span class="line">apispec[yaml]==1.3.3      # via flask-appbuilder</span><br><span class="line">asn1crypto==0.24.0        # via cryptography</span><br><span class="line">attrs==19.1.0             # via jsonschema</span><br><span class="line">babel==2.7.0              # via flask-babel</span><br><span class="line">billiard==3.6.0.0         # via celery</span><br><span class="line">bleach==3.1.0</span><br><span class="line">celery==4.3.0</span><br><span class="line">cffi==1.12.3              # via cryptography</span><br><span class="line">click==6.7</span><br><span class="line">colorama==0.4.1</span><br><span class="line">contextlib2==0.5.5</span><br><span class="line">croniter==0.3.30</span><br><span class="line">cryptography==2.7</span><br><span class="line">decorator==4.4.0          # via retry</span><br><span class="line">defusedxml==0.6.0         # via python3-openid</span><br><span class="line">flask-appbuilder==2.1.13</span><br><span class="line">flask-babel==0.12.2       # via flask-appbuilder</span><br><span class="line">flask-caching==1.7.2</span><br><span class="line">flask-compress==1.4.0</span><br><span class="line">flask-jwt-extended==3.20.0  # via flask-appbuilder</span><br><span class="line">flask-login==0.4.1        # via flask-appbuilder</span><br><span class="line">flask-migrate==2.5.2</span><br><span class="line">flask-openid==1.2.5       # via flask-appbuilder</span><br><span class="line">flask-sqlalchemy==2.4.0   # via flask-appbuilder, flask-migrate</span><br><span class="line">flask-talisman==0.7.0</span><br><span class="line">flask-wtf==0.14.2</span><br><span class="line">flask==1.1.1</span><br><span class="line">future==0.17.1            # via parsedatetime</span><br><span class="line">geographiclib==1.49       # via geopy</span><br><span class="line">geopy==1.20.0</span><br><span class="line">gunicorn==19.8.1</span><br><span class="line">humanize==0.5.1</span><br><span class="line">idna==2.8</span><br><span class="line">isodate==0.6.0</span><br><span class="line">itsdangerous==1.1.0       # via flask</span><br><span class="line">jinja2==2.10.1            # via flask, flask-babel</span><br><span class="line">jsonschema==3.0.1         # via flask-appbuilder</span><br><span class="line">kombu==4.6.3              # via celery</span><br><span class="line">mako==1.0.14              # via alembic</span><br><span class="line">markdown==3.1.1</span><br><span class="line">markupsafe==1.1.1         # via jinja2, mako</span><br><span class="line">marshmallow-enum==1.4.1   # via flask-appbuilder</span><br><span class="line">marshmallow-sqlalchemy==0.17.0  # via flask-appbuilder</span><br><span class="line">marshmallow==2.19.5       # via flask-appbuilder, marshmallow-enum, marshmallow-sqlalchemy</span><br><span class="line">numpy==1.17.0             # via pandas</span><br><span class="line">pandas==0.24.2</span><br><span class="line">parsedatetime==2.4</span><br><span class="line">pathlib2==2.3.4</span><br><span class="line">polyline==1.4.0</span><br><span class="line">prison==0.1.2             # via flask-appbuilder</span><br><span class="line">py==1.8.0                 # via retry</span><br><span class="line">pycparser==2.19           # via cffi</span><br><span class="line">pyjwt==1.7.1              # via flask-appbuilder, flask-jwt-extended</span><br><span class="line">pyrsistent==0.15.4        # via jsonschema</span><br><span class="line">python-dateutil==2.8.0</span><br><span class="line">python-dotenv==0.10.3</span><br><span class="line">python-editor==1.0.4      # via alembic</span><br><span class="line">python-geohash==0.8.5</span><br><span class="line">python3-openid==3.1.0     # via flask-openid</span><br><span class="line">pytz==2019.2              # via babel, celery, pandas</span><br><span class="line">pyyaml==5.1.2</span><br><span class="line">retry==0.9.2</span><br><span class="line">selenium==3.141.0</span><br><span class="line">simplejson==3.16.0</span><br><span class="line">six==1.12.0               # via bleach, cryptography, flask-jwt-extended, flask-talisman, isodate, jsonschema, pathlib2, polyline, prison, pyrsistent, python-dateutil, sqlalchemy-utils, wtforms-json</span><br><span class="line">sqlalchemy-utils==0.34.1</span><br><span class="line">sqlalchemy==1.3.6</span><br><span class="line">sqlparse==0.3.0</span><br><span class="line">urllib3==1.25.3           # via selenium</span><br><span class="line">vine==1.3.0               # via amqp, celery</span><br><span class="line">webencodings==0.5.1       # via bleach</span><br><span class="line">werkzeug==0.15.5          # via flask, flask-jwt-extended</span><br><span class="line">wtforms-json==0.3.3</span><br><span class="line">wtforms==2.2.1            # via flask-wtf, wtforms-json</span><br></pre></td></tr></tbody></table></figure><ul><li>安装依赖，指定国内pip速度飞起。</li></ul><p><code> pip install -r requirements.txt -i https://pypi.douban.com/simple/</code></p><h3 id="3-安装superset-1"><a href="#3-安装superset-1" class="headerlink" title="3.安装superset"></a>3.安装superset</h3><ul><li>指定版本0.30.0,pip源目前为止最高版本为0.30.0</li></ul><p><code>pip install superset==0.30.0  -i https://pypi.douban.com/simple/</code></p><h3 id="4-开始配置初始化superset"><a href="#4-开始配置初始化superset" class="headerlink" title="4.开始配置初始化superset"></a>4.开始配置初始化superset</h3><figure class="highlight plaintext"><table><tbody><tr><td class="code"><pre><span class="line">#创建管理用户及密码</span><br><span class="line">$ export FLASK_APP=superset</span><br><span class="line">flask fab create-admin</span><br><span class="line">或者</span><br><span class="line">fabmanager create-admin --app superset</span><br><span class="line"></span><br><span class="line">#初始化数据库</span><br><span class="line">superset db upgrade</span><br><span class="line"></span><br><span class="line">#初始化角色和权限</span><br><span class="line">superset init</span><br><span class="line"></span><br><span class="line">#加载示例数据</span><br><span class="line">superset load_examples</span><br><span class="line">superset load_examples</span><br><span class="line"></span><br><span class="line">#debug模式启动，并指定8088端口</span><br><span class="line">superset run -p 8088 --with-threads --reload --debugger</span><br></pre></td></tr></tbody></table></figure><p>然后启动成功。浏览器访问</p><p><img src="/blog/img/superset1.png" loading="lazy"></p><p>登陆上面创建的管理用户和密码即可</p><p><img src="/blog/img/superset2.png" loading="lazy"></p><p><img src="/blog/img/superset12.png" loading="lazy"></p><h2 id="三-问题与总结"><a href="#三-问题与总结" class="headerlink" title="三.问题与总结"></a>三.问题与总结</h2><p>记录：conda pip 安装的路径</p><figure class="highlight text"><table><tbody><tr><td class="code"><pre><span class="line">/opt/anaconda3/envs/superset/lib/python3.7/site-packages/superset</span><br></pre></td></tr></tbody></table></figure><p>1.无法创建管理账户,需要保证email的唯一性，说明这个邮件已经被创建过，换一个邮件创建即可。<br>导致这个问题的原因是：之前安装过superset，没有删除遗留的supeset.db文件。</p><figure class="highlight plaintext"><table><tbody><tr><td class="code"><pre><span class="line">2020-02-21 18:16:07,701:INFO:root:Configured event logger of type &lt;class 'superset.utils.log.DBEventLogger'&gt;</span><br><span class="line">Recognized Database Authentications.</span><br><span class="line">2020-02-21 18:16:08,948:ERROR:flask_appbuilder.security.sqla.manager:Error adding new user to database. (sqlite3.IntegrityError) UNIQUE constraint failed: ab_user.email</span><br><span class="line">[SQL: INSERT INTO ab_user (first_name, last_name, username, password, active, email, last_login, login_count, fail_login_count, created_on, changed_on, created_by_fk, changed_by_fk) VALUES (?, ?, ?, ?, ?, ?, ?, ?, ?, ?, ?, ?, ?)]</span><br><span class="line">[parameters: ('admin', 'user', 'admin', 'pbkdf2:sha256:150000$lXoRkj1U$96d4f6c545b94200fabf2e0cee44e66ba928982109d926c75633c10db0a78d7a', 1, 'admin@superset.com', None, None, None, '2020-02-21 18:16:08.946516', '2020-02-21 18:16:08.946527', None, None)]</span><br><span class="line">(Background on this error at: http://sqlalche.me/e/gkpj)</span><br><span class="line">No user created an error occured</span><br></pre></td></tr></tbody></table></figure><ul><li></li></ul><p><code>superset load_examples times out with TimeoutError </code> superset load_examples,无法导入数据,显示拒绝连接</p><p>前天安装还好好的，今天不管是pip,还是源码安装都不行，我以为是我的安装问题<br>日志也没有详情，找错了方向，还以为是sqlite无法连接。<br>这个问题当误好大功夫。找了好久。。。。</p><p>后来找到了github 提交的issue,找到了问题的所在:</p><p>raw.githubusercontent.com域名解析污染了,的确ping raw.githubusercontent.com都是失败的</p><p>参考：</p><p><a href="https://github.com/apache/incubator-superset/issues/8520">https://github.com/apache/incubator-superset/issues/8520</a></p><p><a href="https://github.com/apache/incubator-superset/issues/8491">https://github.com/apache/incubator-superset/issues/8491</a></p><p>解决：</p><p>issues里说可以通过下载数据zip包，手动导入，但是没有给数据包url.下面用一个简单的方法，这里通过修改<code>raw.githubusercontent.com</code>的解析地址解决</p><p>首先通过<a href="https://www.ipaddress.com/">ipaddress</a>,找出raw.githubusercontent.com的ip地址。</p><p><img src="/blog/img/superset10.png" loading="lazy"></p><p>然后<code>vim /etc/hosts</code>添加</p><p><code>199.232.28.133 raw.githubusercontent.com</code></p><p>参考：</p><p><a href="https://www.ioiox.com/archives/62.html">https://www.ioiox.com/archives/62.html</a></p><p>这个方法修改后是可以ping 通的。但是下载速度，就几kb，只能等，没办法了。</p><p><strong>补充下后期安装0.36.0 npm run build遇到了一些问题</strong></p><ul><li>loose不一致错误：</li></ul><figure class="highlight plaintext"><table><tbody><tr><td class="code"><pre><span class="line">The "loose" option must be the same for @babel/plugin-proposal-class-properties, @babel/plugin-proposal-private-methods and @babel/plugin-proposal-private-property-in-object (when they are enabled): you can silence this warning by explicitly adding</span><br></pre></td></tr></tbody></table></figure><p>修改文件：<code>/data/deploy_tools/deploy_superset/incubator-superset-0.36.0/supeset-frontend/babel.config.js</code></p><p>注释45行，添加49，50,将loose设置为true</p><figure class="highlight plaintext"><table><tbody><tr><td class="code"><pre><span class="line">42   plugins: [</span><br><span class="line">43     'lodash',</span><br><span class="line">44     '@babel/plugin-syntax-dynamic-import',</span><br><span class="line">45     //'@babel/plugin-proposal-class-properties',</span><br><span class="line">46     '@babel/plugin-proposal-optional-chaining',</span><br><span class="line">47     ['@babel/plugin-transform-runtime', { corejs: 3 }],</span><br><span class="line">48     'react-hot-loader/babel',</span><br><span class="line">49      ['@babel/plugin-proposal-private-methods', { 'loose': true }],</span><br><span class="line">50      ['@babel/plugin-proposal-class-properties', { 'loose': true }]</span><br><span class="line">51   ],</span><br></pre></td></tr></tbody></table></figure><ul><li>“Property ‘hidden’ does not exist on type ‘HeaderGroup&lt;{}&gt;’”</li></ul><figure class="highlight plaintext"><table><tbody><tr><td class="code"><pre><span class="line">ERROR in /data/deploy_tools/deploy_superset/incubator-superset-0.36.0/superset-frontend/src/components/ListView/TableCollection.tsx</span><br><span class="line">ERROR in /data/deploy_tools/deploy_superset/incubator-superset-0.36.0/superset-frontend/src/components/ListView/TableCollection.tsx(45,22):</span><br><span class="line">TS2339: Property 'hidden' does not exist on type 'HeaderGroup&lt;{}&gt;'.</span><br><span class="line"></span><br><span class="line">ERROR in /data/deploy_tools/deploy_superset/incubator-superset-0.36.0/superset-frontend/src/components/ListView/TableCollection.tsx</span><br><span class="line">ERROR in /data/deploy_tools/deploy_superset/incubator-superset-0.36.0/superset-frontend/src/components/ListView/TableCollection.tsx(48,28):</span><br><span class="line">TS2339: Property 'sortable' does not exist on type 'HeaderGroup&lt;{}&gt;'.</span><br><span class="line"></span><br><span class="line">ERROR in /data/deploy_tools/deploy_superset/incubator-superset-0.36.0/superset-frontend/src/components/ListView/TableCollection.tsx</span><br><span class="line">ERROR in /data/deploy_tools/deploy_superset/incubator-superset-0.36.0/superset-frontend/src/components/ListView/TableCollection.tsx(54,27):</span><br><span class="line">TS2339: Property 'sortable' does not exist on type 'HeaderGroup&lt;{}&gt;'.</span><br></pre></td></tr></tbody></table></figure><p>解决方法：</p><p>修改 <code>/data/deploy_tools/deploy_superset/incubator-superset-0.36.0/superset-frontend/src/components/ListView/TableCollection.tsx</code>文件。</p><p>修改44行，修改前</p><p><code>{headerGroup.headers.map(column =&gt;</code></p><p>修改后</p><p><code>{headerGroup.headers.map((column:any) =&gt;</code></p><p>修改82行，修改前</p><p><code>{row.cells.map(cell:any =&gt; {</code></p><p>修改后</p><p><code>{row.cells.map((cell:any) =&gt; {</code></p><ul><li>‘Error: ENOSPC: System limit for number of file watchers reached, watch’</li></ul><figure class="highlight plaintext"><table><tbody><tr><td class="code"><pre><span class="line">Error from chokidar (/data/deploy_tools/deploy_superset/incubator-superset-0.36.0/superset-frontend/node_modules/fbjs/lib): Error: ENOSPC: System limit for number of file watchers reached, watch '/data/deploy_tools/deploy_superset/incubator-superset-0.36.0/superset-frontend/node_modules/fbjs/lib/camelizeStyleName.js'</span><br><span class="line">Error from chokidar (/data/deploy_tools/deploy_superset/incubator-superset-0.36.0/superset-frontend/node_modules/fbjs/lib): Error: ENOSPC: System limit for number of file watchers reached, watch '/data/deploy_tools/deploy_superset/incubator-superset-0.36.0/superset-frontend/node_modules/fbjs/lib/camelizeStyleName.js.flow'</span><br><span class="line">Error from chokidar (/data/deploy_tools/deploy_superset/incubator-superset-0.36.0/superset-frontend/node_modules/fbjs/lib): Error: ENOSPC: System limit for number of file watchers reached, watch '/data/deploy_tools/deploy_superset/incubator-superset-0.36.0/superset-frontend/node_modules/fbjs/lib/compactArray.js'^C</span><br></pre></td></tr></tbody></table></figure><p>解决方法：</p><p>修改系统监视文件的数量：</p><p><code>echo fs.inotify.max_user_watches=524288 | sudo tee -a /etc/sysctl.conf &amp;&amp; sudo sysctl -p</code></p><p><strong>superset搭建记录就完成了。下一篇集成echart</strong></p>]]></content>
    
    
    <summary type="html">&lt;p&gt;环境：&lt;/p&gt;
&lt;blockquote&gt;
&lt;/blockquote&gt;
&lt;p&gt;mac 10.15 Catalina + Anaconda 3 + Python3.7 + superset 0.30&lt;/p&gt;
&lt;p&gt;&lt;img src=&quot;/blog/img/superset13.png&quot; loading=&quot;lazy&quot;&gt;&lt;/p&gt;
&lt;figure class=&quot;highlight plaintext&quot;&gt;&lt;table&gt;&lt;tbody&gt;&lt;tr&gt;&lt;td class=&quot;code&quot;&gt;&lt;pre&gt;&lt;span class=&quot;line&quot;&gt; Superset 是一款由 Airbnb 开源的“现代化的企业级 BI（商业智能） Web 应用程序”，其通过创建和分享 dashboard，为数据分析提供了轻量级的数据查询和可视化方案。&lt;/span&gt;&lt;br&gt;&lt;span class=&quot;line&quot;&gt; Superset 的前端主要用到了 React 和 NVD3/D3，而后端则基于 Python 的 Flask 框架和 Pandas、SQLAlchemy 等依赖库，主要提供了这几方面的功能：&lt;/span&gt;&lt;br&gt;&lt;span class=&quot;line&quot;&gt;集成数据查询功能，支持多种数据库，包括 MySQL、PostgresSQL、Oracle、SQL Server、SQLite、SparkSQL 等，并深度支持 Druid。&lt;/span&gt;&lt;br&gt;&lt;span class=&quot;line&quot;&gt;通过 NVD3/D3 预定义了多种可视化图表，满足大部分的数据展示功能。如果还有其他需求，也可以自开发更多的图表类型，或者嵌入其他的 JavaScript 图表库（如 HighCharts、ECharts）。&lt;/span&gt;&lt;br&gt;&lt;span class=&quot;line&quot;&gt;提供细粒度安全模型，可以在功能层面和数据层面进行访问控制。支持多种鉴权方式（如数据库、OpenID、LDAP、OAuth、REMOTE_USER 等）。&lt;/span&gt;&lt;br&gt;&lt;/pre&gt;&lt;/td&gt;&lt;/tr&gt;&lt;/tbody&gt;&lt;/table&gt;&lt;/figure&gt;</summary>


    <category term="druid" scheme="https://jerryliu.site/blog/tags/druid/"/>
    
    <category term="superset" scheme="https://jerryliu.site/blog/tags/superset/"/>
    
  </entry>
  
  <entry>
    <title>迁移hexo博客到hugo</title>
    <link href="https://jerryliu.site/blog/posts/5ce0efd4/"/>
    <id>https://jerryliu.site/blog/posts/5ce0efd4/</id>
    <published>2020-01-05T04:00:00.000Z</published>
    <updated>2026-09-09T15:39:33.892Z</updated>
    
    <content type="html"><![CDATA[<figure class="highlight plaintext"><table><tbody><tr><td class="code"><pre><span class="line">之前的博客生成是用的hexo，但是慢慢的随着博客增多速度 越来越慢,一些功能无法实现，比如图片预览的fancybox。</span><br><span class="line">偶然看到了文章介绍hugo，一个用golang编写的静态网站生成器 ，主题很多,号称世界上最快的框架，</span><br><span class="line">实际用起来也比hexo快的多，几十个页面生成速度毫秒级别，网站的访问速度从未有的顺畅，速度起码翻倍。</span><br></pre></td></tr></tbody></table></figure><span id="more"></span><p><a href="https://themes.gohugo.io/">主题地址</a></p><p><img src="/blog/img/hugo2.png" loading="lazy"></p><h2 id="一-Hugo-安装与配置"><a href="#一-Hugo-安装与配置" class="headerlink" title="一.Hugo 安装与配置"></a>一.Hugo 安装与配置</h2><p>Hugo 安装比较简单，但是配置过程中遇到了几个小问题😂</p><p>1.首先安装 Hugo，在不同系统上安装都很简单，在 Mac 上，使用 Homebrew 安装 Hugo：<br><code>brew install hugo</code> 等待安装即可</p><p>2.建立博客站点<br>安装以后，首先我们需要建立一个博客目录，下面存放的是博客的所有配置以及博文等资料，例如要建立一个名为&nbsp;Blog&nbsp;的站点，使用下面的命令：<code>hugo new site Blog</code></p><figure class="highlight plaintext"><table><tbody><tr><td class="code"><pre><span class="line">Congratulations! Your new Hugo site is created in /Users/jdhao/Blog.</span><br><span class="line">Just a few more steps and you're ready to go:</span><br><span class="line">1. Download a theme into the same-named folder. Choose a theme from&nbsp;https://themes.gohugo.io/,&nbsp;or create your own with the “hugo new theme&nbsp;” command.</span><br><span class="line">2. Perhaps you want to add some content. You can add single files with “hugo new&nbsp;/.”.</span><br><span class="line">3. Start the built-in live server via “hugo server”.</span><br><span class="line">Visit&nbsp;https://gohugo.io/&nbsp;for quickstart guide and full documentation.</span><br></pre></td></tr></tbody></table></figure><p>建立站点以后，博客根目录下默认有这些文件和子目录：<br><code>archetypes/  config.toml  content/     data/        layouts/     static/      themes/</code></p><p><code>config.toml</code>&nbsp;就是博客的配置文件，archetypes&nbsp;目录下有一个&nbsp;default.md，存放的是建立新博文时候默认使用的模板，可以根据自己需求修改。content&nbsp;目录用来存放博文，static&nbsp;可以存放一些自己的文件，themes&nbsp;文件夹用于存放不同的主题。</p><p>在博客根目录下，使用以下命令安装 even 主题：</p><figure class="highlight plaintext"><table><tbody><tr><td class="code"><pre><span class="line">git init</span><br><span class="line">git submodule add https://github.com/olOwOlo/hugo-theme-even.git themes/even</span><br></pre></td></tr></tbody></table></figure><p>3.命令创建测试博客<br><code>hugo new post/test.md</code></p><p>这个命令会在&nbsp;content&nbsp;目录下建立&nbsp;post&nbsp;目录，并在&nbsp;post&nbsp;下生成&nbsp;test.md&nbsp;文件，博文书写就在这个文件里使用 Markdown 语法完成。</p><p>4.<code>Hugo server</code> 本地启动博客查看效果。</p><p>这时候报了错误。根据提示一，需要在安装完主题之后，要把主题的配置文件复制到 Blog根目录下，具体参考 <a href="https://github.com/olOwOlo/hugo-theme-even/blob/master/README-zh.md#installation">https://github.com/olOwOlo/hugo-theme-even/blob/master/README-zh.md#installation</a></p><figure class="highlight plaintext"><table><tbody><tr><td class="code"><pre><span class="line">➜  Blog git:(master) ✗ hugo server -D</span><br><span class="line">Building sites … ERROR 2020/01/04 15:08:40</span><br><span class="line"></span><br><span class="line">There are two possible situations that led to this error:</span><br><span class="line">  1. You haven't copied the config.toml yet. See https://github.com/olOwOlo/hugo-theme-even#installation</span><br><span class="line">  2. You have an incompatible update. See https://github.com/olOwOlo/hugo-theme-even/blob/master/CHANGELOG.md#400-2018-11-06</span><br><span class="line"></span><br><span class="line">有两种可能的情况会导致这个错误发生:</span><br><span class="line">  1. 你还没有复制 config.toml 参考 https://github.com/olOwOlo/hugo-theme-even/blob/master/README-zh.md#installation</span><br><span class="line">  2. 你进行了一次不兼容的更新 参考 https://github.com/olOwOlo/hugo-theme-even/blob/master/CHANGELOG.md#400-2018-11-06</span><br></pre></td></tr></tbody></table></figure><p>重点:&nbsp;在主题的&nbsp;exampleSite&nbsp;目录下有一个&nbsp;config.toml&nbsp;文件，将这个&nbsp;config.toml&nbsp;文件复制到你的站点目录下，根据自己的需求更改即可。还需要设置文章的 permalinks 设置Hexo 中，文章的链接都是&nbsp;YYYY/MM/DD/post_name/&nbsp;的格式，在 Hugo 中，可以通过设置&nbsp;permalinks&nbsp;参数来实现平滑过渡，在&nbsp;config.toml&nbsp;中加入以下设置：</p><figure class="highlight plaintext"><table><tbody><tr><td class="code"><pre><span class="line">[permalinks]</span><br><span class="line">  post = "/:year/:month/:day/:filename/"</span><br></pre></td></tr></tbody></table></figure><h2 id="二-迁移hexo中之前的博客"><a href="#二-迁移hexo中之前的博客" class="headerlink" title="二.迁移hexo中之前的博客"></a>二.迁移hexo中之前的博客</h2><p>只需要将之前hexo博客中下/source/_posts/目录下的.md文件拷贝到Blog/content/post/下即可。</p><p>这里需要注意两点</p><p>1.hexo和hugo的front matter格式不同，tag,date,categories,需要手动更改之前的文件。使用工具全局替换。</p><p>时间格式<br>Hexo 中时间格式与 Hugo 格式不太相同，Hugo 对时间格式的要求比较严格，Hexo 中YYYY-MM-DD HH:MM格式的时间在 Hugo 中无法被正确识别。Hugo 中使用的时间格式如下：<br>YYYY-MM-DD HH:MM:SS +0800<br>最后的&nbsp;+0800&nbsp;代表中国的时区是GMT+8。<br>另外，Hexo 中 front matter 代表博客更新时间的&nbsp;updated&nbsp;选项在 Hugo 中是&nbsp;lastmod。<br>具体时间格式的替换，我采用 Sublime Text 配合正则表达式匹配来替换。</p><figure class="highlight plaintext"><table><tbody><tr><td class="code"><pre><span class="line">Front-matter&nbsp;的区别</span><br><span class="line">hexo的时间格式</span><br><span class="line">date: 2020-01-04 15:00:29</span><br><span class="line">tag: Mac</span><br><span class="line">categories: Mac, Linux</span><br><span class="line">hugo中的时间格式</span><br><span class="line">date: 2020-01-04T15:00:29+08:00</span><br><span class="line">tag: [Mac]。     #[]前面要有空格</span><br><span class="line">categories: [Mac, Linux]    #[]前面要有空格</span><br></pre></td></tr></tbody></table></figure><p>2.博文的 front matter 里draft&nbsp;选项默认为&nbsp;true，需要改为&nbsp;false&nbsp;才能发表博文，建议直接更改上面说的archetypes&nbsp;目录下的&nbsp;default&nbsp;文件，把&nbsp;draft: true&nbsp;改为&nbsp;draft: false，这样生成的博文就是默认可以发表的</p><p>3.个人文件的位置</p><p>如果博客中有图片，建议把文件放在博客根目录下的 static 目录，可以在该目录下建立名为 files 的目录，然后把文件放在 files 目录下。假如 files 目录下有一个文件 test.JPG，参考这里，在博客中引用它的正确方式是:</p><p><a href="/img/test.JPG">点击这里下载 test.JPG</a></p><p>然后命令运行,Hugo server 查看效果。</p><figure class="highlight plaintext"><table><tbody><tr><td class="code"><pre><span class="line">➜  Blog git:(master) ✗ hugo server</span><br><span class="line"></span><br><span class="line">| EN</span><br><span class="line">+------------------+----+</span><br><span class="line">  Pages            | 37</span><br><span class="line">  Paginator pages  |  4</span><br><span class="line">  Non-page files   |  0</span><br><span class="line">  Static files     | 40</span><br><span class="line">  Processed images |  0</span><br><span class="line">  Aliases          |  9</span><br><span class="line">  Sitemaps         |  1</span><br><span class="line">  Cleaned          |  0</span><br><span class="line"></span><br><span class="line">Built in 38 ms</span><br><span class="line">Watching for changes in /Users/seven/Blog/{archetypes,content,data,layouts,static,themes}</span><br><span class="line">Watching for config changes in /Users/seven/Blog/config.toml</span><br><span class="line">Environment: "development"</span><br><span class="line">Serving pages from memory</span><br><span class="line">Running in Fast Render Mode. For full rebuilds on change: hugo server --disableFastRender</span><br><span class="line">Web Server is available at http://localhost:1313/ (bind address 127.0.0.1)</span><br><span class="line">Press Ctrl+C to stop</span><br></pre></td></tr></tbody></table></figure><p>37个页面，生成速度，才38ms。</p><h2 id="三-部署到github"><a href="#三-部署到github" class="headerlink" title="三.部署到github"></a>三.部署到github</h2><p>之前已经部署过对应的xxxx.github.io的github仓库，运行以下命令，将之前的仓库清空。</p><figure class="highlight plaintext"><table><tbody><tr><td class="code"><pre><span class="line">mkdir public</span><br><span class="line">cd public</span><br><span class="line">git init</span><br><span class="line">git remote add upstream https://github.com/jdhao/jdhao.github.io.git</span><br></pre></td></tr></tbody></table></figure><p>执行 hugo -t even，hugo 会生成 blog 内容，放到 public 目录。然后，我们把 public 下面的内容 push 到 github 即可。</p><figure class="highlight plaintext"><table><tbody><tr><td class="code"><pre><span class="line">git add .</span><br><span class="line">git commit -m  "hugo commit"</span><br><span class="line">git push -f upstream master # 第一次 push 必须使用 -f，因为此时远程仓库非空，和本地有冲突</span><br></pre></td></tr></tbody></table></figure><p>这样就部署成功了，一般等待几分钟，访问自己的博客，就能看到更新以后的内容。</p><p>然后参考官方文档,写bash脚本方便每次统一部署。</p><figure class="highlight plaintext"><table><tbody><tr><td class="code"><pre><span class="line">!/bin/bash</span><br><span class="line"></span><br><span class="line">echo -e "\033[0;32mDeploying updates to GitHub...\033[0m"</span><br><span class="line"></span><br><span class="line"># Build the project.</span><br><span class="line">hugo # if using a theme, replace with `hugo -t &lt;YOURTHEME&gt;`</span><br><span class="line"></span><br><span class="line"># Go To Public folder</span><br><span class="line">cd public</span><br><span class="line"></span><br><span class="line"># Add changes to git.</span><br><span class="line">git add .</span><br><span class="line"></span><br><span class="line"># Commit changes.</span><br><span class="line">msg="rebuilding site `date`"</span><br><span class="line">if [ $# -eq 1 ]</span><br><span class="line">  then msg="$1"</span><br><span class="line">fi</span><br><span class="line">git commit -m "$msg"</span><br><span class="line"></span><br><span class="line"># Push source and build repos.</span><br><span class="line">git push origin master</span><br><span class="line"></span><br><span class="line"># Come Back up to the Project Root</span><br><span class="line">cd ..</span><br></pre></td></tr></tbody></table></figure><p>赋予 deploy.sh 文件执行权限：</p><p>chmod u+x deploy.sh<br>以后执行 ./deploy.sh 就可以部署博客到 github 了。</p><p>注：第一次 push 需要使用 -f，以后 push 就不需要该参数了，force push 以后，github 仓库的 commit 数量会清零，原有的 commit 信息会丢失</p><h2 id="四-总结与问题"><a href="#四-总结与问题" class="headerlink" title="四.总结与问题"></a>四.总结与问题</h2><p>用hugo最直观的感受是，毫秒级的页面生成。主题多，集成度高（集成了阅读时间，字数统计，图片预览）,文件的统一管理，之前一直在找图片点击放大的插件，之前的主题不支持，这次好，给集成了。配置也方便，一个config.toml配置搞定所有。</p><p><strong>报错生成页面错误：</strong><br>1，原因是front matter不符合规范 <code>render of "page" failed</code></p><figure class="highlight plaintext"><table><tbody><tr><td class="code"><pre><span class="line">➜  Blog git:(master) ✗ hugo server</span><br><span class="line">ERROR 2020/01/04 15:40:34 render of "page" failed: execute of template failed: template: post/single.html:14:5: executing "post/single.html" at &lt;partial "head.html" .&gt;: error calling partial: "/Users/seven/Blog/themes/even/layouts/partials/head.html:22:82": execute of template failed: template: _internal/schema.html:22:82: executing "_internal/schema.html" at &lt;.Params.tags&gt;: range can't iterate over CDH</span><br><span class="line">ERROR 2020/01/04 15:40:34 render of "page" failed: execute of template failed: template: post/single.html:14:5: executing "post/single.html" at &lt;partial "head.html" .&gt;: error calling partial: "/Users/seven/Blog/themes/even/layouts/partials/head.html:22:82": execute of template failed: template: _internal/schema.html:22:82: executing "_internal/schema.html" at &lt;.Params.tags&gt;: range can't iterate over flume</span><br><span class="line">ERROR 2020/01/04 15:40:34 render of "page" failed: execute of template failed: template: post/single.html:14:5: executing "post/single.html" at &lt;partial "head.html" .&gt;: error calling partial: "/Users/seven/Blog/themes/even/layouts/partials/head.html:22:82": execute of template failed: template: _internal/schema.html:22:82: executing "_internal/schema.html" at &lt;.Params.tags&gt;: range can't iterate over 123456</span><br><span class="line">Built in 26 ms</span><br><span class="line">Error: Error building site: failed to render pages: render of "page" failed: execute of template failed: template: post/single.html:14:5: executing "post/single.html" at &lt;partial "head.html" .&gt;: error calling partial: "/Users/seven/Blog/themes/even/layouts/partials/head.html:22:82": execute of template failed: template: _internal/schema.html:22:82: executing "_internal/schema.html" at &lt;.Params.tags&gt;: range can't iterate over CDH,sentry</span><br></pre></td></tr></tbody></table></figure><p>2.Front matter tag:[],中括号前面没有空格导致错误</p><p><code>failed to unmarshal YAML: yaml: line 5: could not find expected ':'</code></p><p><strong>参考资料</strong></p><ul><li><p><a href="https://gohugo.io/documentation/">https://gohugo.io/documentation/</a></p></li><li><p><a href="http://scarletsky.github.io/2019/05/02/migrate-hexo-to-hugo/">http://scarletsky.github.io/2019/05/02/migrate-hexo-to-hugo/</a></p></li><li><p><a href="https://jdhao.github.io/2018/10/10/hexo_to_hugo/">https://jdhao.github.io/2018/10/10/hexo_to_hugo/</a></p></li></ul>]]></content>
    
    
    <summary type="html">&lt;figure class=&quot;highlight plaintext&quot;&gt;&lt;table&gt;&lt;tbody&gt;&lt;tr&gt;&lt;td class=&quot;code&quot;&gt;&lt;pre&gt;&lt;span class=&quot;line&quot;&gt;之前的博客生成是用的hexo，但是慢慢的随着博客增多速度 越来越慢,一些功能无法实现，比如图片预览的fancybox。&lt;/span&gt;&lt;br&gt;&lt;span class=&quot;line&quot;&gt;偶然看到了文章介绍hugo，一个用golang编写的静态网站生成器 ，主题很多,号称世界上最快的框架，&lt;/span&gt;&lt;br&gt;&lt;span class=&quot;line&quot;&gt;实际用起来也比hexo快的多，几十个页面生成速度毫秒级别，网站的访问速度从未有的顺畅，速度起码翻倍。&lt;/span&gt;&lt;br&gt;&lt;/pre&gt;&lt;/td&gt;&lt;/tr&gt;&lt;/tbody&gt;&lt;/table&gt;&lt;/figure&gt;</summary>


    <category term="cdh" scheme="https://jerryliu.site/blog/tags/cdh/"/>
    
    <category term="sentry" scheme="https://jerryliu.site/blog/tags/sentry/"/>
    
    <category term="flume" scheme="https://jerryliu.site/blog/tags/flume/"/>
    
    <category term="hugo" scheme="https://jerryliu.site/blog/tags/hugo/"/>
    
  </entry>
  
  <entry>
    <title>CDH6.3.1使用sentry权限控制</title>
    <link href="https://jerryliu.site/blog/posts/b43bd655/"/>
    <id>https://jerryliu.site/blog/posts/b43bd655/</id>
    <published>2020-01-02T04:00:00.000Z</published>
    <updated>2026-09-09T15:48:15.884Z</updated>
    
    <content type="html"><![CDATA[<blockquote></blockquote><p>环境：CDH6.3.1,Centos7.5</p><p><img src="/blog/img/ext_sentry.png" loading="lazy"></p><p>上一篇记录的是kerberos。是用来管理用户身份*即用户身份认证</p><figure class="highlight plaintext"><table><tbody><tr><td class="code"><pre><span class="line">Sentry，用户身份和权限的映射关系管理 即授权。</span><br><span class="line">CDH的介绍是：Sentry 服务存储身份验证政策元数据并为客户端提供对该元数据的并发安全访问。</span><br></pre></td></tr></tbody></table></figure><span id="more"></span><p>我理解的kerberos+sentry = 用户验证+权限管理。搭配组合使用来做多租户的权限分配。<br>可以管理用户读那些hive表，和那些hdfs路径下的文件。</p><h2 id="一-CM添加Sentry服务及配置"><a href="#一-CM添加Sentry服务及配置" class="headerlink" title="一.CM添加Sentry服务及配置"></a>一.CM添加Sentry服务及配置</h2><p><strong>1.在CM中添加服务。Sentry</strong></p><p><img src="/blog/img/sentry1.png" loading="lazy"></p><p>给服务器分配sentry角色</p><p><img src="/blog/img/sentry2.png" loading="lazy"></p><p>需要生成一个sentry的数据库,我这里sentry数据库和其他服务放在了一起都在h1上，数据库名字自定义，我这里数据库和用户都叫sentry</p><p><img src="/blog/img/sentry3.png" loading="lazy"></p><p>下面两步没有截图。略过了。</p><p><strong>2.添加好sentry服务下面开始设置sentry：</strong></p><p>Hive的设置，将图中两项勾选去掉</p><p><img src="/blog/img/sentry4.png" loading="lazy"></p><p>第二步 将Hive服务的Sentry勾上，默认是none</p><p><img src="/blog/img/sentry5.png" loading="lazy"></p><p>然后重启hive的过时配置即可。</p><p><strong>3.设置hdfs的控制列表和sentry同步</strong></p><p>紧接着，开启HDFS角色的acl（这里主要控制用户访问的HDFS目录，因为在生产环境中会指定一些目录是该用户可以访问的，而其他一些目录该用户访问不了）</p><p>以下两项勾选。</p><p><img src="/blog/img/sentry6.png" loading="lazy"></p><p>然后重启hdfs的过期配置，并勾选重新部署客户端配置</p><p><strong>4.接下来。生成hive.keytab</strong></p><p>在KDC服务器上执行以下命令，将集群的所有机器的keytab汇总到一个文件中：</p><p>首先在Kerberos数据库中创建principal:<code>kadmin.local -q "addprinc -randkey hive/h$i.cat.com@CAT.COM"</code></p><p>批量生成命令：<code>for i in {1..4}; do sudo kadmin.local -q "addprinc -randkey hive/h$i.cat.com@CAT.COM ";done</code></p><p>然后，在当前目录下生成hive.keytab文件:<code>kadmin.local -q "xst -norandkey -k hive.keytab hive/h$i.cat.com@CAT.COM"</code></p><p>批量生成命令:<code>for i in {1..4};do sudo kadmin.local -q "xst -norandkey -k hive.keytab hive/h$i.cat.com@CAT.COM";done</code></p><p>然后在集群中一个节点修改<code>/etc/hive/conf/hive-site.conf</code></p><p>添加以下内容。指定keytab的路径</p><figure class="highlight plaintext"><table><tbody><tr><td class="code"><pre><span class="line">&lt;property&gt;</span><br><span class="line">&lt;name&gt;hive.metastore.kerberos.keytab.file&lt;/name&gt;</span><br><span class="line">&lt;value&gt;/etc/hive/conf/hive.keytab&lt;/value&gt;</span><br><span class="line">&lt;/property&gt;</span><br></pre></td></tr></tbody></table></figure><p>将修改后的hive-site.conf发送到集群中的其他机器的<code>/etc/hive/conf</code>目录下（h1,h2,h3,h4）</p><p><code>for i in {1..4};do scp  hive-site.conf h$i:/etc/hive/conf;done</code></p><p>将上面生成的keytab发给集群的其他所有服务器（h1,h2,h3,h4）</p><p><code>for i in {1..4};do  scp  hive.keytab h$i:/etc/hive/conf;done</code></p><p>然后修改keytab的权限。</p><p><code>for i in {1..4}; do ssh h$i "cd /etc/hive/conf; chmod 400 hive.keytab; chown hive:hadoop hive.keytab"; done</code></p><ul><li>注：由于 keytab 相当于有了永久凭证，不需要提供密码(如果修改 kdc 中的 principal 的密码，则该 keytab 就会失效)，所以其他用户如果对该文件有读权限，就可以冒充 keytab 中指定的用户身份访问 hadoop，所以 keytab 文件需要确保只对 owner 有读权限(0400)</li></ul><h2 id="二-权限测试及验证"><a href="#二-权限测试及验证" class="headerlink" title="二.权限测试及验证"></a>二.权限测试及验证</h2><p>创建系统用户,user1,user2,上一篇说过，建立账户要给所有的机器都创建。考虑到用户的任务分发问题,会报错。</p><figure class="highlight plaintext"><table><tbody><tr><td class="code"><pre><span class="line">[root@h1 ~]# useradd user1</span><br><span class="line">[root@h1 ~]# useradd user2</span><br><span class="line">[root@h2 ~]# useradd user1</span><br><span class="line">[root@h2 ~]# useradd user2</span><br><span class="line">[root@h3 ~]# useradd user1</span><br><span class="line">[root@h3 ~]# useradd user2</span><br><span class="line">[root@h4 ~]# useradd user1</span><br><span class="line">[root@h4 ~]# useradd user2</span><br></pre></td></tr></tbody></table></figure><p>在KDC上创建Kerberos用户</p><figure class="highlight plaintext"><table><tbody><tr><td class="code"><pre><span class="line">sudo kadmin.local -q "addprinc user1"</span><br><span class="line">sudo kadmin.local -q "addprinc user2"</span><br></pre></td></tr></tbody></table></figure><p>使用keytab 登陆kerberos hive用户</p><figure class="highlight plaintext"><table><tbody><tr><td class="code"><pre><span class="line">[root@h1 ~]#kinit -kt hive.keytab hive/h1.cat.com</span><br><span class="line">[root@h1 ~]#hive</span><br></pre></td></tr></tbody></table></figure><p>创建测试数据库</p><figure class="highlight plaintext"><table><tbody><tr><td class="code"><pre><span class="line">create database db1;</span><br><span class="line">create database db2;</span><br></pre></td></tr></tbody></table></figure><p>在数据库中创建表<br>在db1中创建table1，在db2中创建table1和table2</p><figure class="highlight plaintext"><table><tbody><tr><td class="code"><pre><span class="line">create table db1.table1 (</span><br><span class="line">name STRING, age STRING</span><br><span class="line">) ROW FORMAT DELIMITED FIELDS TERMINATED BY ',';</span><br><span class="line">create table db2.table1 (</span><br><span class="line">name STRING, age STRING</span><br><span class="line">) ROW FORMAT DELIMITED FIELDS TERMINATED BY ',';</span><br><span class="line">create table db2.table2 (</span><br><span class="line">name STRING, age STRING</span><br><span class="line">) ROW FORMAT DELIMITED FIELDS TERMINATED BY ',';</span><br></pre></td></tr></tbody></table></figure><figure class="highlight plaintext"><table><tbody><tr><td class="code"><pre><span class="line">cat test.csv</span><br><span class="line">leo,19</span><br><span class="line">lilei,23</span><br><span class="line">jack,25</span><br><span class="line">tony,28</span><br><span class="line">eric,18</span><br><span class="line">lucy,16</span><br></pre></td></tr></tbody></table></figure><p>导入数据</p><figure class="highlight plaintext"><table><tbody><tr><td class="code"><pre><span class="line">load data local inpath '/home/user1/test.csv' overwrite into table db1.table1;</span><br><span class="line">load data local inpath '/home/user1/test.csv' overwrite into table db2.table1;</span><br><span class="line">load data local inpath '/home/user1/test.csv' overwrite into table db2.table2;</span><br></pre></td></tr></tbody></table></figure><p>用户授权。给user1，user2授权数据库权限</p><p>使用Hive client授权报错。<br>上面已经用kinit -kt hive.keytab hive/h1.cat.com 切换为hive用户了，hive还是没有权限操作。</p><figure class="highlight plaintext"><table><tbody><tr><td class="code"><pre><span class="line">hive&gt; create role user1_role;</span><br><span class="line">FAILED: Execution Error, return code 1 from org.apache.hadoop.hive.ql.exec.DDLTask. Current user : hive is not allowed to add roles. User has to belong to ADMIN role and have it as current role, for this action.</span><br><span class="line">hive&gt; GRANT ALL ON DATABASE db1 TO ROLE user1_role;</span><br><span class="line">FAILED: Execution Error, return code 1 from org.apache.hadoop.hive.ql.exec.DDLTask. Permission denied: Principal [name=hive, type=USER] does not have following privileges for operation GRANT_PRIVILEGE [[SELECT with grant, INSERT with grant, UPDATE with grant, DELETE with grant] on Object [type=DATABASE, name=db1]]</span><br><span class="line">hive&gt; GRANT ROLE user1_role TO GROUP user1;</span><br><span class="line">FAILED: Execution Error, return code 1 from org.apache.hadoop.hive.ql.exec.DDLTask. Invalid principal type in principal Principal [name=user1, type=GROUP]</span><br></pre></td></tr></tbody></table></figure><p>hive没有权限做授权，看网上资料用的是beeline,然后成功。</p><figure class="highlight plaintext"><table><tbody><tr><td class="code"><pre><span class="line">create role user1_role;</span><br><span class="line">GRANT ALL ON DATABASE db1 TO ROLE user1_role;</span><br><span class="line">GRANT ROLE user1_role TO GROUP user1;</span><br><span class="line"></span><br><span class="line">create role user2_role;</span><br><span class="line">GRANT ALL ON DATABASE db2 TO ROLE user2_role;</span><br><span class="line">GRANT ROLE user2_role TO GROUP user2;</span><br></pre></td></tr></tbody></table></figure><p><img src="/blog/img/sentry7.png" loading="lazy"></p><p>验证User1只有db1和default的权限（default是默认的自带库）</p><p><img src="/blog/img/sentry8.png" loading="lazy"></p><p>User2只有db2和default的权限</p><p><img src="/blog/img/sentry9.png" loading="lazy"></p><p>然后验证hdfs 权限<br>User1只能查看db1.db表下面的数据文件</p><p><img src="/blog/img/sentry10.png" loading="lazy"></p><p>同理use2只能查看db2.db下面的数据。</p><p><img src="/blog/img/sentry11.png" loading="lazy"></p><h2 id="三-问题与总结："><a href="#三-问题与总结：" class="headerlink" title="三.问题与总结："></a>三.问题与总结：</h2><p>1.当使用hive cli的时候，会显示所有表，而beeline只会显示有权限的表,但hive显示没有权限的表当查询的时候也会报没有权限的错误。</p><p>例如。User2用户使用user1的db1。会报以下错误。没有权限读取元数据的hdfs目录数据</p><figure class="highlight plaintext"><table><tbody><tr><td class="code"><pre><span class="line">FAILED: SemanticException Unable to determine if hdfs://h1.cat.com:8020/user/hive/warehouse/db1.db/table1</span><br><span class="line">is encrypted: org.apache.hadoop.security.AccessControlException: Permission denied: user=user2, access=READ,</span><br><span class="line">inode="/user/hive/warehouse/db1.db/table1":hive:hive:drwxrwx--</span><br></pre></td></tr></tbody></table></figure><p><img src="/blog/img/sentry12.png" loading="lazy"></p><p>2.这里用keytab登陆hive报错。</p><figure class="highlight text"><table><tbody><tr><td class="code"><pre><span class="line">hive&gt; [root@h1 ckinit -kt hive.keytab hive/h1.cat.com</span><br><span class="line">kinit: Password incorrect while getting initial credentials</span><br></pre></td></tr></tbody></table></figure><ul><li>注意。修改配置，和重启服务会提示keytab失效，报以下错误，需要生成，然后分发即可。</li></ul><p>3.连接beeline命令<br>!connect jdbc:hive2://localhost:10000/;principal=hive/<a href="mailto:h1@CAT.COM">h1@CAT.COM</a></p>]]></content>
    
    
    <summary type="html">&lt;blockquote&gt;
&lt;/blockquote&gt;
&lt;p&gt;环境：CDH6.3.1,Centos7.5&lt;/p&gt;
&lt;p&gt;&lt;img src=&quot;/blog/img/ext_sentry.png&quot; loading=&quot;lazy&quot;&gt;&lt;/p&gt;
&lt;p&gt;上一篇记录的是kerberos。是用来管理用户身份*即用户身份认证&lt;/p&gt;
&lt;figure class=&quot;highlight plaintext&quot;&gt;&lt;table&gt;&lt;tbody&gt;&lt;tr&gt;&lt;td class=&quot;code&quot;&gt;&lt;pre&gt;&lt;span class=&quot;line&quot;&gt;Sentry，用户身份和权限的映射关系管理 即授权。&lt;/span&gt;&lt;br&gt;&lt;span class=&quot;line&quot;&gt;CDH的介绍是：Sentry 服务存储身份验证政策元数据并为客户端提供对该元数据的并发安全访问。&lt;/span&gt;&lt;br&gt;&lt;/pre&gt;&lt;/td&gt;&lt;/tr&gt;&lt;/tbody&gt;&lt;/table&gt;&lt;/figure&gt;</summary>


    <category term="cdh" scheme="https://jerryliu.site/blog/tags/cdh/"/>
    
    <category term="hadoop" scheme="https://jerryliu.site/blog/tags/hadoop/"/>
    
    <category term="kerberos" scheme="https://jerryliu.site/blog/tags/kerberos/"/>
    
    <category term="sentry" scheme="https://jerryliu.site/blog/tags/sentry/"/>
    
  </entry>
  
  <entry>
    <title>CDH6.3.1开启kerberos认证</title>
    <link href="https://jerryliu.site/blog/posts/824879e0/"/>
    <id>https://jerryliu.site/blog/posts/824879e0/</id>
    <published>2019-12-30T04:00:00.000Z</published>
    <updated>2026-09-09T15:46:09.336Z</updated>
    
    <content type="html"><![CDATA[<p>环境： 基于centos 7.5,CDH 6.3.1</p><p><img src="/blog/img/CDH.png" loading="lazy"></p><p><img src="/blog/img/ext_dog-ring.jpg" loading="lazy"></p><h2 id="一-安装kerberos"><a href="#一-安装kerberos" class="headerlink" title="一.安装kerberos"></a>一.安装kerberos</h2><p><strong>kerberso是什么</strong></p><p>之前没有接触过kerberos，最近项目需要基于CDH的多租户管理，所以简单了解了下。kerberos要做的工作就是验证进行权限申请的人是他声称的那个人的问题。</p><span id="more"></span><p><strong>Kerberos协议：</strong></p><blockquote><p>Kerberos协议主要用于计算机网络的身份鉴别(Authentication), 其特点是用户只需输入一次身份验证信息就可以凭借此验证获得的票据(ticket-granting ticket)访问多个服务，即SSO(Single Sign On)。由于在每个Client和Service之间建立了共享密钥，使得该协议具 有相当的安全性。</p></blockquote><p>一句话来概括kerberos是用来做什么的：</p><blockquote><p>“kerberos主要是用来做网络通信时候的身份认证（Authentication）”</p></blockquote><p>kerberos的简单原理图如下,kerberos的原理实现远远复杂的多。</p><p><img src="/blog/img/ext_u_939042365_379837012_fm_26_gp_0.jpg" loading="lazy"></p><p>kerberos原理介绍参考资料：<a href="https://www.jianshu.com/p/fc2d2dbd510b">简书</a></p><p><strong>1.安装KDC服务</strong></p><p>可以将KDC安装在集群内也可以安装在单独的机器。这里安装到CM（h1）上</p><p>安装命令：</p><figure class="highlight plaintext"><table><tbody><tr><td class="code"><pre><span class="line">(base) [root@h1 ~]#  yum -y install krb5-server krb5-libs krb5-auth-dialog krb5-workstation</span><br></pre></td></tr></tbody></table></figure><p><strong>2.修改kdc的配置文件</strong></p><figure class="highlight plaintext"><table><tbody><tr><td class="code"><pre><span class="line">(base) [root@h1 ~]#  vim /etc/krb5.conf</span><br></pre></td></tr></tbody></table></figure><p>将以下内容粘贴进去</p><figure class="highlight plaintext"><table><tbody><tr><td class="code"><pre><span class="line"># Configuration snippets may be placed in this directory as well</span><br><span class="line">includedir /etc/krb5.conf.d/</span><br><span class="line">[logging]</span><br><span class="line"> default = FILE:/var/log/krb5libs.log</span><br><span class="line"> kdc = FILE:/var/log/krb5kdc.log</span><br><span class="line"> admin_server = FILE:/var/log/kadmind.log</span><br><span class="line">[libdefaults]</span><br><span class="line"> dns_lookup_realm = false</span><br><span class="line"> ticket_lifetime = 24h</span><br><span class="line"> renew_lifetime = 7d</span><br><span class="line"> forwardable = true</span><br><span class="line"> rdns = false</span><br><span class="line"> pkinit_anchors = /etc/pki/tls/certs/ca-bundle.crt</span><br><span class="line"> default_realm = CAT.COM</span><br><span class="line"> #default_ccache_name = KEYRING:persistent:%{uid}</span><br><span class="line">[realms]</span><br><span class="line"> CAT.COM = {</span><br><span class="line">  kdc = master</span><br><span class="line">  admin_server = master</span><br><span class="line"> }</span><br><span class="line">[domain_realm]</span><br><span class="line">.cat.com = CAT.COM</span><br><span class="line">cat.com = CAT.COM</span><br></pre></td></tr></tbody></table></figure><p>*cat.com/CAT.COM。 为自定义名称</p><p>*默认ticket有效时常为24H,续约时长为7D,每次的续约要在有效期内进行续约,如24小时ticket时长，需要在24小时内进行续约。否则将会过期无法续约。</p><p>续约方法：</p><p>sudo到需要续约的用户下，并且使用kinit username进行登录。</p><p><code>kinit -R</code>进行续约  然后用 <code>klist</code> 查看过期时间。</p><p><strong>3 修改/var/kerberos/krb5kdc/kadm5.acl</strong></p><figure class="highlight plaintext"><table><tbody><tr><td class="code"><pre><span class="line">(base) [root@h1 ~]# vim /var/kerberos/krb5kdc/kadm5.acl</span><br><span class="line"></span><br><span class="line">*/admin@HADOOP.COM      *</span><br><span class="line">*/master@HADOOP.COM      *</span><br></pre></td></tr></tbody></table></figure><p><strong>4 修改 /var/kerberos/krb5kdc/kdc.conf</strong></p><figure class="highlight plaintext"><table><tbody><tr><td class="code"><pre><span class="line">(base) [root@h1 ~]# vim /var/kerberos/krb5kdc/kdc.conf</span><br></pre></td></tr></tbody></table></figure><p>将以下内容复制</p><figure class="highlight plaintext"><table><tbody><tr><td class="code"><pre><span class="line">[kdcdefaults]</span><br><span class="line"> kdc_ports = 88</span><br><span class="line"> kdc_tcp_ports = 88</span><br><span class="line"></span><br><span class="line">[realms]</span><br><span class="line"> CAT.COM = {</span><br><span class="line">  #master_key_type = aes256-cts</span><br><span class="line">  #ticket_lifetime = 10m</span><br><span class="line">  max_renewable_life= 7d 0h 0m 0s</span><br><span class="line">  acl_file = /var/kerberos/krb5kdc/kadm5.acl</span><br><span class="line">  dict_file = /usr/share/dict/words</span><br><span class="line">  admin_keytab = /var/kerberos/krb5kdc/kadm5.keytab</span><br><span class="line">  supported_enctypes = aes256-cts:normal aes128-cts:normal des3-hmac-sha1:normal arcfour-hmac:normal camellia256-cts:normal camellia128-cts:normal des-hmac-sha1:normal des-cbc-md5:normal des-cbc-crc:normal</span><br><span class="line"> }</span><br><span class="line"></span><br></pre></td></tr></tbody></table></figure><p><strong>5 创建Kerberos数据库</strong></p><p>创建命令：</p><figure class="highlight plaintext"><table><tbody><tr><td class="code"><pre><span class="line">(base) [root@h1 ~]#  kdb5_util create –r CAT.COM -s</span><br><span class="line"></span><br><span class="line">Loading random data</span><br><span class="line"></span><br><span class="line">Initializing database '/var/kerberos/krb5kdc/principal' for realm 'CAT.COM',</span><br><span class="line"></span><br><span class="line">master key name 'K/M@CAT.COM'</span><br><span class="line"></span><br><span class="line">You will be prompted for the database Master Password.</span><br><span class="line"></span><br><span class="line">It is important that you NOT FORGET this password.</span><br><span class="line"></span><br><span class="line">Enter KDC database master key:</span><br><span class="line"></span><br><span class="line">Re-enter KDC database master key to verify:</span><br><span class="line"></span><br><span class="line">#此处需要输入Kerberos数据库的密码。</span><br></pre></td></tr></tbody></table></figure><p><strong>6 创建Kerberos的管理账号</strong></p><figure class="highlight plaintext"><table><tbody><tr><td class="code"><pre><span class="line">(base) [root@h1 ~]# kadmin.local</span><br><span class="line"></span><br><span class="line">Authenticating as principal root/admin@CAT.COM with password.</span><br><span class="line"></span><br><span class="line">kadmin.local:  addprinc admin/admin@CAT.COM</span><br><span class="line"></span><br><span class="line">WARNING: no policy specified for admin/admin@CAT.COM; defaulting to no policy</span><br><span class="line"></span><br><span class="line">Enter password for principal "admin/admin@CAT.COM":</span><br><span class="line"></span><br><span class="line">Re-enter password for principal "admin/admin@CAT.COM":</span><br><span class="line"></span><br><span class="line">Principal "admin/admin@CAT.COM" created.</span><br><span class="line"></span><br><span class="line">kadmin.local:  exit</span><br></pre></td></tr></tbody></table></figure><p><strong>7.启动krb5dc，kadmin，并设置kerberos开机自启</strong></p><p>启动krb5dc,kadmin</p><figure class="highlight plaintext"><table><tbody><tr><td class="code"><pre><span class="line">[root@h1 ~]# systemctl enable kadmin</span><br><span class="line">Created symlink from /etc/systemd/system/multi-user.target.wants/kadmin.service to /usr/lib/systemd/system/kadmin.service.</span><br><span class="line">[root@h1 ~]# systemctl start krb5kdc</span><br><span class="line">[root@h1 ~]# systemctl start kadmin</span><br></pre></td></tr></tbody></table></figure><p>设置开机自启</p><figure class="highlight plaintext"><table><tbody><tr><td class="code"><pre><span class="line">[root@h1 ~]# systemctl enable krb5kdc</span><br></pre></td></tr></tbody></table></figure><p><strong>8.集群其他机器安装Kerberos客户端，包括KDC机器</strong></p><figure class="highlight plaintext"><table><tbody><tr><td class="code"><pre><span class="line">[root@h2 ~]#yum -y install krb5-libs krb5-workstation</span><br><span class="line">[root@h3 ~]#yum -y install krb5-libs krb5-workstation</span><br><span class="line">[root@h4 ~]#yum -y install krb5-libs krb5-workstation</span><br></pre></td></tr></tbody></table></figure><p><strong>9 在CM服务器上安装额外的包</strong></p><figure class="highlight plaintext"><table><tbody><tr><td class="code"><pre><span class="line">[root@h1 ~]# yum -y install openldap-clients</span><br></pre></td></tr></tbody></table></figure><p><strong>10 将KDC server中的krb5.conf拷贝到集群所有机器的/etc/</strong></p><figure class="highlight plaintext"><table><tbody><tr><td class="code"><pre><span class="line">scp /etc/krb5.conf root@h2:/etc/</span><br></pre></td></tr></tbody></table></figure><p><strong>11 在KDC中给Cloudera Manager添加管理员账号</strong></p><figure class="highlight plaintext"><table><tbody><tr><td class="code"><pre><span class="line">(base) [root@h2 ~]# kadmin.local</span><br><span class="line"></span><br><span class="line">Authenticating as principal admin/admin@CAT.COM with password.</span><br><span class="line"></span><br><span class="line">kadmin.local:  addprinc cloudera-scm/admin@CAT.COM</span><br><span class="line"></span><br><span class="line">WARNING: no policy specified for cloudera-scm/admin@CAT.COM; defaulting to no policy</span><br><span class="line"></span><br><span class="line">Enter password for principal "cloudera-scm/admin@CAT.COM":</span><br><span class="line"></span><br><span class="line">Re-enter password for principal "cloudera-scm/admin@CAT.COM":</span><br><span class="line"></span><br><span class="line">Principal "cloudera-scm/admin@CAT.COM" created.</span><br><span class="line"></span><br><span class="line">kadmin.local:  exit</span><br></pre></td></tr></tbody></table></figure><h2 id="二-进入CM管理页面配置kerberos"><a href="#二-进入CM管理页面配置kerberos" class="headerlink" title="二.进入CM管理页面配置kerberos"></a>二.进入CM管理页面配置kerberos</h2><p>选择管理&gt;安全&gt;启用kerberos</p><p><img src="/blog/img/CDH-k1.png" loading="lazy"></p><p><img src="/blog/img/CDH-k2.png" loading="lazy"></p><p>全部勾选</p><p><img src="/blog/img/CDH-k3.png" loading="lazy"></p><p>KDCserver和KDC admin server选择自己的KDC安装机器hostname</p><p><img src="/blog/img/CDH-k4.png" loading="lazy"></p><p>不勾选</p><p><img src="/blog/img/CDH-k5.png" loading="lazy"></p><p>填写上面11步设置的用户和密码即可，然后一路确认。s</p><p><img src="/blog/img/CDH-k6.png" loading="lazy"></p><p>完成之后Kerberos会创建CDH相关用户，使用命令查看当前的所有kerberos用户，不过这些自动创建的用户不知道如何登陆，因为没有密码(后来发现要用不用角色的keytab登陆）</p><p><img src="/blog/img/user_list.png" loading="lazy"></p><h2 id="三-kerberos的使用"><a href="#三-kerberos的使用" class="headerlink" title="三.kerberos的使用"></a>三.kerberos的使用</h2><p>创建user1测试用户，执行Hive和MapReduce任务，需要在集群所有节点创建user1用户</p><p><strong>1.使用kadmin创建一个user1的principal</strong></p><figure class="highlight plaintext"><table><tbody><tr><td class="code"><pre><span class="line">(base) [root@h1 ~]# kadmin.local</span><br><span class="line"></span><br><span class="line">Authenticating as principal admin/admin@CAT.COM with password.</span><br><span class="line"></span><br><span class="line">kadmin.local:  addprinc user1@CAT.COM</span><br><span class="line"></span><br><span class="line">WARNING: no policy specified for user1@CAT.COM; defaulting to no policy</span><br><span class="line"></span><br><span class="line">Enter password for principal "user1@CATCOM":</span><br><span class="line"></span><br><span class="line">Re-enter password for principal "user1@CAT.COM":</span><br><span class="line"></span><br><span class="line">Principal "user1@CAT.COM" created.</span><br><span class="line"></span><br><span class="line">kadmin.local:  exit</span><br></pre></td></tr></tbody></table></figure><p><strong>2.使用user1用户登录Kerberos</strong></p><figure class="highlight plaintext"><table><tbody><tr><td class="code"><pre><span class="line">[root@h1 ~]# kdestroy</span><br><span class="line">[root@h1 ~]# kinit user1</span><br><span class="line">#设置user1登陆密码</span><br><span class="line">Password for user1@CAT.COM:</span><br><span class="line">#查看user1的有效期</span><br><span class="line">(base) [root@h1 ~]# klist</span><br><span class="line">Ticket cache: FILE:/tmp/krb5cc_0</span><br><span class="line">Default principal: user1@CAT.COM</span><br><span class="line">Valid starting       Expires              Service principal</span><br><span class="line">12/26/2019 18:29:17  12/27/2019 18:29:17  krbtgt/CAT.COM@CAT.COM</span><br><span class="line">        renew until 01/03/2019 18:29:17</span><br></pre></td></tr></tbody></table></figure><p><strong>3.在集群所有节点添加user1用户</strong></p><p>一定要在所有机器添加，因为任务是分布式的，比如yarn和mr会分配container给不同的机器，不然跑任务会报错。</p><ul><li>添加user1用户</li></ul><figure class="highlight plaintext"><table><tbody><tr><td class="code"><pre><span class="line">[root@h1 ~]#useradd user1</span><br><span class="line">[root@h2 ~]#useradd user1</span><br><span class="line">[root@h3 ~]#useradd user1</span><br></pre></td></tr></tbody></table></figure><ul><li>把user1用户添加到hdfs,hadoop用户组中</li></ul><figure class="highlight plaintext"><table><tbody><tr><td class="code"><pre><span class="line">[root@h1 ~]# usermod -G hdfs,hadoop user1</span><br><span class="line">[root@h1 ~]# usermod -G hadoop user1</span><br></pre></td></tr></tbody></table></figure><p><strong>4.运行MapReduce作业</strong></p><figure class="highlight plaintext"><table><tbody><tr><td class="code"><pre><span class="line">#先用user1登陆kerberos</span><br><span class="line">[root@h1 conf]# su - user1</span><br><span class="line">[root@h1 conf]# kinit user1</span><br><span class="line">Password for user1@CAT.COM:</span><br><span class="line">[root@h1 conf]# klist</span><br><span class="line">Ticket cache: FILE:/tmp/krb5cc_0</span><br><span class="line">Default principal: user1@CAT.COM</span><br><span class="line">Valid starting       Expires              Service principal</span><br><span class="line">12/30/2019 22:27:40  12/31/2019 22:27:40  krbtgt/CAT.COM@CAT.COM</span><br><span class="line">        renew until 01/06/2020 22:27:40</span><br><span class="line">#测试mr demo</span><br><span class="line">[root@h1 conf]# hadoop jar /opt/cloudera/parcels/CDH/lib/hadoop-mapreduce/hadoop-mapreduce-examples.jar pi 10 1</span><br><span class="line">WARNING: Use "yarn jar" to launch YARN applications.</span><br><span class="line">Number of Maps  = 10</span><br><span class="line">Samples per Map = 1</span><br><span class="line">Wrote input for Map #0</span><br><span class="line">Wrote input for Map #1</span><br><span class="line">Wrote input for Map #2</span><br><span class="line">Wrote input for Map #3</span><br><span class="line">Wrote input for Map #4</span><br><span class="line">Wrote input for Map #5</span><br><span class="line">Wrote input for Map #6</span><br><span class="line">Wrote input for Map #7</span><br><span class="line">Wrote input for Map #8</span><br><span class="line">Wrote input for Map #9</span><br><span class="line">Starting Job</span><br><span class="line">19/12/30 22:32:49 INFO client.RMProxy: Connecting to ResourceManager at h1.cat.com/192.168.1.171:8032</span><br><span class="line">19/12/30 22:32:50 INFO hdfs.DFSClient: Created token for user2: HDFS_DELEGATION_TOKEN owner=user2@CAT.COM, renewer=yarn, realUser=, issueDate=1577716370019, maxDate=1578321170019, sequenceNumber=4, masterKeyId=10 on 192.168.1.171:8020</span><br><span class="line">19/12/30 22:32:50 INFO security.TokenCache: Got dt for hdfs://h1.cat.com:8020; Kind: HDFS_DELEGATION_TOKEN, Service: 192.168.1.171:8020, Ident: (token for user2: HDFS_DELEGATION_TOKEN owner=user2@CAT.COM, renewer=yarn, realUser=, issueDate=1577716370019, maxDate=1578321170019, sequenceNumber=4, masterKeyId=10)</span><br><span class="line">19/12/30 22:32:50 INFO mapreduce.JobResourceUploader: Disabling Erasure Coding for path: /user/user2/.staging/job_1577701614246_0003</span><br><span class="line">19/12/30 22:32:50 INFO input.FileInputFormat: Total input files to process : 10</span><br><span class="line">19/12/30 22:32:50 INFO mapreduce.JobSubmitter: number of splits:10</span><br><span class="line">19/12/30 22:32:50 INFO Configuration.deprecation: yarn.resourcemanager.system-metrics-publisher.enabled is deprecated. Instead, use yarn.system-metrics-publisher.enabled</span><br><span class="line">19/12/30 22:32:50 INFO mapreduce.JobSubmitter: Submitting tokens for job: job_1577701614246_0003</span><br><span class="line">19/12/30 22:32:50 INFO mapreduce.JobSubmitter: Executing with tokens: [Kind: HDFS_DELEGATION_TOKEN, Service: 192.168.1.171:8020, Ident: (token for user2: HDFS_DELEGATION_TOKEN owner=user2@CAT.COM, renewer=yarn, realUser=, issueDate=1577716370019, maxDate=1578321170019, sequenceNumber=4, masterKeyId=10)]</span><br><span class="line">19/12/30 22:32:51 INFO conf.Configuration: resource-types.xml not found</span><br><span class="line">19/12/30 22:32:51 INFO resource.ResourceUtils: Unable to find 'resource-types.xml'.</span><br><span class="line">19/12/30 22:32:51 INFO impl.YarnClientImpl: Submitted application application_1577701614246_0003</span><br><span class="line">19/12/30 22:32:51 INFO mapreduce.Job: The url to track the job: http://h1.cat.com:8088/proxy/application_1577701614246_0003/</span><br><span class="line">19/12/30 22:32:51 INFO mapreduce.Job: Running job: job_1577701614246_0003</span><br><span class="line">19/12/30 22:33:04 INFO mapreduce.Job: Job job_1577701614246_0003 running in uber mode : false</span><br><span class="line">19/12/30 22:33:04 INFO mapreduce.Job:  map 0% reduce 0%</span><br><span class="line">19/12/30 22:33:14 INFO mapreduce.Job:  map 20% reduce 0%</span><br><span class="line">19/12/30 22:33:19 INFO mapreduce.Job:  map 30% reduce 0%</span><br><span class="line">19/12/30 22:33:20 INFO mapreduce.Job:  map 40% reduce 0%</span><br><span class="line">19/12/30 22:33:24 INFO mapreduce.Job:  map 50% reduce 0%</span><br><span class="line">19/12/30 22:33:25 INFO mapreduce.Job:  map 60% reduce 0%</span><br><span class="line">19/12/30 22:33:30 INFO mapreduce.Job:  map 80% reduce 0%</span><br><span class="line">19/12/30 22:33:35 INFO mapreduce.Job:  map 100% reduce 0%</span><br><span class="line">19/12/30 22:33:41 INFO mapreduce.Job:  map 100% reduce 100%</span><br><span class="line">19/12/30 22:33:42 INFO mapreduce.Job: Job job_1577701614246_0003 completed successfully</span><br><span class="line">19/12/30 22:33:42 INFO mapreduce.Job: Counters: 54</span><br><span class="line">        File System Counters</span><br><span class="line">                FILE: Number of bytes read=49</span><br><span class="line">                FILE: Number of bytes written=2433690</span><br><span class="line">                FILE: Number of read operations=0</span><br><span class="line">                FILE: Number of large read operations=0</span><br><span class="line">                FILE: Number of write operations=0</span><br><span class="line">......................</span><br><span class="line">Job Finished in 53.382 seconds</span><br><span class="line">Estimated value of Pi is 3.60000000000000000000</span><br></pre></td></tr></tbody></table></figure><p><strong>测试连接 beelin</strong></p><figure class="highlight plaintext"><table><tbody><tr><td class="code"><pre><span class="line">beeline&gt; !connect jdbc:hive2://localhost:10000/;principal=hive/h1@CAT.COM</span><br><span class="line">Connecting to jdbc:hive2://localhost:10000/;principal=hive/h1@CAT.COM</span><br><span class="line">Connected to: Apache Hive (version 2.1.1-cdh6.3.1)</span><br><span class="line">Driver: Hive JDBC (version 2.1.1-cdh6.3.1)</span><br><span class="line">Transaction isolation: TRANSACTION_REPEATABLE_READ</span><br><span class="line">0: jdbc:hive2://localhost:10000/&gt;</span><br></pre></td></tr></tbody></table></figure><p><strong>以上就完成了kerberos的设置</strong></p><h2 id="四-下面我们来设置下kerberos-hive环境"><a href="#四-下面我们来设置下kerberos-hive环境" class="headerlink" title="四.下面我们来设置下kerberos  hive环境"></a>四.下面我们来设置下kerberos  hive环境</h2><p>需要完成以下设置，才可以使用hive</p><ul><li><p>不然可能会报下面的错误。</p></li><li><p>两种情况下会报以下错误：</p></li></ul><p>1.ticket过期没有续约情况下<br>2.没有生成keytab</p><figure class="highlight text"><table><tbody><tr><td class="code"><pre><span class="line">“Failed on local exception: java.io.IOException: org.apache.hadoop.security.AccessControlException: Client cannot authenticate via:[TOKEN, KERBEROS]; Host Details : local host is: “h1.cat.com/192.168.1.171”; destination host is: “h1.cat.com”:8020; "</span><br></pre></td></tr></tbody></table></figure><figure class="highlight plaintext"><table><tbody><tr><td class="code"><pre><span class="line">[root@h1 ~]# hive</span><br><span class="line">WARNING: Use "yarn jar" to launch YARN applications.</span><br><span class="line">SLF4J: Class path contains multiple SLF4J bindings.</span><br><span class="line">SLF4J: Found binding in [jar:file:/opt/cloudera/parcels/CDH-6.3.1-1.cdh6.3.1.p0.1470567/jars/log4j-slf4j-impl-2.8.2.jar!/org/slf4j/impl/StaticLoggerBinder.class]</span><br><span class="line">SLF4J: Found binding in [jar:file:/opt/cloudera/parcels/CDH-6.3.1-1.cdh6.3.1.p0.1470567/jars/slf4j-log4j12-1.7.25.jar!/org/slf4j/impl/StaticLoggerBinder.class]</span><br><span class="line">SLF4J: See http://www.slf4j.org/codes.html#multiple_bindings for an explanation.</span><br><span class="line">SLF4J: Actual binding is of type [org.apache.logging.slf4j.Log4jLoggerFactory]</span><br><span class="line"></span><br><span class="line">Logging initialized using configuration in jar:file:/opt/cloudera/parcels/CDH-6.3.1-1.cdh6.3.1.p0.1470567/jars/hive-common-2.1.1-cdh6.3.1.jar!/hive-log4j2.properties Async: false</span><br><span class="line">Exception in thread "main" java.lang.RuntimeException: java.io.IOException: Failed on local exception: java.io.IOException: org.apache.hadoop.security.AccessControlException: Client cannot authenticate via:[TOKEN, KERBEROS]; Host Details : local host is: "h1.cat.com/192.168.1.171"; destination host is: "h1.cat.com":8020;</span><br><span class="line">        at org.apache.hadoop.hive.ql.session.SessionState.start(SessionState.java:604)</span><br><span class="line">        at org.apache.hadoop.hive.ql.session.SessionState.beginStart(SessionState.java:545)</span><br><span class="line">        at org.apache.hadoop.hive.cli.CliDriver.run(CliDriver.java:763)</span><br><span class="line">        at org.apache.hadoop.hive.cli.CliDriver.main(CliDriver.java:699)</span><br><span class="line">        at sun.reflect.NativeMethodAccessorImpl.invoke0(Native Method)</span><br><span class="line">        at sun.reflect.NativeMethodAccessorImpl.invoke(NativeMethodAccessorImpl.java:62)</span><br><span class="line">        at sun.reflect.DelegatingMethodAccessorImpl.invoke(DelegatingMethodAccessorImpl.java:43)</span><br><span class="line">        at java.lang.reflect.Method.invoke(Method.java:498)</span><br><span class="line">        at org.apache.hadoop.util.RunJar.run(RunJar.java:313)</span><br><span class="line">        at org.apache.hadoop.util.RunJar.main(RunJar.java:227)</span><br><span class="line">Caused by: java.io.IOException: Failed on local exception: java.io.IOException: org.apache.hadoop.security.AccessControlException: Client cannot authenticate via:[TOKEN, KERBEROS]; Host Details : local host is: "h1.cat.com/192.168.1.171"; destination host is: "h1.cat.com":8020;</span><br><span class="line">        at org.apache.hadoop.net.NetUtils.wrapException(NetUtils.java:808)</span><br><span class="line">        at org.apache.hadoop.ipc.Client.getRpcResponse(Client.java:1503)</span><br><span class="line">        at org.apache.hadoop.ipc.Client.call(Client.java:1445)</span><br><span class="line">        at org.apache.hadoop.ipc.Client.call(Client.java:1355)</span><br><span class="line">        at org.apache.hadoop.ipc.ProtobufRpcEngine$Invoker.invoke(ProtobufRpcEngine.java:228)</span><br><span class="line">        at org.apache.hadoop.ipc.ProtobufRpcEngine$Invoker.invoke(ProtobufRpcEngine.java:116)</span><br><span class="line">        at com.sun.proxy.$Proxy28.getFileInfo(Unknown Source)</span><br><span class="line">        at org.apache.hadoop.hdfs.protocolPB.ClientNamenodeProtocolTranslatorPB.getFileInfo(ClientNamenodeProtocolTranslatorPB.java:875)</span><br><span class="line">        at sun.reflect.NativeMethodAccessorImpl.invoke0(Native Method)</span><br><span class="line">        at sun.reflect.NativeMethodAccessorImpl.invoke(NativeMethodAccessorImpl.java:62)</span><br><span class="line">        at sun.reflect.DelegatingMethodAccessorImpl.invoke(DelegatingMethodAccessorImpl.java:43)</span><br><span class="line">        at java.lang.reflect.Method.invoke(Method.java:498)</span><br><span class="line">        at org.apache.hadoop.io.retry.RetryInvocationHandler.invokeMethod(RetryInvocationHandler.java:422)</span><br><span class="line">        at org.apache.hadoop.io.retry.RetryInvocationHandler$Call.invokeMethod(RetryInvocationHandler.java:165)</span><br><span class="line">        at org.apache.hadoop.io.retry.RetryInvocationHandler$Call.invoke(RetryInvocationHandler.java:157)</span><br><span class="line">        at org.apache.hadoop.io.retry.RetryInvocationHandler$Call.invokeOnce(RetryInvocationHandler.java:95)</span><br><span class="line">        at org.apache.hadoop.io.retry.RetryInvocationHandler.invoke(RetryInvocationHandler.java:359)</span><br><span class="line">        at com.sun.proxy.$Proxy29.getFileInfo(Unknown Source)</span><br><span class="line">        at org.apache.hadoop.hdfs.DFSClient.getFileInfo(DFSClient.java:1630)</span><br><span class="line">        at org.apache.hadoop.hdfs.DistributedFileSystem$29.doCall(DistributedFileSystem.java:1496)</span><br><span class="line">        at org.apache.hadoop.hdfs.DistributedFileSystem$29.doCall(DistributedFileSystem.java:1493)</span><br><span class="line">        at org.apache.hadoop.fs.FileSystemLinkResolver.resolve(FileSystemLinkResolver.java:81)</span><br><span class="line">        at org.apache.hadoop.hdfs.DistributedFileSystem.getFileStatus(DistributedFileSystem.java:1508)</span><br><span class="line">        at org.apache.hadoop.fs.FileSystem.exists(FileSystem.java:1617)</span><br><span class="line">        at org.apache.hadoop.hive.ql.session.SessionState.createRootHDFSDir(SessionState.java:712)</span><br><span class="line">        at org.apache.hadoop.hive.ql.session.SessionState.createSessionDirs(SessionState.java:650)</span><br><span class="line">        at org.apache.hadoop.hive.ql.session.SessionState.start(SessionState.java:580)</span><br><span class="line">        ... 9 more</span><br><span class="line">Caused by: java.io.IOException: org.apache.hadoop.security.AccessControlException: Client cannot authenticate via:[TOKEN, KERBEROS]</span><br><span class="line">        at org.apache.hadoop.ipc.Client$Connection$1.run(Client.java:756)</span><br></pre></td></tr></tbody></table></figure><p><strong>1.生成 keytab</strong></p><p>在 KDC server 节点上执行下面命令：</p><p>生成集群所有机器的keytab 汇总后发送给集群每个机器。</p><figure class="highlight plaintext"><table><tbody><tr><td class="code"><pre><span class="line">cd /var/kerberos/krb5kdc/</span><br><span class="line"></span><br><span class="line">kadmin.local -q "addprinc -randkey hive/h1.cat.com@CAT.COM "</span><br><span class="line">kadmin.local -q "addprinc -randkey hive/h2.cat.com@CAT.COM "</span><br><span class="line">kadmin.local -q "addprinc -randkey hive/h3.cat.com@CAT.COM "</span><br><span class="line"></span><br><span class="line">kadmin.local -q "xst  -k hive.keytab  hive/h1.cat.com@CAT.COM "</span><br><span class="line">kadmin.local -q "xst  -k hive.keytab  hive/h2.cat.com@CAT.COM "</span><br><span class="line">kadmin.local -q "xst  -k hive.keytab  hive/h3.cat.com@CAT.COM "</span><br></pre></td></tr></tbody></table></figure><p>*h1.cat.com为hostname,CAT.COM为kerber设置的安全域,在前面设置的。</p><p><strong>2 拷贝 hive.keytab 文件到其他节点的 /etc/hive/conf 目录</strong></p><figure class="highlight plaintext"><table><tbody><tr><td class="code"><pre><span class="line">$ scp hive.keytab cdh1:/etc/hive/conf</span><br><span class="line">$ scp hive.keytab cdh2:/etc/hive/conf</span><br><span class="line">$ scp hive.keytab cdh3:/etc/hive/conf</span><br></pre></td></tr></tbody></table></figure><p>并设置权限，分别在 cdh1、cdh2、cdh3 上执行：</p><figure class="highlight plaintext"><table><tbody><tr><td class="code"><pre><span class="line">$ ssh cdh1 "cd /etc/hive/conf/;chown hive:hadoop hive.keytab ;chmod 400 *.keytab"</span><br><span class="line">$ ssh cdh2 "cd /etc/hive/conf/;chown hive:hadoop hive.keytab ;chmod 400 *.keytab"</span><br><span class="line">$ ssh cdh3 "cd /etc/hive/conf/;chown hive:hadoop hive.keytab ;chmod 400 *.keytab"</span><br></pre></td></tr></tbody></table></figure><p>有了keytab 相当于有了永久凭证，不需要提供密码(如果修改 kdc 中的 principal 的密码，则该 keytab 就会失效)，所以其他用户如果对该文件有读权限，就可以冒充 keytab 中指定的用户身份访问 hadoop，所以 keytab 文件需要确保只对 owner 有读权限(0400)</p><ul><li>然后重启hive</li></ul><figure class="highlight plaintext"><table><tbody><tr><td class="code"><pre><span class="line">[user1@h1 ~]$ kinit -kt hive.keytab hive/h1</span><br><span class="line">[user1@h1 ~]$ hive</span><br></pre></td></tr></tbody></table></figure><ul><li>再次执行hive命令。运行正常</li></ul><hr><h2 id="五-问题与总结"><a href="#五-问题与总结" class="headerlink" title="五.问题与总结"></a>五.问题与总结</h2><p><strong>1.连接beelin遇到的错误</strong></p><p>问题貌似出在：</p><p>1.没有把用户加到机器<br>2.没有把用户添加到hdfs,hadoop用户组中</p><figure class="highlight plaintext"><table><tbody><tr><td class="code"><pre><span class="line">beeline&gt; !connect jdbc:hive2://h1:10000/;principal=hive/h1@CAT.COM</span><br><span class="line">Connecting to jdbc:hive2://h1:10000/;principal=hive/h1@CAT.COM</span><br><span class="line">19/12/30 17:36:50 [main]: WARN jdbc.HiveConnection: Failed to connect to h1:10000</span><br><span class="line">Could not open connection to the HS2 server. Please check the server URI and if the URI is correct, then ask the administrator to check the server status.</span><br><span class="line">Error: Could not open client transport with JDBC Uri: jdbc:hive2://h1:10000/;principal=hive/h1@CAT.COM: java.net.ConnectException: Connection refused (Connection refused) (state=08S01,code=0)</span><br><span class="line"></span><br><span class="line">beeline&gt; !connect jdbc:hive2://h1:10000/;principal=hive/h1@CAT.COM</span><br><span class="line">Connecting to jdbc:hive2://h1:10000/;principal=hive/h1@CAT.COM</span><br><span class="line">19/12/30 19:10:22 [main]: ERROR transport.TSaslTransport: SASL negotiation failure</span><br><span class="line">javax.security.sasl.SaslException: GSS initiate failed</span><br></pre></td></tr></tbody></table></figure><p><strong>2.hue报错,Kerberos Ticket Renewer无法启动</strong><br>错误：</p><p><img src="/blog/img/hue-erro.png" loading="lazy"></p><figure class="highlight plaintext"><table><tbody><tr><td class="code"><pre><span class="line">INFO kt_renewer</span><br><span class="line">Renewing kerberos ticket to work around kerberos 1.8.1: /bin/kinit -R -c /var/run/hue/hue_krb5_ccache</span><br><span class="line">ERROR kt_renewer Couldn't renew kerberos ticket in order to work around Kerberos 1.8.1 issue. Please check that the ticket for 'hue/$server1@ANYTHING.COM' is still renewable:</span><br><span class="line">$ klist -f -c /var/run/hue/hue_krb5_ccache</span><br><span class="line">If the 'renew until' date is the same as the 'valid starting' date, the ticket cannot be renewed. Please check your KDC configuration, and the ticket renewal policy (maxrenewlife) for the 'hue/$server1@ANYTHING.COM' and `krbtgt' principals.</span><br><span class="line">[19/Feb/2019 07:32:04 ] settings INFO Welcome to Hue 3.9.0</span><br></pre></td></tr></tbody></table></figure><p>原因是KDC配置有一项配置有问题<br>/var/kerberos/krb5kdc/kdc.conf<br>修改后重启就好。 注释 #ticket_lifetime = 10m 不应该写。ticket相关设置在client中设置</p><figure class="highlight plaintext"><table><tbody><tr><td class="code"><pre><span class="line">[kdcdefaults]</span><br><span class="line"> kdc_ports = 88</span><br><span class="line"> kdc_tcp_ports = 88</span><br><span class="line"></span><br><span class="line">[realms]</span><br><span class="line"> CAT.COM = {</span><br><span class="line">  #master_key_type = aes256-cts</span><br><span class="line">  #ticket_lifetime = 10m</span><br><span class="line">  max_renewable_life= 7d 0h 0m 0s</span><br><span class="line">  acl_file = /var/kerberos/krb5kdc/kadm5.acl</span><br><span class="line">  dict_file = /usr/share/dict/words</span><br><span class="line">  admin_keytab = /var/kerberos/krb5kdc/kadm5.keytab</span><br><span class="line">  supported_enctypes = aes256-cts:normal aes128-cts:normal des3-hmac-sha1:normal arcfour-hmac:normal camellia256-cts:normal ca</span><br><span class="line">mellia128-cts:normal des-hmac-sha1:normal des-cbc-md5:normal des-cbc-crc:normal</span><br><span class="line"> }</span><br></pre></td></tr></tbody></table></figure><p>另外一个可能引起的问题是maxnewlisf配置有问题。<br>大部分导致的原因是maxnewlife时间是0</p><p>官方介绍<br><a href="https://docs.cloudera.com/documentation/manager/5-1-x/Configuring-Hadoop-Security-with-Cloudera-Manager/cm5chs_enable_hue_sec_s10.html">https://docs.cloudera.com/documentation/manager/5-1-x/Configuring-Hadoop-Security-with-Cloudera-Manager/cm5chs_enable_hue_sec_s10.html</a></p><p>命令查看maxnewlife的配置: <code>kadmin.local -q 'getprinc krbtgt/CAT.COM@CAT.COM'</code><br>看是否为0，如果是0需要修改。</p><p><img src="/blog/img/setting.png" loading="lazy"></p><p>用两个命令修改,或者去配置文件/var/kerberos/krb5kdc/kdc.conf</p><p>修改maxnew life时间</p><p><code> modprinc -maxrenewlife 90day krbtgt/CAT.COM@CAT.COM</code></p><p>修改单个用户的maxnew life时间</p><p><code>modprinc -maxrenewlife 90day allow_renewable hue/h1.cat.com@CAT.COM</code></p><p><strong>3.hive metastore问题:</strong></p><p>原因是hive的keytab生成有误，metastore无法正常启动<br>解决办法：按照上面的步骤重新生成新的keytab,然后发送到所有机器即可</p><p>failure to login: for principal: <a href="mailto:hive/h1.cat.com@CAT.COM">hive/h1.cat.com@CAT.COM</a> from keytab hive.keytab javax.security.auth.logi<br>n.LoginException: Checksum failed</p><figure class="highlight text"><table><tbody><tr><td class="code"><pre><span class="line">```</span><br><span class="line">2019-12-30 18:22:08,407 ERROR org.apache.hadoop.hive.metastore.HiveMetaStore: [main]: org.apache.thrift.transport.TTransportException: org.apache</span><br><span class="line">.hadoop.security.KerberosAuthException: failure to login: for principal: hive/h1.cat.com@CAT.COM from keytab hive.keytab javax.security.auth.logi</span><br><span class="line">n.LoginException: Checksum failed</span><br><span class="line">        at org.apache.hadoop.hive.thrift.HadoopThriftAuthBridge$Server.&lt;init&gt;(HadoopThriftAuthBridge.java:327)</span><br><span class="line">        at org.apache.hadoop.hive.thrift.HadoopThriftAuthBridge.createServer(HadoopThriftAuthBridge.java:101)</span><br><span class="line">        at org.apache.hadoop.hive.metastore.HiveMetaStore.startMetaStore(HiveMetaStore.java:7291)</span><br><span class="line">        at org.apache.hadoop.hive.metastore.HiveMetaStore.main(HiveMetaStore.java:7210)</span><br><span class="line">        at sun.reflect.NativeMethodAccessorImpl.invoke0(Native Method)</span><br><span class="line">        at sun.reflect.NativeMethodAccessorImpl.invoke(NativeMethodAccessorImpl.java:62)</span><br><span class="line">        at sun.reflect.DelegatingMethodAccessorImpl.invoke(DelegatingMethodAccessorImpl.java:43)</span><br><span class="line">        at java.lang.reflect.Method.invoke(Method.java:498)</span><br><span class="line">        at org.apache.hadoop.util.RunJar.run(RunJar.java:313)</span><br><span class="line">        at org.apache.hadoop.util.RunJar.main(RunJar.java:227)</span><br><span class="line">Caused by: org.apache.hadoop.security.KerberosAuthException: failure to login: for principal: hive/h1.cat.com@CAT.COM from keytab hive.keytab jav</span><br><span class="line">ax.security.auth.login.LoginException: Checksum failed</span><br></pre></td></tr></tbody></table></figure><figure class="highlight plaintext"><table><tbody><tr><td class="code"><pre><span class="line"></span><br><span class="line">================================================================</span><br><span class="line"></span><br><span class="line">### 其他总结</span><br><span class="line"></span><br><span class="line">**给新建用户分配权限步骤**</span><br><span class="line"></span><br><span class="line">- 1.创建kerberos用户和密码</span><br><span class="line"></span><br></pre></td></tr></tbody></table></figure><p>[root@bogon ~]# kadmin.local -q “addprinc user1”<br>Authenticating as principal root/<a href="mailto:admin@CAT.COM">admin@CAT.COM</a> with password.<br>WARNING: no policy specified for <a href="mailto:user1@CAT.COM">user1@CAT.COM</a>; defaulting to no policy<br>Enter password for principal “<a href="mailto:user1@CAT.COM">user1@CAT.COM</a>“:<br>Re-enter password for principal “<a href="mailto:user1@CAT.COM">user1@CAT.COM</a>“:<br>Principal “<a href="mailto:user1@CAT.COM">user1@CAT.COM</a>“ created.</p><figure class="highlight plaintext"><table><tbody><tr><td class="code"><pre><span class="line"></span><br><span class="line">**2. 在所有机器节点添加 user1 用户**</span><br><span class="line"></span><br><span class="line">```bash</span><br><span class="line">useradd user1        # 每台节点都执行</span><br></pre></td></tr></tbody></table></figure><p><strong>3. 登陆验证</strong></p><figure class="highlight bash"><table><tbody><tr><td class="code"><pre><span class="line">su - user1</span><br><span class="line">kinit user1          <span class="comment"># 输入上面设置的密码</span></span><br><span class="line">klist                <span class="comment"># 查看有效期</span></span><br></pre></td></tr></tbody></table></figure><h3 id="其他记录"><a href="#其他记录" class="headerlink" title="其他记录"></a>其他记录</h3><ul><li><code>kdestroy</code>：清理当前凭证 / 退出当前 kerberos 用户</li><li><code>kinit -R</code>：续订票据</li><li>不同用户/机器的 ticket 时间可能不同，取决于 <code>/etc/krb5.conf</code></li><li>必须在 ticket 有效期内续约才有效</li><li>一台机器同一时间只能运行一个 kerberos 用户：a 登录 user1 后，b 登录 user2 时 user1 的角色自动切换为 user2</li><li>查看配置：<code>kadmin.local -q 'getprinc krbtgt/CAT.COM@CAT.COM'</code></li><li>hue 的 principal：<code>hue/h1.cat.com@CAT.COM</code></li><li>配置文件目录：<code>/etc/krb5.conf</code>、<code>/var/kerberos/krb5kdc/kdc.conf</code></li></ul><p>启动服务命令：</p><figure class="highlight bash"><table><tbody><tr><td class="code"><pre><span class="line">systemctl start krb5kdc</span><br><span class="line">systemctl start kadmin</span><br></pre></td></tr></tbody></table></figure><p>查看 kerberos 用户列表：<code>kadmin.local -q "listprincs"</code></p><p><strong>kerberos的记录就完成了。下一篇研究sentry</strong></p>]]></content>

    
    
    <summary type="html">&lt;p&gt;环境： 基于centos 7.5,CDH 6.3.1&lt;/p&gt;
&lt;p&gt;&lt;img src=&quot;/blog/img/CDH.png&quot; loading=&quot;lazy&quot;&gt;&lt;/p&gt;
&lt;p&gt;&lt;img src=&quot;/blog/img/ext_dog-ring.jpg&quot; loading=&quot;lazy&quot;&gt;&lt;/p&gt;
&lt;h2 id=&quot;一-安装kerberos&quot;&gt;&lt;a href=&quot;#一-安装kerberos&quot; class=&quot;headerlink&quot; title=&quot;一.安装kerberos&quot;&gt;&lt;/a&gt;一.安装kerberos&lt;/h2&gt;&lt;p&gt;&lt;strong&gt;kerberso是什么&lt;/strong&gt;&lt;/p&gt;
&lt;p&gt;之前没有接触过kerberos，最近项目需要基于CDH的多租户管理，所以简单了解了下。kerberos要做的工作就是验证进行权限申请的人是他声称的那个人的问题。&lt;/p&gt;</summary>


    <category term="cdh" scheme="https://jerryliu.site/blog/tags/cdh/"/>
    
    <category term="hadoop" scheme="https://jerryliu.site/blog/tags/hadoop/"/>
    
    <category term="kerberos" scheme="https://jerryliu.site/blog/tags/kerberos/"/>
    
    <category term="sentry" scheme="https://jerryliu.site/blog/tags/sentry/"/>
    
  </entry>
  
  <entry>
    <title>Centos7.5离线搭建CDH6.3</title>
    <link href="https://jerryliu.site/blog/posts/2360fe26/"/>
    <id>https://jerryliu.site/blog/posts/2360fe26/</id>
    <published>2019-10-15T04:00:00.000Z</published>
    <updated>2026-09-09T15:39:33.885Z</updated>
    
    <content type="html"><![CDATA[<p><img src="/blog/img/CDH.png" loading="lazy"></p><p>环境：CentOS 7.5, CDH 6.3</p><p>本文记录在 CentOS 7.5 下完全离线部署 CDH 6.3 的完整过程。之前搭建过 CDH 5.x，每次都会遇到一些问题，这次把 6.x 的搭建过程记录下来。</p><span id="more"></span><ul><li>官方文档：<a href="https://docs.cloudera.com/documentation/enterprise/6/6.0/topics/install_cm_cdh.html#cmig_topic_6_6">Cloudera Enterprise 6.0 安装指南</a></li><li>参考：<a href="https://www.staroon.dev/2018/12/01/CDH6Install/">staroon.dev CDH6 安装</a></li></ul><h2 id="一、搭建前的环境准备"><a href="#一、搭建前的环境准备" class="headerlink" title="一、搭建前的环境准备"></a>一、搭建前的环境准备</h2><h3 id="1-版本与依赖要求"><a href="#1-版本与依赖要求" class="headerlink" title="1. 版本与依赖要求"></a>1. 版本与依赖要求</h3><ul><li>操作系统：RHEL 7.2<del>7.5 / CentOS 7.2</del>7.5（64 位）</li><li>Python：2.7+（安装 Hue 需要，不支持 Python 3）、perl、python-psycopg2 2.5.4+</li><li>Java：仅支持 Oracle 64 位 JDK 8（最低 1.8u31，推荐 1.8u74+）</li><li>数据库：生产环境需外部数据库，MySQL 5.7 或 MariaDB 5.5/10.0；库表必须使用 UTF8 编码（不要用 utf8mb4）</li><li>MySQL 5.7 需额外安装 MySQL-shared-compat 或 MySQL-shared 包</li><li>浏览器：Chrome 63+ / Firefox 59+ / IE 11+ / Edge 41+</li></ul><h3 id="2-网络与安全配置（所有节点）"><a href="#2-网络与安全配置（所有节点）" class="headerlink" title="2. 网络与安全配置（所有节点）"></a>2. 网络与安全配置（所有节点）</h3><p>设置唯一主机名并配置 hosts：</p><figure class="highlight bash"><table><tbody><tr><td class="code"><pre><span class="line">hostnamectl set-hostname &lt;主机名&gt;          <span class="comment"># 每台节点唯一</span></span><br><span class="line">vim /etc/hosts                            <span class="comment"># 写入集群所有主机名与 IP，禁止大写、禁止重复 IP</span></span><br></pre></td></tr></tbody></table></figure><blockquote><p>注意：CDH 不支持 IPv6，建议在系统层面禁用。</p></blockquote><p>禁用防火墙：</p><figure class="highlight bash"><table><tbody><tr><td class="code"><pre><span class="line">systemctl stop firewalld</span><br><span class="line">systemctl <span class="built_in">disable</span> firewalld</span><br></pre></td></tr></tbody></table></figure><p>SELinux 设为 permissive：</p><figure class="highlight bash"><table><tbody><tr><td class="code"><pre><span class="line">getenforce          <span class="comment"># enforcing 才需要改</span></span><br><span class="line">sed -i <span class="string">'s/SELINUX=enforcing/SELINUX=permissive/'</span> /etc/selinux/config</span><br><span class="line">setenforce 0</span><br></pre></td></tr></tbody></table></figure><h3 id="3-时间同步-NTP（所有节点）"><a href="#3-时间同步-NTP（所有节点）" class="headerlink" title="3. 时间同步 NTP（所有节点）"></a>3. 时间同步 NTP（所有节点）</h3><p>集群时间必须同步：选一个节点做 NTP 服务端，其余节点做客户端。</p><figure class="highlight bash"><table><tbody><tr><td class="code"><pre><span class="line">yum -y install ntp</span><br><span class="line">systemctl start ntpd &amp;&amp; systemctl <span class="built_in">enable</span> ntpd</span><br><span class="line"><span class="comment"># 客户端向服务端同步（服务端 IP 如 192.168.2.10）</span></span><br><span class="line">ntpdate -u 192.168.2.10</span><br></pre></td></tr></tbody></table></figure><h3 id="4-安装-JDK-8（所有节点）"><a href="#4-安装-JDK-8（所有节点）" class="headerlink" title="4. 安装 JDK 8（所有节点）"></a>4. 安装 JDK 8（所有节点）</h3><figure class="highlight bash"><table><tbody><tr><td class="code"><pre><span class="line"><span class="built_in">cd</span> /opt</span><br><span class="line">wget https://repo.huaweicloud.com/java/jdk/8u202-b08/jdk-8u202-linux-x64.tar.gz</span><br><span class="line">tar -zxvf jdk-8u202-linux-x64.tar.gz</span><br></pre></td></tr></tbody></table></figure><p><code>~/.bashrc</code> 添加环境变量：</p><figure class="highlight bash"><table><tbody><tr><td class="code"><pre><span class="line"><span class="built_in">export</span> JAVA_HOME=/opt/jdk1.8.0_202   <span class="comment"># 换成自己的解压目录</span></span><br><span class="line"><span class="built_in">export</span> JRE_HOME=<span class="variable">${JAVA_HOME}</span>/jre</span><br><span class="line"><span class="built_in">export</span> CLASSPATH=.:<span class="variable">${JAVA_HOME}</span>/lib:<span class="variable">${JRE_HOME}</span>/lib</span><br><span class="line"><span class="built_in">export</span> PATH=<span class="variable">${JAVA_HOME}</span>/bin:<span class="variable">$PATH</span></span><br></pre></td></tr></tbody></table></figure><figure class="highlight bash"><table><tbody><tr><td class="code"><pre><span class="line"><span class="built_in">source</span> ~/.bashrc</span><br><span class="line">java -version</span><br></pre></td></tr></tbody></table></figure><h3 id="5-局域网-Yum-源"><a href="#5-局域网-Yum-源" class="headerlink" title="5. 局域网 Yum 源"></a>5. 局域网 Yum 源</h3><p>安装 CM 需要大量依赖，建议先在集群内某节点搭一个局域网 Yum 源（如用 httpd + createrepo，或 FTP 方式），后续所有节点都指向它。</p><h2 id="二、准备离线安装包"><a href="#二、准备离线安装包" class="headerlink" title="二、准备离线安装包"></a>二、准备离线安装包</h2><ol><li><strong>CDH Parcel 包</strong>（放到 CM Server 的 parcel-repo）：<code>CDH-6.0.1-1.cdh6.0.1.p0.590678-el7.parcel</code> 及 <code>manifest.json</code></li><li><strong>Cloudera Manager RPM 包</strong>（cm6/6.3.1，从 <a href="https://archive.cloudera.com/cm6/6.3.1/redhat7/yum/RPMS/x86_64/">archive.cloudera.com</a> 下载到 <code>/opt/cloudera-repos</code>）：</li></ol><figure class="highlight text"><table><tbody><tr><td class="code"><pre><span class="line">cloudera-manager-agent-6.3.1-1466458.el7.x86_64.rpm</span><br><span class="line">cloudera-manager-daemons-6.3.1-1466458.el7.x86_64.rpm</span><br><span class="line">cloudera-manager-server-6.3.1-1466458.el7.x86_64.rpm</span><br><span class="line">cloudera-manager-server-db-2-6.3.1-1466458.el7.x86_64.rpm</span><br><span class="line">oracle-j2sdk1.8-1.8.0+update181-1.x86_64.rpm     # 约 176MB</span><br></pre></td></tr></tbody></table></figure><ol start="3"><li><strong>MySQL 驱动</strong>：<code>mysql-connector-java-5.1.47.tar.gz</code></li></ol><h2 id="三、搭建本地-CM-Yum-源（CM-Server-节点）"><a href="#三、搭建本地-CM-Yum-源（CM-Server-节点）" class="headerlink" title="三、搭建本地 CM Yum 源（CM Server 节点）"></a>三、搭建本地 CM Yum 源（CM Server 节点）</h2><blockquote><p>不要尝试用 FTP 搭建 CM 的 Yum 库。</p></blockquote><figure class="highlight bash"><table><tbody><tr><td class="code"><pre><span class="line">yum -y install httpd createrepo</span><br><span class="line">systemctl start httpd &amp;&amp; systemctl <span class="built_in">enable</span> httpd</span><br><span class="line"><span class="built_in">cd</span> /opt/cloudera-repos</span><br><span class="line">createrepo .</span><br><span class="line"><span class="built_in">mv</span> cloudera-repos /var/www/html/</span><br></pre></td></tr></tbody></table></figure><p>浏览器验证：<code>http://&lt;server-ip&gt;/cloudera-repos/</code> 能看到 RPM 列表即可。</p><p>在 CM Server 节点创建 repo 文件：</p><figure class="highlight bash"><table><tbody><tr><td class="code"><pre><span class="line">vim /etc/yum.repos.d/cloudera-manager.repo</span><br></pre></td></tr></tbody></table></figure><figure class="highlight ini"><table><tbody><tr><td class="code"><pre><span class="line"><span class="section">[cloudera-manager]</span></span><br><span class="line"><span class="attr">name</span>=Cloudera Manager <span class="number">6.3</span>.<span class="number">1</span></span><br><span class="line"><span class="attr">baseurl</span>=http://&lt;server-ip&gt;/cloudera-repos/</span><br><span class="line"><span class="attr">gpgcheck</span>=<span class="number">0</span></span><br><span class="line"><span class="attr">enabled</span>=<span class="number">1</span></span><br></pre></td></tr></tbody></table></figure><figure class="highlight bash"><table><tbody><tr><td class="code"><pre><span class="line">yum clean all &amp;&amp; yum makecache</span><br></pre></td></tr></tbody></table></figure><h2 id="四、安装-Cloudera-Manager"><a href="#四、安装-Cloudera-Manager" class="headerlink" title="四、安装 Cloudera Manager"></a>四、安装 Cloudera Manager</h2><figure class="highlight bash"><table><tbody><tr><td class="code"><pre><span class="line">yum install -y cloudera-manager-daemons cloudera-manager-agent cloudera-manager-server</span><br></pre></td></tr></tbody></table></figure><h2 id="五、配置-Parcel-存储库"><a href="#五、配置-Parcel-存储库" class="headerlink" title="五、配置 Parcel 存储库"></a>五、配置 Parcel 存储库</h2><p>将 CDH Parcel 与 manifest.json 上传到 CM Server 的 <code>/opt/cloudera/parcel-repo/</code>：</p><figure class="highlight bash"><table><tbody><tr><td class="code"><pre><span class="line"><span class="built_in">cd</span> /opt/cloudera/parcel-repo</span><br><span class="line"><span class="built_in">sha1sum</span> CDH-6.0.1-1.cdh6.0.1.p0.590678-el7.parcel | awk <span class="string">'{print $1}'</span> &gt; CDH-6.0.1-1.cdh6.0.1.p0.590678-el7.parcel.sha</span><br><span class="line"><span class="built_in">chown</span> -R cloudera-scm:cloudera-scm /opt/cloudera/parcel-repo/*</span><br></pre></td></tr></tbody></table></figure><h2 id="六、配置-MariaDB-MySQL"><a href="#六、配置-MariaDB-MySQL" class="headerlink" title="六、配置 MariaDB / MySQL"></a>六、配置 MariaDB / MySQL</h2><h3 id="1-安装并启动"><a href="#1-安装并启动" class="headerlink" title="1. 安装并启动"></a>1. 安装并启动</h3><figure class="highlight bash"><table><tbody><tr><td class="code"><pre><span class="line">yum -y install mariadb-server</span><br><span class="line">systemctl start mariadb &amp;&amp; systemctl <span class="built_in">enable</span> mariadb</span><br></pre></td></tr></tbody></table></figure><h3 id="2-修改配置-etc-my-cnf"><a href="#2-修改配置-etc-my-cnf" class="headerlink" title="2. 修改配置 /etc/my.cnf"></a>2. 修改配置 <code>/etc/my.cnf</code></h3><figure class="highlight ini"><table><tbody><tr><td class="code"><pre><span class="line"><span class="section">[mysqld]</span></span><br><span class="line"><span class="attr">datadir</span>=/var/lib/mysql</span><br><span class="line"><span class="attr">socket</span>=/var/lib/mysql/mysql.sock</span><br><span class="line"><span class="attr">transaction-isolation</span> = READ-COMMITTED</span><br><span class="line"><span class="attr">symbolic-links</span> = <span class="number">0</span></span><br><span class="line"><span class="attr">key_buffer</span> = <span class="number">16</span>M</span><br><span class="line"><span class="attr">key_buffer_size</span> = <span class="number">32</span>M</span><br><span class="line"><span class="attr">max_allowed_packet</span> = <span class="number">32</span>M</span><br><span class="line"><span class="attr">thread_stack</span> = <span class="number">256</span>K</span><br><span class="line"><span class="attr">thread_cache_size</span> = <span class="number">64</span></span><br><span class="line"><span class="attr">query_cache_limit</span> = <span class="number">8</span>M</span><br><span class="line"><span class="attr">query_cache_size</span> = <span class="number">64</span>M</span><br><span class="line"><span class="attr">query_cache_type</span> = <span class="number">1</span></span><br><span class="line"><span class="attr">max_connections</span> = <span class="number">550</span></span><br><span class="line"><span class="attr">log_bin</span>=/var/lib/mysql/mysql_binary_log</span><br><span class="line"><span class="attr">server_id</span>=<span class="number">1</span></span><br><span class="line"><span class="attr">binlog_format</span> = mixed</span><br><span class="line"><span class="attr">read_buffer_size</span> = <span class="number">2</span>M</span><br><span class="line"><span class="attr">read_rnd_buffer_size</span> = <span class="number">16</span>M</span><br><span class="line"><span class="attr">sort_buffer_size</span> = <span class="number">8</span>M</span><br><span class="line"><span class="attr">join_buffer_size</span> = <span class="number">8</span>M</span><br><span class="line"><span class="attr">innodb_file_per_table</span> = <span class="number">1</span></span><br><span class="line"><span class="attr">innodb_flush_log_at_trx_commit</span> = <span class="number">2</span></span><br><span class="line"><span class="attr">innodb_log_buffer_size</span> = <span class="number">64</span>M</span><br><span class="line"><span class="attr">innodb_buffer_pool_size</span> = <span class="number">4</span>G</span><br><span class="line"><span class="attr">innodb_thread_concurrency</span> = <span class="number">8</span></span><br><span class="line"><span class="attr">innodb_flush_method</span> = O_DIRECT</span><br><span class="line"><span class="attr">innodb_log_file_size</span> = <span class="number">512</span>M</span><br><span class="line"></span><br><span class="line"><span class="section">[mysqld_safe]</span></span><br><span class="line"><span class="attr">log-error</span>=/var/log/mariadb/mariadb.log</span><br><span class="line"><span class="attr">pid-file</span>=/var/run/mariadb/mariadb.pid</span><br><span class="line">!includedir /etc/my.cnf.d</span><br></pre></td></tr></tbody></table></figure><p>重启生效：<code>systemctl restart mariadb</code></p><h3 id="3-安装-JDBC-驱动（CM-Server-节点）"><a href="#3-安装-JDBC-驱动（CM-Server-节点）" class="headerlink" title="3. 安装 JDBC 驱动（CM Server 节点）"></a>3. 安装 JDBC 驱动（CM Server 节点）</h3><figure class="highlight bash"><table><tbody><tr><td class="code"><pre><span class="line">tar zxvf mysql-connector-java-5.1.47.tar.gz</span><br><span class="line"><span class="built_in">mkdir</span> -p /usr/share/java/</span><br><span class="line"><span class="built_in">cp</span> mysql-connector-java-5.1.47-bin.jar /usr/share/java/mysql-connector-java.jar</span><br></pre></td></tr></tbody></table></figure><h3 id="4-创建-CDH-所需数据库"><a href="#4-创建-CDH-所需数据库" class="headerlink" title="4. 创建 CDH 所需数据库"></a>4. 创建 CDH 所需数据库</h3><p>按需创建数据库及对应用户（UTF8 编码）：</p><figure class="highlight sql"><table><tbody><tr><td class="code"><pre><span class="line"><span class="keyword">CREATE</span> DATABASE scm <span class="keyword">DEFAULT</span> <span class="keyword">CHARACTER SET</span> utf8 <span class="keyword">DEFAULT</span> <span class="keyword">COLLATE</span> utf8_general_ci;</span><br><span class="line"><span class="keyword">CREATE</span> DATABASE amon <span class="keyword">DEFAULT</span> <span class="keyword">CHARACTER SET</span> utf8 <span class="keyword">DEFAULT</span> <span class="keyword">COLLATE</span> utf8_general_ci;</span><br><span class="line"><span class="keyword">CREATE</span> DATABASE rman <span class="keyword">DEFAULT</span> <span class="keyword">CHARACTER SET</span> utf8 <span class="keyword">DEFAULT</span> <span class="keyword">COLLATE</span> utf8_general_ci;</span><br><span class="line"><span class="keyword">CREATE</span> DATABASE metastore <span class="keyword">DEFAULT</span> <span class="keyword">CHARACTER SET</span> utf8 <span class="keyword">DEFAULT</span> <span class="keyword">COLLATE</span> utf8_general_ci;</span><br><span class="line"><span class="keyword">CREATE</span> DATABASE oozie <span class="keyword">DEFAULT</span> <span class="keyword">CHARACTER SET</span> utf8 <span class="keyword">DEFAULT</span> <span class="keyword">COLLATE</span> utf8_general_ci;</span><br><span class="line"><span class="keyword">CREATE</span> DATABASE hue <span class="keyword">DEFAULT</span> <span class="keyword">CHARACTER SET</span> utf8 <span class="keyword">DEFAULT</span> <span class="keyword">COLLATE</span> utf8_general_ci;</span><br><span class="line"></span><br><span class="line"><span class="keyword">GRANT</span> <span class="keyword">ALL</span> <span class="keyword">ON</span> scm.<span class="operator">*</span> <span class="keyword">TO</span> <span class="string">'scm'</span>@<span class="string">'%'</span> IDENTIFIED <span class="keyword">BY</span> <span class="string">'scm'</span>;</span><br><span class="line"><span class="keyword">GRANT</span> <span class="keyword">ALL</span> <span class="keyword">ON</span> amon.<span class="operator">*</span> <span class="keyword">TO</span> <span class="string">'amon'</span>@<span class="string">'%'</span> IDENTIFIED <span class="keyword">BY</span> <span class="string">'amon'</span>;</span><br><span class="line"><span class="keyword">GRANT</span> <span class="keyword">ALL</span> <span class="keyword">ON</span> rman.<span class="operator">*</span> <span class="keyword">TO</span> <span class="string">'rman'</span>@<span class="string">'%'</span> IDENTIFIED <span class="keyword">BY</span> <span class="string">'rman'</span>;</span><br><span class="line"><span class="keyword">GRANT</span> <span class="keyword">ALL</span> <span class="keyword">ON</span> metastore.<span class="operator">*</span> <span class="keyword">TO</span> <span class="string">'hive'</span>@<span class="string">'%'</span> IDENTIFIED <span class="keyword">BY</span> <span class="string">'hive'</span>;</span><br><span class="line"><span class="keyword">GRANT</span> <span class="keyword">ALL</span> <span class="keyword">ON</span> oozie.<span class="operator">*</span> <span class="keyword">TO</span> <span class="string">'oozie'</span>@<span class="string">'%'</span> IDENTIFIED <span class="keyword">BY</span> <span class="string">'oozie'</span>;</span><br><span class="line"><span class="keyword">GRANT</span> <span class="keyword">ALL</span> <span class="keyword">ON</span> hue.<span class="operator">*</span> <span class="keyword">TO</span> <span class="string">'hue'</span>@<span class="string">'%'</span> IDENTIFIED <span class="keyword">BY</span> <span class="string">'hue'</span>;</span><br><span class="line">FLUSH PRIVILEGES;</span><br></pre></td></tr></tbody></table></figure><h3 id="5-初始化-CM-数据库"><a href="#5-初始化-CM-数据库" class="headerlink" title="5. 初始化 CM 数据库"></a>5. 初始化 CM 数据库</h3><figure class="highlight bash"><table><tbody><tr><td class="code"><pre><span class="line">/opt/cloudera/cm/schema/scm_prepare_database.sh mysql scm scm</span><br><span class="line"><span class="comment"># 输入 scm 用户的密码，看到 Started Jetty server 前耐心等待</span></span><br></pre></td></tr></tbody></table></figure><h2 id="七、启动-CM-并安装-CDH"><a href="#七、启动-CM-并安装-CDH" class="headerlink" title="七、启动 CM 并安装 CDH"></a>七、启动 CM 并安装 CDH</h2><figure class="highlight bash"><table><tbody><tr><td class="code"><pre><span class="line">systemctl start cloudera-scm-server</span><br><span class="line"><span class="built_in">tail</span> -f /var/log/cloudera-scm-server/cloudera-scm-server.log</span><br></pre></td></tr></tbody></table></figure><p>看到日志输出 <code>Started Jetty server</code> 后，浏览器访问：</p><figure class="highlight plaintext"><table><tbody><tr><td class="code"><pre><span class="line">http://&lt;server-ip&gt;:7180     # 默认账号/密码：admin / admin</span><br></pre></td></tr></tbody></table></figure><p>Web 界面操作要点：</p><ol><li>选择要安装的集群机器；</li><li>若只有一台机器，选「基础安装」，把所有角色分配到这一台上；</li><li>填写之前准备好的 MySQL 库信息；</li><li>等待各服务安装完成 —— 单机部署时中间可能因 GC 导致步骤失败，多试几次即可；</li><li>Parcel 分发与激活在 Web 界面完成。</li></ol><h2 id="八、集群优化参考"><a href="#八、集群优化参考" class="headerlink" title="八、集群优化参考"></a>八、集群优化参考</h2><ul><li><a href="https://www.staroon.dev/2018/11/30/CDH6Performance/">staroon.dev CDH6 性能调优（操作系统层面）</a></li></ul><h2 id="备注"><a href="#备注" class="headerlink" title="备注"></a>备注</h2><ul><li>安装完成后如需要可重新启用 SELinux（改回 enforcing 并 <code>setenforce 1</code>）。</li><li>生产环境不建议使用内置 PostgreSQL，务必使用本文的外部数据库方案。</li></ul>]]></content>
    
    
    <summary type="html">&lt;p&gt;&lt;img src=&quot;/blog/img/CDH.png&quot; loading=&quot;lazy&quot;&gt;&lt;/p&gt;
&lt;p&gt;环境：CentOS 7.5, CDH 6.3&lt;/p&gt;
&lt;p&gt;本文记录在 CentOS 7.5 下完全离线部署 CDH 6.3 的完整过程。之前搭建过 CDH 5.x，每次都会遇到一些问题，这次把 6.x 的搭建过程记录下来。&lt;/p&gt;</summary>


    <category term="cdh" scheme="https://jerryliu.site/blog/tags/cdh/"/>
    
    <category term="hadoop" scheme="https://jerryliu.site/blog/tags/hadoop/"/>
    
  </entry>
  
  <entry>
    <title>通过Thrift source向Flume发送数据的Python实现</title>
    <link href="https://jerryliu.site/blog/posts/f233e23a/"/>
    <id>https://jerryliu.site/blog/posts/f233e23a/</id>
    <published>2019-08-16T03:12:45.000Z</published>
    <updated>2026-09-09T15:33:42.340Z</updated>
    
    <content type="html"><![CDATA[<p>前面说到，因为兼容之前的旧项目（使用的scribe收集日志，但facebook好像早就停止更新维护），现在的收集架构是scribe+flume，故Flume使用Thrift source.</p><span id="more"></span><p>另外，测试环境下因为scribe日志机器和flume不在一台机器，所以这里使用python将数据发送到flume进行测试，以下是具体的实现过程:</p><blockquote><p>环境：Python 2.6.6/CDH-5.8.3 Flume 1.8/Thrift 0.5.0/</p></blockquote><p>首先，我们需要一个Thrift协议的Python Flume客户端的模块，这个模块可以根据Thrift的定义自动生成。先从flume官网下载src源码包 ：</p><p><code>wget  http://www.apache.org/dist/flume/1.8.0/apache-flume-1.8.0-src.tar.gz</code></p><p>下载到本地之后解压，在目录apache-flume-1.8.0-src\flume-ng-sdk\src\main\thrift下有Thrift对应的定义文件，并用它来生成对应的客户端模块：</p><figure class="highlight plaintext"><table><tbody><tr><td class="code"><pre><span class="line">tar -xzvf apache-flume-1.8.0-src.tar.gz</span><br><span class="line"></span><br><span class="line">cd apache-flume-1.8.0-src\flume-ng-sdk\src\main\thrift</span><br><span class="line"></span><br><span class="line">thrift --gen py flume.thrit</span><br><span class="line"></span><br></pre></td></tr></tbody></table></figure><p>你会在当前目录下得到一个叫做gen-py的目录，我们将其更名为genpy之后，放到Python的系统模块路径中去：</p><p><code>mv gen-py/  /usr/lib/python2.6/site-packag/genpy</code></p><p>此时，你就可以通过以下过程来引用这个模块了：  </p><blockquote><p>[GCC 4.4.7 20120313 (Red Hat 4.4.7-3)] on linux2<br>Type “help”, “copyright”, “credits” or “license” for more information.<br>from genpy import flume<br>dir(flume)<br>[‘<strong>all</strong>‘, ‘<strong>builtins</strong>‘, ‘<strong>doc</strong>‘, ‘<strong>file</strong>‘, ‘<strong>name</strong>‘, ‘<strong>package</strong>‘, ‘<strong>path</strong>‘]</p></blockquote><ul><li>代码进行测试</li></ul><figure class="highlight plaintext"><table><tbody><tr><td class="code"><pre><span class="line">#!/usr/bin/env python</span><br><span class="line">#encoding: utf-8</span><br><span class="line">from genpy.flume import ThriftSourceProtocol  </span><br><span class="line">from genpy.flume.ttypes import ThriftFlumeEvent  </span><br><span class="line">from thrift.transport import TTransport, TSocket  </span><br><span class="line">from thrift.protocol import TCompactProtocol</span><br><span class="line"></span><br><span class="line">class _Transport(object):  </span><br><span class="line">    def __init__(self, thrift_host, thrift_port, timeout=None, unix_socket=None):  </span><br><span class="line">        self.thrift_host = thrift_host  </span><br><span class="line">        self.thrift_port = thrift_port  </span><br><span class="line">        self.timeout = timeout  </span><br><span class="line">        self.unix_socket = unix_socket </span><br><span class="line">        self._socket = TSocket.TSocket(self.thrift_host, self.thrift_port, self.unix_socket)  </span><br><span class="line">        self._transport_factory = TTransport.TFramedTransportFactory()  </span><br><span class="line">        self._transport = self._transport_factory.getTransport(self._socket)</span><br><span class="line"></span><br><span class="line">def connect(self):  </span><br><span class="line">        try:  </span><br><span class="line">            if self.timeout:  </span><br><span class="line">                self._socket.setTimeout(self.timeout)  </span><br><span class="line">            if not self.is_open():  </span><br><span class="line">                self._transport = self._transport_factory.getTransport(self._socket)  </span><br><span class="line">                self._transport.open()  </span><br><span class="line">        except Exception, e:</span><br><span class="line">            print '#'*20  </span><br><span class="line">            print(e)  </span><br><span class="line">            self.close()</span><br><span class="line"></span><br><span class="line">def is_open(self):  </span><br><span class="line">        return self._transport.isOpen()</span><br><span class="line"></span><br><span class="line">def get_transport(self):  </span><br><span class="line">        return self._transport</span><br><span class="line"></span><br><span class="line">def close(self):  </span><br><span class="line">        self._transport.close()</span><br><span class="line"></span><br><span class="line">class FlumeClient(object):  </span><br><span class="line">    def __init__(self, thrift_host, thrift_port, timeout=None, unix_socket=None):  </span><br><span class="line">        self._transObj = _Transport(thrift_host, thrift_port, timeout=timeout, unix_socket=unix_socket)  </span><br><span class="line">        self._protocol = TCompactProtocol.TCompactProtocol(trans=self._transObj.get_transport())  </span><br><span class="line">        self.client = ThriftSourceProtocol.Client(iprot=self._protocol, oprot=self._protocol)  </span><br><span class="line">        self._transObj.connect()</span><br><span class="line"></span><br><span class="line">def send(self, event):  </span><br><span class="line">        try:  </span><br><span class="line">            self.client.append(event)  </span><br><span class="line">        except Exception, e:  </span><br><span class="line">            print(e)  </span><br><span class="line">        finally:  </span><br><span class="line">            self._transObj.connect()</span><br><span class="line"></span><br><span class="line">def send_batch(self, events):  </span><br><span class="line">        try:  </span><br><span class="line">            self.client.appendBatch(events)  </span><br><span class="line">        except Exception, e:  </span><br><span class="line">            print(e)  </span><br><span class="line">        finally:  </span><br><span class="line">            self._transObj.connect()</span><br><span class="line"></span><br><span class="line">def close(self):  </span><br><span class="line">        self._transObj.close()</span><br><span class="line"></span><br><span class="line">if __name__ == '__main__':  </span><br><span class="line">    import random  </span><br><span class="line">    flume_client = FlumeClient('xxxxxx',4444)  </span><br><span class="line">    events = [ThriftFlumeEvent({'GAMENAME':'NYHX'},'NYevents under hello world %s' %(random.randint(0, 100))) for _ in range(100)]    </span><br><span class="line">    events1 = [ThriftFlumeEvent({'GAMENAME':'FSZHS'},'FSevents under hello world %s' %(random.randint(0, 100))) for _ in range(100)]  </span><br><span class="line">    flume_client.send_batch(events)  </span><br><span class="line">    flume_client.send_batch(events1)  </span><br><span class="line">    flume_client.close() </span><br></pre></td></tr></tbody></table></figure><ul><li>贴上flume的配置，这里使用selector进行筛选，只输出header内容为FSZHS的日志</li></ul><figure class="highlight plaintext"><table><tbody><tr><td class="code"><pre><span class="line">tier1.sources.source1.selector.type = multiplexing</span><br><span class="line">tier1.sources.source1.selector.header = GAMENAME</span><br><span class="line">tier1.sources.source1.selector.mapping.FSZHS = channel1</span><br><span class="line"></span><br><span class="line"># 配置kafka接收数据</span><br><span class="line">#tier1.sinks.sink1.type = org.apache.flume.sink.kafka.KafkaSink</span><br><span class="line">#tier1.sinks.sink1.brokerList = localhost:9092</span><br><span class="line">#tier1.sinks.sink1.topic = test</span><br><span class="line">#tier1.sinks.sink1.serializer.class = kafka.serializer.StringEncoder</span><br><span class="line">#tier1.sinks.sink1.channel = channel1</span><br></pre></td></tr></tbody></table></figure><p>然后日志输出了指定header的内容</p><blockquote><p>2019-08-16 10:57:41,700 (SinkRunner-PollingRunner-DefaultSinkProcessor) [INFO - org.apache.flume.sink.LoggerSink.process(LoggerSink.java:95)] Event: { headers:{GAMENAME= <strong>FSZHS</strong> } body: 46 53 65 76 65 6E 74 73 20 75 6E 64 65 72 20 68 FSevents under h }<br>2019-08-16 10:57:41,701 (SinkRunner-PollingRunner-DefaultSinkProcessor) [INFO - org.apache.flume.sink.LoggerSink.process(LoggerSink.java:95)] Event: { headers:{GAMENAME=<strong>FSZHS</strong>} body: 46 53 65 76 65 6E 74 73 20 75 6E 64 65 72 20 68 FSevents under h }<br>2019-08-16 10:57:41,701 (SinkRunner-PollingRunner-DefaultSinkProcessor) [INFO - org.apache.flume.sink.LoggerSink.process(LoggerSink.java:95)] Event: { headers:{GAMENAME=<strong>FSZHS</strong>} body: 46 53 65 76 65 6E 74 73 20 75 6E 64 65 72 20 68 FSevents under h }<br>2019-08-16 10:57:41,702 (SinkRunner-PollingRunner-DefaultSinkProcessor) [INFO - org.apache.flume.sink.LoggerSink.process(LoggerSink.java:95)] Event: { headers:{GAMENAME=<strong>FSZHS</strong>} body: 46 53 65 76 65 6E 74 73 20 75 6E 64 65 72 20 68 FSevents under h }<br>2019-08-16 10:57:41,703 (SinkRunner-PollingRunner-DefaultSinkProcessor) [INFO - org.apache.flume.sink.LoggerSink.process(LoggerSink.java:95)] Event: { headers:{GAMENAME=<strong>FSZHS</strong>} body: 46 53 65 76 65 6E 74 73 20 75 6E 64 65 72 20 68 FSevents under h }<br>2019-08-16 10:57:41,703 (SinkRunner-PollingRunner-DefaultSinkProcessor) [INFO - org.apache.flume.sink.LoggerSink.process(LoggerSink.java:95)] Event: { headers:{GAMENAME=<strong>FSZHS</strong>} body: 46 53 65 76 65 6E 74 73 20 75 6E 64 65 72 20 68 FSevents under h }<br>2019-08-16 10:57:41,704 (SinkRunner-PollingRunner-DefaultSinkProcessor) [INFO - org.apache.flume.sink.LoggerSink.process(LoggerSink.java:95)] Event: { headers:{GAMENAME=<strong>FSZHS</strong>} body: 46 53 65 76 65 6E 74 73 20 75 6E 64 65 72 20 68 FSevents under h }</p></blockquote><p>下面代码为监控日志文件并实时发送给flume：<br>大体流程，读取日志，发送到flume，然后记录读取位置。</p><figure class="highlight plaintext"><table><tbody><tr><td class="code"><pre><span class="line">#!/usr/bin/env python</span><br><span class="line"># encoding: utf-8</span><br><span class="line">from multiprocessing.dummy import Pool as ThreadPool</span><br><span class="line">import time,datetime,os,sys</span><br><span class="line"></span><br><span class="line">from flume import FlumeClient</span><br><span class="line">from genpy.flume.ttypes import ThriftFlumeEvent</span><br><span class="line"></span><br><span class="line">hour=datetime.datetime.now().strftime('%H')</span><br><span class="line"></span><br><span class="line">if hour == '23':</span><br><span class="line">    day=(datetime.datetime.now() + datetime.timedelta(days=1)).strftime('%Y-%m-%d')</span><br><span class="line">else:</span><br><span class="line">    day=datetime.datetime.now().strftime('%Y-%m-%d')</span><br><span class="line"></span><br><span class="line">def read_server():</span><br><span class="line">    time.sleep(5)</span><br><span class="line">    while True:</span><br><span class="line">        try:</span><br><span class="line">            if not os.path.exists('/data/scribe/log_xxx/PRODUCT_xxx_ANDR_%s/PRODUCT_xxx_ANDR_%s_00000'%(day,day)):</span><br><span class="line">                print('服务端日志文件不存在,sleep........50')</span><br><span class="line">                time.sleep(50)</span><br><span class="line">                continue</span><br><span class="line">            fread_tell = '0'</span><br><span class="line">            if os.path.exists('/home/eric/servertell/server_tell_%s.txt' % day):</span><br><span class="line">                fread = open('/home/eric/servertell/server_tell_%s.txt' % day)</span><br><span class="line">                fread_tells = fread.readlines()</span><br><span class="line">                fread_tell = fread_tells[-1]</span><br><span class="line">                fread.close()</span><br><span class="line">            else:</span><br><span class="line">                fread = open('/home/eric/servertell/server_tell_%s.txt' % day,'a+')</span><br><span class="line">                fread.write('0\n')</span><br><span class="line">                fread.close()</span><br><span class="line">            ffile = open('/data/scribe/log_xxx/PRODUCT_xxxx_ANDR_%s/PRODUCT_xxx_ANDR_%s_00000'%(day,day))</span><br><span class="line">            if not len(fread_tell):</span><br><span class="line">                continue</span><br><span class="line">            ffile.seek(int(fread_tell))</span><br><span class="line">            lines = ffile.readlines()</span><br><span class="line">            log = None</span><br><span class="line">            print'未读行数======',(len(lines))</span><br><span class="line">            if len(lines)&lt;1:</span><br><span class="line">                time.sleep(10)</span><br><span class="line">                print '行数少于1休眠10s..................'</span><br><span class="line">            else:</span><br><span class="line">                for line in lines:</span><br><span class="line">                    if line == line.strip() or len(line)&lt;10:</span><br><span class="line">                        time.sleep(5)</span><br><span class="line">                        print "空行或者小于10行.........."</span><br><span class="line">                        continue</span><br><span class="line">                    else:</span><br><span class="line">                        print "reading................."</span><br><span class="line">                        print line</span><br><span class="line">                        flume_client = FlumeClient('xxxxxxx',4444)</span><br><span class="line">                        events1 = [ThriftFlumeEvent({'GAMENAME':'FSZHS'},line.strip('\n'))]</span><br><span class="line">                        flume_client.send_batch(events1)</span><br><span class="line">                        #bilog.sendBI(line.strip('\n'),'PRODUCT_CKQY_ANDR_%s'%(day))</span><br><span class="line">            where1 = ffile.tell()</span><br><span class="line">            while True:</span><br><span class="line">                where1 = where1 -1</span><br><span class="line">                seek = ffile.seek(where1,os.SEEK_SET)</span><br><span class="line">                if ffile.read(1)=='\n':</span><br><span class="line">                    break</span><br><span class="line">            print '读取位置',(where1)</span><br><span class="line">            f = open('/home/eric/servertell/server_tell_%s.txt' % day,'a+')</span><br><span class="line">            f.write('\n')</span><br><span class="line">            f.write(str(where1))</span><br><span class="line">            f.close()</span><br><span class="line">            ffile.close()</span><br><span class="line">            if log:</span><br><span class="line">                log.close()</span><br><span class="line">        except Exception as e:</span><br><span class="line">            traceback.print_exc()</span><br><span class="line">            time.sleep(5)</span><br><span class="line">            continue</span><br><span class="line">if __name__ == '__main__':</span><br><span class="line">    pool = ThreadPool(processes = 1)</span><br><span class="line">    pool.apply_async(read_server)</span><br><span class="line">    pool.close()</span><br><span class="line">    pool.join()</span><br></pre></td></tr></tbody></table></figure><p>至此日志转发完成。</p>]]></content>
    
    
    <summary type="html">&lt;p&gt;前面说到，因为兼容之前的旧项目（使用的scribe收集日志，但facebook好像早就停止更新维护），现在的收集架构是scribe+flume，故Flume使用Thrift source.&lt;/p&gt;</summary>


    <category term="flume" scheme="https://jerryliu.site/blog/tags/flume/"/>
    
  </entry>
  
  <entry>
    <title>Flume+Kafka+Flink+Redis构建大数据实时处理系统（单机环境）--环境篇</title>
    <link href="https://jerryliu.site/blog/posts/611d6905/"/>
    <id>https://jerryliu.site/blog/posts/611d6905/</id>
    <published>2019-08-15T08:23:13.000Z</published>
    <updated>2026-09-09T15:48:15.885Z</updated>
    
    <content type="html"><![CDATA[<p><strong>大体流程：</strong></p><ul><li>python readlog 读取本地日志文件发送到flume(本测试基于原有项目，原有项目是有scribe接收日志存到本地。正式项目flume直接读取本地文件 source改为直接监控日志文件 a1.sources.r1.type = exec, a1.sources.r1.command = tail -F /var/log/secure)</li></ul><span id="more"></span><ul><li><p>flume sink 数据到kafka</p></li><li><p>flink  scala消费kafka</p></li><li><p>存入到redis</p></li><li><p>django展示</p></li></ul><blockquote><p>这里原应有一个流程图，但是不知道为何markdown不支持flow流程图</p></blockquote><figure class="highlight plaintext"><table><tbody><tr><td class="code"><pre><span class="line">graph LR</span><br><span class="line">A[scribe] --&gt; B[disk] </span><br><span class="line">A --&gt; C(hdfs)</span><br><span class="line">B --&gt; D[python ThriftFlumeEvent发送到flume]</span><br><span class="line">D --&gt; F[Flume]</span><br><span class="line">F --sink--&gt; G[kafka]</span><br><span class="line">G--scala--&gt; H[flink]</span><br><span class="line"></span><br></pre></td></tr></tbody></table></figure><p><strong>本机系统：</strong></p><figure class="highlight plaintext"><table><tbody><tr><td class="code"><pre><span class="line">Ubuntu 16.04</span><br><span class="line">conda环境下的python 3.7</span><br></pre></td></tr></tbody></table></figure><p><strong>需要安装的环境：</strong></p><figure class="highlight plaintext"><table><tbody><tr><td class="code"><pre><span class="line">jdk1.8.0_202，scala 2.11.6 ，zookeeper-3.4.5，kafka_2.11-2.3.0，flume-1.8.0，flink-1.8.0</span><br></pre></td></tr></tbody></table></figure><h2 id="1-安装java环境"><a href="#1-安装java环境" class="headerlink" title="1.安装java环境"></a><a name="fenced-code-block">1.安装java环境</a></h2><ul><li>这里安装1.8</li></ul><blockquote><p>环境存放到 cd /opt/</p></blockquote><ul><li>下载 wget <a href="https://repo.huaweicloud.com/java/jdk/8u202-b08/jdk-8u202-linux-x64.tar.gz">https://repo.huaweicloud.com/java/jdk/8u202-b08/jdk-8u202-linux-x64.tar.gz</a></li></ul><p>(这里是用华为的镜像地址下载，oracle需要登陆账号)</p><ul><li><p>解压到指定目录 tar -zxvf jdk-8u202-linux-x64.tar.gz</p></li><li><p>vim ~/.bashrc  添加环境变量如下</p></li></ul><figure class="highlight plaintext"><table><tbody><tr><td class="code"><pre><span class="line">export JAVA_HOME=/opt/jdk1.8.0_202  ## 这里要注意目录要换成自己解压的jdk 目录</span><br><span class="line">export JRE_HOME=${JAVA_HOME}/jre</span><br><span class="line">export CLASSPATH=.:${JAVA_HOME}/lib:${JRE_HOME}/lib</span><br><span class="line">export PATH=${JAVA_HOME}/bin:$PATH</span><br></pre></td></tr></tbody></table></figure><p>立即生效：</p><figure class="highlight bash"><table><tbody><tr><td class="code"><pre><span class="line"><span class="built_in">source</span> ~/.bashrc</span><br><span class="line">java -version</span><br></pre></td></tr></tbody></table></figure><h2 id="2-安装scala"><a href="#2-安装scala" class="headerlink" title="2.安装scala"></a><a name="fenced-code-block">2.安装scala</a></h2><ul><li><p>这里安装2.11版本</p></li><li><p>spark和scala版本对应关系: spark1.6.2–scala2.10 spark2.0.0–scala2.11<br>本机还要安装spark2.0所以这里安装的是2.11.6</p></li></ul><figure class="highlight plaintext"><table><tbody><tr><td class="code"><pre><span class="line">wget https://downloads.lightbend.com/scala/2.11.6/scala-2.11.6.tgz</span><br><span class="line"></span><br><span class="line">tar -zxvf scala-2.11.6.tgz -C /opt/scala-2.11.6</span><br><span class="line"></span><br><span class="line">vim ~/.bashrc</span><br><span class="line"></span><br><span class="line">source ~/.bashrc</span><br><span class="line"></span><br><span class="line">添加环境变量如下</span><br><span class="line">export SCALA_HOME=/opt/scala-2.11.6</span><br><span class="line">export PATH=$PATH:${SCALA_HOME}/bin</span><br><span class="line"></span><br><span class="line">验证 scala -version</span><br></pre></td></tr></tbody></table></figure><h2 id="3-安装zookeeper"><a href="#3-安装zookeeper" class="headerlink" title="3.安装zookeeper"></a><a name="fenced-code-block">3.安装zookeeper</a></h2><figure class="highlight plaintext"><table><tbody><tr><td class="code"><pre><span class="line">下载 wget http://archive.apache.org/dist/zookeeper/zookeeper-3.4.5/zookeeper-3.4.5.tar.gz</span><br><span class="line"></span><br><span class="line">解压 tar -zxvf zookeeper-3.4.5.tar.gz -C /opt/zookeeper-3.4.5</span><br><span class="line"></span><br><span class="line">进入解压目录  cd /opt/zookeeper-3.4.5/conf/</span><br></pre></td></tr></tbody></table></figure><ul><li><p>拷贝配置文件 cp zoo_sample.cfg  zoo.cfg</p></li><li><p>vim zoo.cfg 添加如下内容</p></li></ul><figure class="highlight plaintext"><table><tbody><tr><td class="code"><pre><span class="line">修改zookeeper数据存放地址，dataDir,dataLogDir</span><br><span class="line"></span><br><span class="line">dataDir=/data/zookeeper/data</span><br><span class="line">dataLogDir=/data/zookeeper/log</span><br></pre></td></tr></tbody></table></figure><ul><li>新建添加的zk数据目录</li></ul><figure class="highlight plaintext"><table><tbody><tr><td class="code"><pre><span class="line">mkdir /data/zookeeper/data</span><br><span class="line">mkdir /data/zookeeper/log</span><br><span class="line">在/data/zookeeper/data 目录新建一个myid文件，内容为1，代表服务器的编号是1</span><br></pre></td></tr></tbody></table></figure><ul><li>vim /etc/profile    添加环境变量</li></ul><figure class="highlight plaintext"><table><tbody><tr><td class="code"><pre><span class="line">export ZOOKEEPER_HOME=/opt/zookeeper-3.4.5</span><br><span class="line">export PATH=.:$ZOOKEEPER_HOME/bin:$JAVA_HOME/bin:$PATH</span><br></pre></td></tr></tbody></table></figure><ul><li><p>source /etc/profile 立即生效</p></li><li><p>进入zk解压目录 <code>cd /opt/zookeeper-3.4.5</code></p></li><li><p>启动  <code>bin/zkServer.sh  start</code>  此命令会在当前目录创建日志文件</p></li></ul><blockquote><p>输出以下代表已启动正常，如有错误查看当前目录日志 zookeeper.out</p></blockquote><blockquote><p>JMX enabled by default<br>Using config: /opt/zookeeper-3.4.5/bin/../conf/zoo.cfg<br>Starting zookeeper … STARTED</p></blockquote><p>查看启动状态：</p><ul><li><code>bin/zkServer.sh status</code></li></ul><p>输出：</p><blockquote><p>JMX enabled by default<br>Using config: /opt/zookeeper-3.4.5/bin/../conf/zoo.cfg<br>Mode: standalone</p></blockquote><h2 id="4-安装kafka"><a href="#4-安装kafka" class="headerlink" title="4.安装kafka"></a><a name="fenced-code-block">4.安装kafka</a></h2><p><img src="/blog/img/ext_kafka_diagram.png" alt="kafka" loading="lazy"></p><ul><li><p>这里安装 2.3.0</p></li><li><p>kafka_2.11-2.3.0  2.11为scala版本，kafka版本为2.3.0</p></li><li><p>下载 <code>wget https://www.apache.org/dyn/closer.cgi?path=/kafka/2.3.0/kafka_2.11-2.3.0.tgz</code></p></li><li><p>解压 <code>tar -zxvf kafka_2.11-2.3.0.tgz -C /opt/kafka_2.11-2.3.0</code></p></li><li><p>添加环境变量</p></li></ul><figure class="highlight plaintext"><table><tbody><tr><td class="code"><pre><span class="line">vi ~/.bash_profile</span><br><span class="line"></span><br><span class="line">export KAFKA_HOME=/opt/kafka_2.11-2.3.0</span><br><span class="line"></span><br><span class="line">export PATH=$KAFKA_HOME/bin:$PATH</span><br></pre></td></tr></tbody></table></figure><p>立即生效 <code>source ~/.bash_profile</code></p><ul><li>kafka需要使用Zookeeper,所以需要启动Zookeeper服务,上面的操作就已经启动了Zookeeper服务<br>如果没有的话,可以使用kafka自带的脚本启动一个简单的单一节点Zookeeper实例</li></ul><figure class="highlight plaintext"><table><tbody><tr><td class="code"><pre><span class="line">cd /opt/kafka_2.11-2.3.0/</span><br><span class="line">bin/zookeeper-server-start.sh config/zookeeper.properties</span><br></pre></td></tr></tbody></table></figure><ul><li>现在启动kafka(前台执行，会打印日志)  <code>bin/kafka-server-start.sh config/server.properties</code></li></ul><p>后台执行</p><figure class="highlight plaintext"><table><tbody><tr><td class="code"><pre><span class="line">//配置了环境变量,1代表标准输出,2代表错误输出,把2重定向到标准输出1需要使用&amp;,最后的&amp;表示后台运行</span><br><span class="line">nohup bin/kafka-server-start.sh config/server.properties &gt; kafka_start.log 2&gt;&amp;1 &amp; </span><br></pre></td></tr></tbody></table></figure><ul><li><p>创建一个主题,只使用单个分区一个复本<br><code>bin/kafka-topics.sh --create --zookeeper localhost:2181 --replication-factor 1 --partitions 1 --topic test</code></p></li><li><p>启动生产者发送消息</p></li></ul><p><code>bin/kafka-console-producer.sh --broker-list localhost:9092 --topic test</code></p><blockquote><p>Hello Kafka</p></blockquote><p>另开终端启动消费者进行消费信息</p><p><code>bin/kafka-console-consumer.sh --bootstrap-server localhost:9092 --topic test</code></p><p>消费者成功打印出</p><blockquote><p>Hello Kafka</p></blockquote><p>kafka相关命令</p><figure class="highlight plaintext"><table><tbody><tr><td class="code"><pre><span class="line">//启动kafka</span><br><span class="line">bin/kafka-server-start.sh config/server.properties </span><br><span class="line">//停止kafka</span><br><span class="line">bin/kafka-server-stop.sh</span><br><span class="line">//创建topic,--replication-factor指定副本个数,--partitions指定分区个数</span><br><span class="line">bin/kafka-topics.sh --create --zookeeper localhost:2181 --replication-factor 1 --partitions 1 --topic test</span><br><span class="line">//查看所有的topic信息</span><br><span class="line">bin/kafka-topics.sh --list --zookeeper localhost:2181</span><br><span class="line">//启动生产者</span><br><span class="line">bin/kafka-console-producer.sh --broker-list your.host.name:9092 --topic test</span><br><span class="line">//启动消费者</span><br><span class="line">bin/kafka-console-consumer.sh --bootstrap-server your.host.name:9092 --topic test --from-beginning</span><br><span class="line">//删除topic</span><br><span class="line">bin/kafka-topics.sh --delete --zookeeper localhost:2181 --topic test</span><br></pre></td></tr></tbody></table></figure><p>如果后期开发的话需要对kafka配置进行修改 server.properties</p><p>其他参数没有深究，其他配置可以参考官网说明</p><figure class="highlight plaintext"><table><tbody><tr><td class="code"><pre><span class="line">//用于区分broker,必须唯一</span><br><span class="line">broker.id=0</span><br><span class="line"></span><br><span class="line">//代理将向生产者和消费者宣传的主机名和端口。 如果没有设定，它将使用“listeners”的值。否则，它从java.net.InetAddress.getCanonicalHostName获得。</span><br><span class="line">advertised.listeners=PLAINTEXT://外网ip:9092</span><br><span class="line"></span><br><span class="line">//配置zookeeper的地址,zookeeper集群地址以逗号隔开</span><br><span class="line">zookeeper.connect=localhost:2181</span><br><span class="line"></span><br><span class="line">//配置数据存放目录</span><br><span class="line">log.dirs=/data/kafka2.3</span><br></pre></td></tr></tbody></table></figure><p>advertised.listeners是个坑，这里说明下，也是让自己长点记性</p><p>官方解释：</p><blockquote><p>Listeners to publish to ZooKeeper for clients to use, if different than the listeners above.<br>In IaaS environments, this may need to be different from the interface to which the broker binds.<br>If this is not set, the value for listeners will be used.</p></blockquote><p>下面是默认配置，没有修改：</p><figure class="highlight plaintext"><table><tbody><tr><td class="code"><pre><span class="line">#listeners=PLAINTEXT://:9092</span><br><span class="line">#advertised.listeners=PLAINTEXT://your.host.name:9092</span><br><span class="line">zookeeper.connect=localhost:2181</span><br></pre></td></tr></tbody></table></figure><p>注释的两个参数，虽然注释了，但是通过介绍可以知道，这两个参数，可以通过java.net.InetAddress.getCanonicalHostName获得，也就是可以获取到127.0.0.1  这样的话，本机测试是可以正常消费和生产数据的，但外网不行。</p><p>经各种测试后发现，修改kafka的advertised.listeners 为外网ip 即可：</p><figure class="highlight plaintext"><table><tbody><tr><td class="code"><pre><span class="line">#listeners=PLAINTEXT://:9092</span><br><span class="line">advertised.listeners=PLAINTEXT://外网ip:9092</span><br><span class="line">zookeeper.connect=localhost:2181</span><br></pre></td></tr></tbody></table></figure><h2 id="5-flume安装"><a href="#5-flume安装" class="headerlink" title="5.flume安装"></a><a name="fenced-code-block">5.flume安装</a></h2><ul><li>Flume<br><img src="/blog/img/ext_DevGuide_image00.png" alt="photo" loading="lazy"></li></ul><figure class="highlight plaintext"><table><tbody><tr><td class="code"><pre><span class="line">wget http://archive.apache.org/dist/flume/1.8.0/apache-flume-1.8.0-bin.tar.gz</span><br><span class="line">tar -zxvf apache-flume-1.8.0-bin.tar.gz</span><br><span class="line">重命名 mv apache-flume-1.8.0-bin flume-1.8.0</span><br></pre></td></tr></tbody></table></figure><p>添加环境变量</p><figure class="highlight plaintext"><table><tbody><tr><td class="code"><pre><span class="line">vi ~/.bash_profile</span><br><span class="line">export FLUME_HOME=/opt/flume-1.8.0</span><br><span class="line">export PATH=$PATH:$FLUME_HOME/bin</span><br></pre></td></tr></tbody></table></figure><p>立即生效 <code>source ~/.bash_profile</code></p><p>进入解压目录修改配置<code>cd /opt/flume-1.8.0/conf/</code><br><code>mv flume-env.sh.template flume-env.sh</code></p><p><code>vim flume-env.sh</code> 去掉注释，配置正确的java路径<br><code>export JAVA_HOME=/opt/jdk1.8.0_202</code></p><p>验证 <code>flume-ng version</code> 输出：</p><blockquote><p>Flume 1.8.0<br>Source code repository: <a href="https://git-wip-us.apache.org/repos/asf/flume.git">https://git-wip-us.apache.org/repos/asf/flume.git</a><br>Revision: 99f591994468633fc6f8701c5fc53e0214b6da4f<br>Compiled by denes on Fri Sep 15 14:58:00 CEST 2017<br>From source with checksum fbb44c8c8fb63a49be0a59e27316833d</p></blockquote><p>拷贝并修改配置<code>cp flume-conf.properties.template   flume-conf.properties</code></p><p>使用官方配置,官方配置使用netcat源，更多源查看官方网站<a href="%5Bhttps://flume.apache.org/releases/content/1.9.0/FlumeUserGuide.html#spooling-directory-source%5D(https://flume.apache.org/releases/content/1.9.0/FlumeUserGuide.html#spooling-directory-source)">https://flume.apache.org/releases/content/1.9.0/FlumeUserGuide.html#spooling-directory-source</a></p><figure class="highlight plaintext"><table><tbody><tr><td class="code"><pre><span class="line">#example.conf: A single-node Flume configuration</span><br><span class="line"></span><br><span class="line">#Name the components on this agent</span><br><span class="line">a1.sources = r1</span><br><span class="line">a1.sinks = k1</span><br><span class="line">a1.channels = c1</span><br><span class="line"></span><br><span class="line">#Describe/configure the source</span><br><span class="line">a1.sources.r1.type = netcat</span><br><span class="line">a1.sources.r1.bind = localhost</span><br><span class="line">a1.sources.r1.port = 44444</span><br><span class="line"></span><br><span class="line">#Describe the sink</span><br><span class="line">#打印内容到日志中</span><br><span class="line">a1.sinks.k1.type = logger</span><br><span class="line"></span><br><span class="line">#Use a channel which buffers events in memory</span><br><span class="line">a1.channels.c1.type = memory</span><br><span class="line">a1.channels.c1.capacity = 1000</span><br><span class="line">a1.channels.c1.transactionCapacity = 100</span><br><span class="line"></span><br><span class="line">#Bind the source and sink to the channel</span><br><span class="line">a1.sources.r1.channels = c1</span><br><span class="line">a1.sinks.k1.channel = c1</span><br><span class="line"></span><br></pre></td></tr></tbody></table></figure><p>启动验证<br><code>bin/flume-ng agent --conf conf --conf-file conf/flume-conf.properties --name a1 -Dflume.root.logger=INFO,console</code></p><p>另起窗口输入,然后输入内容，前面的终端会输出内容，测试成功。</p><blockquote><p>telnet localhost 44444</p></blockquote><ul><li>这里要使用,Thrift源。因为项目中原本要兼容flume+scribe，新建配置 flume-thrift.properties,接收python发送过来的日志</li></ul><figure class="highlight plaintext"><table><tbody><tr><td class="code"><pre><span class="line">tier1.sources  = source1</span><br><span class="line">tier1.channels = channel1</span><br><span class="line">tier1.sinks    = sink1</span><br><span class="line"></span><br><span class="line">tier1.sources.source1.channels = channel1</span><br><span class="line">tier1.channels.channel1.type   = memory</span><br><span class="line">tier1.sources.source1.type = thrift</span><br><span class="line">tier1.sources.source1.bind = 0.0.0.0</span><br><span class="line">tier1.sources.source1.port = 4444</span><br><span class="line"></span><br><span class="line">tier1.sources.source1.selector.type = multiplexing</span><br><span class="line">tier1.sources.source1.selector.header = GAMENAME</span><br><span class="line">tier1.sources.source1.selector.mapping.FSZHS = channel1</span><br><span class="line"></span><br><span class="line">#配置sink下沉到kafka，kafka来消费数据</span><br><span class="line">tier1.sinks.sink1.type = org.apache.flume.sink.kafka.KafkaSink</span><br><span class="line">tier1.sinks.sink1.brokerList = localhost:9092</span><br><span class="line">tier1.sinks.sink1.topic = test</span><br><span class="line">tier1.sinks.sink1.serializer.class = kafka.serializer.StringEncoder</span><br><span class="line">tier1.sinks.sink1.channel = channel1</span><br><span class="line"></span><br><span class="line">tier1.channels.channel1.capacity = 5000</span><br><span class="line">tier1.channels.channel1.transactionCapacity = 2000</span><br><span class="line"></span><br><span class="line">#日志中打印出内容</span><br><span class="line">#tier1.sinks.sink1.type = logger</span><br><span class="line">#tier1.sinks.sink1.channel = channel1</span><br><span class="line"></span><br></pre></td></tr></tbody></table></figure><p>关于selector参数的说明：</p><p>它的type 有** Multiplexing <strong>,</strong> Replicating** , 这里是用selector来根据header的GAMENAME内容分发到对应的channel，暂时不做存储。（项目需要本地，hdfs分别一份，每个项目需要两个channel）</p><p>区别是：Replicating 会将source过来的events发往所有channel,而Multiplexing 可以选择该发往哪些channel</p><p>之前没有设置会出现<code>Thrift source %s could not append events to the channel.</code></p><p>查阅资料,这和memory channel的另一个参数有关：</p><p>transactionCapacity，（The maximum number of events the channel will take from a source or give to a sink per transaction）表明source给channel、channel给sink一次发送的event个数，如果不设置，默认值为100。所以当我设置batchsize为100时，可以正确发送，但是超过100，就发送失败。</p><p>关于参数** transactionCapacity ** 和** capacity ** :</p><blockquote><p>a1.sinks.k1.hdfs.batchSize 官方解释:<br>##number of events written to file before it is flushed to HDFS<br>a1.channels.c1.capacity  官方解释 :<br>#The maximum number of events stored in the channel<br>a1.channels.c1.transactionCapacity 官方解释 :<br>#The maximum number of events the channel will take from a source or give to a sink per transaction</p></blockquote><p>这三者之间的关系:</p><p>batchsize &lt;=transactionCapacity&lt;=capacity</p><h2 id="6-flink安装"><a href="#6-flink安装" class="headerlink" title=" 6.flink安装 "></a><a name="fenced-code-block"> 6.flink安装 </a></h2><p><img src="/blog/img/ext_flink-home-graphic.png" alt="flink" loading="lazy"></p><figure class="highlight plaintext"><table><tbody><tr><td class="code"><pre><span class="line">wget https://archive.apache.org/dist/flink/flink-1.8.0/flink-1.8.0-bin-scala_2.11.tgz</span><br><span class="line"></span><br><span class="line">解压 tar -zxvf apache-flume-1.8.0-bin.tar.gz</span><br></pre></td></tr></tbody></table></figure><p>启动flink <code>bin/start-cluster.sh</code></p><p>查看web <a href="http://localhost:8081/">http://localhost:8081</a></p><ul><li>测试   nc -l 9000 输入<blockquote><p>hello flink</p></blockquote></li></ul><p>启动官方demo<br><code>./bin/flink run examples/streaming/SocketWindowWordCount.jar --port 9000</code></p><p>查看日志log目录下</p><p><code>tail -f flink-root-taskexecutor-0-xxxxxxxxx.out </code></p><p>输出：</p><blockquote><p>(hello,1)<br>(flink,1)</p></blockquote><p>至此环境搭建完成。</p>]]></content>
    
    
    <summary type="html">&lt;p&gt;&lt;strong&gt;大体流程：&lt;/strong&gt;&lt;/p&gt;
&lt;ul&gt;
&lt;li&gt;python readlog 读取本地日志文件发送到flume(本测试基于原有项目，原有项目是有scribe接收日志存到本地。正式项目flume直接读取本地文件 source改为直接监控日志文件 a1.sources.r1.type = exec, a1.sources.r1.command = tail -F /var/log/secure)&lt;/li&gt;
&lt;/ul&gt;</summary>


    <category term="kafka" scheme="https://jerryliu.site/blog/tags/kafka/"/>
    
    <category term="flume" scheme="https://jerryliu.site/blog/tags/flume/"/>
    
    <category term="flink" scheme="https://jerryliu.site/blog/tags/flink/"/>
    
  </entry>
  
  <entry>
    <title>ubantu 16.04 conda环境安装kafka</title>
    <link href="https://jerryliu.site/blog/posts/800c731c/"/>
    <id>https://jerryliu.site/blog/posts/800c731c/</id>
    <published>2019-05-28T11:34:00.000Z</published>
    <updated>2026-09-09T15:39:33.890Z</updated>
    
    <content type="html"><![CDATA[<p>环境：conda python3.7.3</p><ol><li>使用 pip 安装 kafka, 导入报错</li></ol><figure class="highlight plaintext"><table><tbody><tr><td class="code"><pre><span class="line">pip install kafka-python==1.3.1</span><br><span class="line">pip3 uninstall kafka</span><br><span class="line">pip uninstall kafka</span><br><span class="line">pip uninstall kafka-python</span><br><span class="line">conda install -c conda-forge kafka-python==1.3.1</span><br></pre></td></tr></tbody></table></figure>]]></content>


    <summary type="html">&lt;p&gt;环境：conda python3.7.3&lt;/p&gt;
&lt;ol&gt;
&lt;li&gt;使用 pip 安装 kafka, 导入报错&lt;/li&gt;
&lt;/ol&gt;
&lt;figure class=&quot;highlight plaintext&quot;&gt;&lt;table&gt;&lt;tbody&gt;&lt;tr&gt;&lt;td class=&quot;code&quot;</summary>


    <category term="kafka" scheme="https://jerryliu.site/blog/tags/kafka/"/>
    
    <category term="conda" scheme="https://jerryliu.site/blog/tags/conda/"/>
    
  </entry>
  
  <entry>
    <title>今日更新(2019-05-10)</title>
    <link href="https://jerryliu.site/blog/posts/88c6290b/"/>
    <id>https://jerryliu.site/blog/posts/88c6290b/</id>
    <published>2019-05-10T02:02:22.000Z</published>
    <updated>2026-09-09T15:33:29.179Z</updated>
    
    <content type="html"><![CDATA[<ul><li>今日更新：新加不蒜子页脚统计UV,PV功能,增加文章更新时间功能.</li></ul>]]></content>


    <summary type="html">&lt;ul&gt;
&lt;li&gt;今日更新：新加不蒜子页脚统计UV,PV功能,增加文章更新时间功能.&lt;/li&gt;
&lt;/ul&gt;
</summary>


    <category term="功能更新" scheme="https://jerryliu.site/blog/tags/%E5%8A%9F%E8%83%BD%E6%9B%B4%E6%96%B0/"/>
    
  </entry>
  
  <entry>
    <title>Hello,2019</title>
    <link href="https://jerryliu.site/blog/posts/a9c35d26/"/>
    <id>https://jerryliu.site/blog/posts/a9c35d26/</id>
    <published>2019-01-02T09:29:01.000Z</published>
    <updated>2026-09-09T15:33:29.173Z</updated>


  </entry>
  
  <entry>
    <title>立冬</title>
    <link href="https://jerryliu.site/blog/posts/9abcd761/"/>
    <id>https://jerryliu.site/blog/posts/9abcd761/</id>
    <published>2018-11-08T08:18:33.000Z</published>
    <updated>2026-09-09T15:33:29.180Z</updated>
    
    <content type="html"><![CDATA[<p>秋风吹尽旧庭柯，黄叶丹枫客里过。一点禅灯半轮月，今宵寒较昨宵多。</p>]]></content>


    <summary type="html">&lt;p&gt;秋风吹尽旧庭柯，黄叶丹枫客里过。一点禅灯半轮月，今宵寒较昨宵多。&lt;/p&gt;
</summary>


  </entry>
  
  <entry>
    <title>rain</title>
    <link href="https://jerryliu.site/blog/posts/b7528aad/"/>
    <id>https://jerryliu.site/blog/posts/b7528aad/</id>
    <published>2018-07-24T02:19:56.000Z</published>
    <updated>2026-09-09T15:33:29.176Z</updated>
    
    <content type="html"><![CDATA[<p><img src="/blog/img/IMG_708311.JPG" alt="雨" loading="lazy"></p>]]></content>


    <summary type="html">&lt;p&gt;&lt;img src=&quot;/blog/img/IMG_708311.JPG&quot; alt=&quot;雨&quot; loading=&quot;lazy&quot;&gt;&lt;/p&gt;
</summary>


  </entry>
  
  <entry>
    <title>又是一日雨</title>
    <link href="https://jerryliu.site/blog/posts/8496cc94/"/>
    <id>https://jerryliu.site/blog/posts/8496cc94/</id>
    <published>2018-07-24T01:47:19.000Z</published>
    <updated>2026-09-09T15:33:29.180Z</updated>
    
    <content type="html"><![CDATA[<p>受台风安比影响。今天又是大雨。</p>]]></content>


    <summary type="html">&lt;p&gt;受台风安比影响。今天又是大雨。&lt;/p&gt;
</summary>


  </entry>
  
  <entry>
    <title>今日更新</title>
    <link href="https://jerryliu.site/blog/posts/71ff22e6/"/>
    <id>https://jerryliu.site/blog/posts/71ff22e6/</id>
    <published>2018-07-19T07:57:53.000Z</published>
    <updated>2026-09-09T15:33:29.180Z</updated>
    
    <content type="html"><![CDATA[<ul><li>今日更新：新加来必力评论功能，更换icon为gitHub同款章鱼猫，新加About page.</li></ul>]]></content>


    <summary type="html">&lt;ul&gt;
&lt;li&gt;今日更新：新加来必力评论功能，更换icon为gitHub同款章鱼猫，新加About page.&lt;/li&gt;
&lt;/ul&gt;
</summary>


    <category term="123456" scheme="https://jerryliu.site/blog/tags/123456/"/>
    
  </entry>
  
</feed>